
User manual


Bijou
25
INITIAL OPERATION
O.K., we are going to actually start operating the
machine rather than just looking at it! But, as we
have no way of knowing if you just got the
console from the factory, or if it has been in use
for years and you are just a new user, please
complete these steps so that you can follow
along:
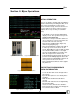
1. Turn ON the console and the VGA/SVGA
display screen. The system boots up to the
Stage Screen (Figure 26).
2. Move the 2-scene preset Faders down to 0
(do so only if the 2-scene preset Faders are
located on the left of the console).
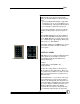
3. Move the XY and AB Faders (Figure 27)
down to the [Stop/Rev] key.
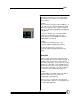
4. Move the Grand Master (Figure 28) down to
0. In the top of all screens, there are the
words “Grand Master” in green with an output
level shown in white (if there is an output
level). If the Grand Master is turned to 0 or
OFF, the output level is shown in red.
5. Turn the Blackout switch (Figure 28) to the off
position. A red LED light appears above the
switch and the word BLACKOUT appears at
the top center of all screens in red.
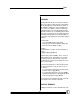
6. Move all Submasters/Effects sliders (Figure
29) down to 0.
PROTECTING PRERECORDED
SHOW INFORMATION
1. Locate the disk drive on the far right end of
the console.
2. Eject the disk (if there is one already in the
machine).
3. Mark the date and time that the disk is
ejected.
4. Find two new and unused 3.5” High Density
PC formatted disks.
5. Insert one of the disks into the disk drive.
6. Enter [Setup]. The Setup Screen will appear.
7. Press Next to “Save to Disk”
Section II: Bijou Operations
Figure 26-Stage Screen
Figure 27-XY & AB Faders
Figure 28-Grand Master Fader
Figure 29-Submasters/Effects Sliders
Figure 30-Default Setting 1 Screen