
Specifications


41
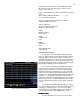
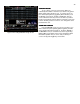
Figure 33 Sub Preview Screen
Submaster window and on the console Submaster LED’s.
On the stage screen the submasters are shown on the
bottom of the screen as:
E/Pg: = Effect Number if in yellow and submaster page if in
green.
Sub: Handle numbers 01 02 03 04……………..24
Lev:= submaster output level.
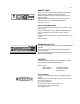
The color coding used on the stage screen and the
submaster LED’s is as follows:
Type of Submaster
Stage Screen Console Sub LED
Off not recorded Gray Off
NORM
Manual operation
Green Green
INHB
Inhibitive Red
Red
SOLO
Bright Red
Red
Effect loaded to Sub
Yellow Orange
SUB PREVIEW SCREEN
To get to this screen press [Sub-master/List] key one
time. The majority of the screen is devoted to blue channel
numbers. These are the same channels as used on the
STAGE screen and they are used in the same manner here.
To record a Submaster you can enter channel levels using
the number keys [0] thru [9] in combination with [Thru] [And]
[Except] [At] and [Enter] to set the output levels.
For the purpose of learning how Submasters work you
need to have (or create) at least two Submasters on two
separate pages of memories. To see if you have existing
Submaster memories in the board you can go to the SUB
LIST screen (second hit of [Sum-master/List] key, here you
will find a list of all recorded Submasters with their Type and
attributes. For the purpose of training we will assume no
Submasters have been recorded and when you press [Sub-
master/List] to return to the SUB PREVIEW screen you will
have no channel levels showing for Pg 1 Sub 1 (lower left of
screen).
To to begin press [1] [Thru] [5] [At] [Fl] [Enter]. Please
note that you did not have to use any ‘record submaster’ key
sequences to confirm the entry. If you now press [Sub-
master/List] to go to the SUB LIST screen you will see that
you now have Pg 1 Sub 1 Type NORM with no name.
NAMING A SUB
NAMING A SUBNAMING A SUB
NAMING A SUB
To name a Submaster you use the accessory alpha