
Specifications
28
Another use of both 2 Scene, but more often 1 Scene, is
to manually establish a lighting look on stage and then record
that look to a memory preset. The use of this function will be
covered in a latter section covering memory operations. Be
aware that both 2 Scene and 1 Scene operation can be used
independent of memory operation or in conjunction with
memory operation. The choice is up to the operator based on
the needs of the production. This makes the Bijou an
extremely flexible control console.
First turn the Blackout switch to the On position, this will
make the red BLACK OUT at the top of the STAGE screen
disappear.
Second go to SETUP screen and change console
operation from 2 Scene to 1 Scene. To do this press; [Setup]
[3] [F2] [Enter] then return to STAGE screen by pressing
[Stage].
Third (if you are starting here after just turning the board
on) press [F1] [Enter].
If you are continuing on from 2 scene
operation above this will already have been done and can be
ignored.
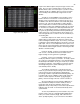
This will configure the XY cross fader for 1 Scene
preset operation. Note that in the Cross Fader Display the
CUE has been set for X as Scn 1 (Scene 1). The X fader will
operate by physically pushing it up or down so fade times are
MAN (manual). Manual cue action does not have a TYPE
and can not be assigned a screen NAME so their slots
remain blank. Under level with the XY fader in the down (next
to the [Stop/Rev] key) the LEV (level) should be blank for the
X fader.
In 1 Scene operation the Y fader is not active and
can be ignored.
For the purpose of this discussion only Channels/faders
1-24 will be used as all 2 Scene/1 Scene Preset versions of
the Bijou contain a minimum of 24 Channel/faders. But in 1
Scene mode of operation the lower row of Channel/faders
extend (double) the channel count with manual fader handles.
So if you have a Bijou 24/48 in 1 Scene operation the
Channel/faders will control channels 1 - 48 (note the silk
screened numbers between the faders and the bump
buttons).
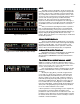
GRANDMASTER
GRANDMASTERGRANDMASTER
GRANDMASTER
In order for any levels you are setting to be seen the
Blackout switch needs to be off (LED off) and the
Grandmaster faded to its full on position. The Grandmaster
is in proportional control of all Channel/fader outputs from the
control console except ‘Parked’ dimmers. It can be used to
do fade to black cues for set changes and blackouts for end
of scenes. At this time fade the Grandmaster to its full on
position.
CHANNEL FADER OPERATION 1 Scene
CHANNEL FADER OPERATION 1 SceneCHANNEL FADER OPERATION 1 Scene
CHANNEL FADER OPERATION 1 Scene
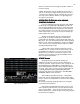
To begin set Channel/faders 1 -10 at full. As the X or XY
cross fader is in the down (off) position there will be no output
and you will not see any associated levels on your display
screen. Now move the X or if you prefer the XY cross fader
to the up (X FL) position. As you did this the display screen
indicated that the X LEV went to full and the Channels 1 - 10