
Specifications

24
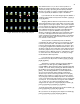
Figure 20 Stage Screen
Screen you will see that the change you made to Profile 17
has been cleared.
NOTE: All 25 profiles may be modified by the operator to
suit your needs but it is suggested that you leave Profiles 1 -
7 at their factory defaults to avoid confusing other operators
who may not know that the dimmer is not ‘ghosting’ it has
been given a hot preheat.
OPERATING THE BIJOU AS A MANUAL
OPERATING THE BIJOU AS A MANUALOPERATING THE BIJOU AS A MANUAL
OPERATING THE BIJOU AS A MANUAL
CONTROL CONSOLE:
CONTROL CONSOLE:CONTROL CONSOLE:
CONTROL CONSOLE:
If you are working through this manual in order and did
the ten steps at the beginning of SECTION II you will only
have to hit the [Stage] key to proceed. If on the other hand
you just picked up the manual and opened to this operation,
as a learning session, please go back to the start of Section
and do all ten steps so you do not ruin a show that may be
prerecorded in the console.
The Bijou is designed to work in a manual 2 Scene
preset mode. As we have already done a Clear All the
system will have defaulted to 2 Scene Preset with a One-To-
One patch. So for the time being Channel 1 will be operating
Dimmer 1 only, Channel 2 = Dimmer 2, Channel 3 = Dimmer
4 etc. All are set at a maximum dimmer output set at 100%
operating under default Profile 1.
2 Scene and 1 Scene operation all operate from the
STAGE screen. That does not mean that you have to be in
the STAGE screen display for the console to be running
dimmers, but if you want to see what the status is of the
channels you have running on stage the STAGE screen is
where you get that information.
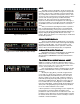
STAGE Screen
STAGE ScreenSTAGE Screen
STAGE Screen
The Stage Screen is used when running cues,
submasters & effects in 2 Scene, 1 Scene and memory
modes of operation. At the top of the screen you will see the
title STAGE in green, BLACK OUT in red, Grandmaster in
green followed by 00 in red and on the far right you will find
the clock. If the clock is not set correctly you will need to go
to [Setup] [Next] [Next] [Next] [Next] [Next] [Next] Misc.
Functions and set the hour and minutes. See SECTION I,
SCREENS, SETUP for this operation.
The next block down lists Channels 1 - 150 (in blue).
Below each of these numbers will be shown channel output
levels in various colors dependent on where the level is being
generated.
By using the [Page Up] and [Page Down] you can quickly
review all 512-channel levels.
Directly below the Channel block in the center you will
find a operator information block. The left side of the block
will, for now, be blank. In the Center of the block you will
find the HELP section. On the far right are the [F1], [F2], [F3]
key functions (in magenta).