
Specifications

23
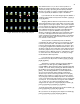
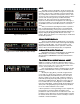
Figure 19 Profile Screen
output of the dimmer equal to the percentage of travel of the
fader. So if you raise a channel fader to a level of 65 the
dimmer will be at 65% of its total output. If you do not select
a different profile for a dimmer when you create your patch
screen the Bijou will automatically assign Profile 1 to the
dimmer.
You will see on the PROFILE screen Profiles 2, 3 & 4
listed as Preheat. The selection of a Preheat Profile for a
dimmer causes a small amount of current to be sent out of
the dimmer even when the dimmer control fader and grand
master is at ‘0’. This may be desired for outdoor dramas
where condensation in a fixture could cause lamp failure or
cracked lenses if they were suddenly turned from off (cold) to
on. Another use of preheat is so that lamp filaments do not
POP on. A cold filament requires a substantial current to get
it to glow, buy preheating the filament the lamp will fade up
rather than pop on. The three preheat choices allow you to
select the right amount of current for the size of filament you
are working with.
Profile #6 is “Square Law” which, in theory, makes the
visible output of lamp equal to the percent of travel of the
fader controlling the dimmer output. So, in theory, if the fader
is faded up to 35 the lamp will appear to be at 35% of its total
light output. This is of coarse dependent on the optics of the
fixture, the size of the lamp filament, the input power voltages
to the dimmers and the length and size of the wiring from the
dimmer to the fixture/lamp.
Profile #7 - Ballast. Used for non-incandescent fixtures
such as neon, cold cathode & flourescent which need a
higher starting current to get them to ignite/light.
Profiles 8 - 25 are user configurable to allow you to
modify any dimmers output to your needs. To modify a profile
go to it by use of the [Next] [Last] key or use [F3] followed by
the desired profile number. So to go to Profile 17 you would
push [F3] [1] [7] [Enter]. The number 17 (in the left column)
will change from green to yellow indicating that you have
selected that profile to modify.
To modify the output levels of a profile (in this case
Profile 17) you next enter the percentage of the fader output
from the top row then use the [At] key followed by the
percentage of dimmer output desired followed by [Enter]. So
to make Profile 17 have a dimmer output of 30% when the
fader is at 45 the sequence would be: [4] [5] [At] [3] [0]
[Enter]. Note the change in the 45% column of Profile 17.
As most productions use low wattage (1,000 watts or
less) incandescent lamps the need to modify or select a
profile other than Profile #1 is limited to special case
applications and you may find you never select a profile in the
PATCH screen as Profile 1 is entered automatically as the
system default.
To clear any modifications you have made to any of the
profiles on this screen go to [Setup] hit [Next] [Next] which
takes you to Clear Functions, hit [8] and at the “Are You
Sure?” prompt hit [Enter]. If you now return to the PATCH