
Specifications
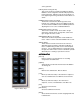

19
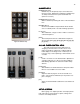
Figure 16 Bijou disk drive
activates input/output port and screen for programming
MIDI activated events.
If the clock is not set to the proper time you should set it
at this time. The time will stay accurate even with the power
turned off as the board has a battery backup built in to protect
memory loss.
SECTION II: BIJOU OPERATIONS the fun
SECTION II: BIJOU OPERATIONS the funSECTION II: BIJOU OPERATIONS the fun
SECTION II: BIJOU OPERATIONS the fun
stuff.
stuff.stuff.
stuff.
O.K. we are going to actually start operating the machine
rather than just looking at it. But as we have no way of
knowing if you just got the console from the factory or, it has
been in use for years and you are just a new user, please do
the following in order for you to follow along with the
discussion.
Turn on the console and the VGA/SVGA display screen.
The system will boot up to the STAGE screen.
1. If you have a Bijou that has 2 scene-preset faders on
the left move them all down to ‘0’.
2. Move the XY and AB Faders down to the [Stop/Rev]
key. Move the Grand Master down to ‘0’. Note that at
the top of all screens there is the word Grandmaster in
green with an output level shown in white (if there is an
output) and red if the Grandmaster is turned to 0 or off.
3. Turn the Blackout switch to the ‘Off’ position. Note that
when you turn the Blackout switch to Off a red LED
lights above the switch and the word BLACK OUT
appears at the top center of all screens in RED.
4. Move all Submasters/Effects sliders down to 0.
PROTECTING PRE-RECORDED SHOW INFORMATION
PROTECTING PRE-RECORDED SHOW INFORMATIONPROTECTING PRE-RECORDED SHOW INFORMATION
PROTECTING PRE-RECORDED SHOW INFORMATION
5. Locate the disk drive on the far right end of the console.
Eject the disk if there is one in the machine. Mark the
date and time you ejected the disk so if there was a
show recorded on it you can not be blamed for messing
it up.
6. Find two new unused 3.5” High Density PC formatted
disks. Insert one of the disks into the disk drive.
7. From the Save To Disk screen enter [8] SAVE ALL
[Enter].
When everything is saved, eject the disk and write the
date and time on it. This is a new, true copy of the board
settings as you found it and may be more accurate than the
disk you ejected back in step 5.
8. Now mark your name and date on the last NEW disk
and insert it in the disk drive.
9. Using the [Last] key go to Clear Functions, hit [9] Clear
All [Enter]. This will remove any prerecorded show