
Specifications

14
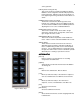
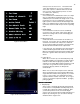
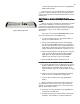
Figure 8 Default Setting 1 Screen
MAIN MENU
MAIN MENUMAIN MENU
MAIN MENU
The Setup Screen is divided into two columns. The left
column lists the topics that may be addressed and the right
column lists the items that may be modified, configured or
actions that can be taken under that topic.
By using the [Next] and [Last] keys you step thru the
seven setup topics. Note that as you step thru the column the
green headings will change to light blue indicating the active
category. And as you step thru the topics in the left column
note that the right side of the screen will change to show the
items available to be configured or addressed in the selected
category.
To select an item from the right column to modify or
address you simply enter the item number that will bring up
the available selections in the lower left of the screen in the
command line. Note that the [F1] and [F2] keys serve as YES
or NO commands for making changes requiring a yes or no
answer.
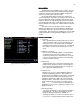
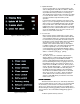
DEFAULT SETTING 1
DEFAULT SETTING 1DEFAULT SETTING 1
DEFAULT SETTING 1
1. Cue times
Sets a predetermined In and Out fade rate for cues as
they are being recorded. Used to speed up the cue
writing process as only variation from the standard
need to be entered in the record process. The default
time will be 5 seconds unless reset by you for your
show.
2. Number of channels
Best set to the maximum number of channels being
used in the system so processor does not create
confusion by showing more channels than your really
can use or waste processor memory or printer paper
looking at unused channels.
3. One Scene
Toggles between two scene preset and single scene
preset manual operation for those consoles with the
two-scene manual operation feature. To change use
[F1] or [F2] then hit the [Enter] key.
4. Active Patch
The Bijou can use one of three individual, dimmer to
channel, (assignments) patches. One-To-One is a
default where every dimmer in the system is controlled
by the channel of the same numeric placement at a
maximum output level of 100% (FL) and is using the
default Profile #1. Patch table 1 & 2 are user created
patch assignments (see section on creating a patch
page________). To select a patch for operation enter
[0] [Enter] for one-to-one or [1] [Enter] for patch 1 or [2]
[Enter] for patch 2.
5. Cue default Track
‘Yes’ places the default for all cues being recorded as
Tracking Cues. ‘No’ places the default for all cues
being recorded as Preset Cues.
(NOTE: In a
Tracking Cue when you create a cue and you do not
set a level for a channel and that channel had a level