Instruction Manual Ambient Monitor
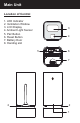
Main Unit Location of Control 1. LED Indicator 2. Ventilation Window 3. LCD Display 4. Ambient Light Sensor 5. Pair Button 6. Reset Button 7. Battery Door 8.
Features Thanks you for purchasing the BTL - Wire. This product is designed as a BTL- Wire by working with Ipad, Iphone , IPod or other IOS devices. • Supports iOS 7 or above • Supports Bluetooth 4.
Before you start using it Please make sure to read the instruction manual carefully. • Following and respecting to your manual will prevent damage to your instrument and loss of you statutory rights arising from defects due to incorrect use. • We shall not be liable for any damage occurring as a result of non-following of these instructions. Likewise, we take no responsibility for any incorrect readings and for any consequences which may result from them.
Getting started 1. Installing battery into the sensor 1.1. Open the battery door on the Ambient Sensor 1.2. Insert two (2) AAA batteries according to the polarities ○+ and ○– as indicated 1.3. Close the battery door. 1.4. The Ambient Sensor should start showing the temperature, humidity and light intensity measurements on the LCD display. 2. Install the Ambient App on your device 2.1. Access App Store and search for “Ambient” 2.2.
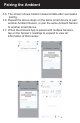
Pairing the Ambient 3. Pairing the Ambient Sensor with the App 3.1. Make sure the Bluetooth is turned ON before running the Ambient app. 3.2. Tap the Ambient to start the app. It will start with an empty screen for the first time. 3.3. Press the “+” icon to start pairing with new devices. 3.4. Press and hold the “PAIR” button on the sensor for more the 5 sensor. The LED indicates a blue glow and the LCD display shows the Sensor ID as a 3-digit hexadecimal value (0~9, A, b, C, d, E, F).
Pairing the Ambient 3.5. The screen shows instant measured data after successful pairing. 3.6. Repeat the above steps on the same smart device to pair another Ambient Sensor, or pair the same Ambient Sensor to another smart device. 3.7. When the Ambient App is paired with multiple Sensors, tap on the Sensor’s readings to expand to view all information of that sensor.
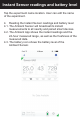
Instant Edit the Sensor Experiment readings name: and battery level Tap the experiment name location. User can edit the name of the experiment. 4. Reading the Instant Sensor readings and battery level 4.1. The Ambient Sensor will broadcast its instant measurements to all nearby and paired smart devices. 4.2. The Ambient App shows the instant readings and the 24-hour measured range, as well as the freshness of the measured data. 4.3. The battery icon shows the battery level of the Ambient Sensor.
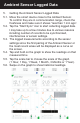
Ambient Sensor Logged Data 5. Getting the Ambient Sensor Logged Data 5.1. Move the smart device close to the Ambient Sensor. To confirm they are in communication range, check the freshness and make sure it shows “less than 1 min ago”. 5.2. Tap the “Start Sync” icon to start collecting logged data. I may take up to a few minutes due to various reasons including number of records to be synchronized, interferences or sensor settings. 5.3.
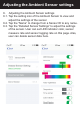
Adjusting the Ambient Sensor settings 6. Adjusting the Ambient Sensor settings 6.1. Tap the setting icon of the Ambient Sensor to view and adjust the settings of the sensor. 6.2. Tap the “Name” to change from a Sensor ID to any name. 6.3. Tap the “Detailed Sensor Settings” to adjust the settings of the sensor. User can set LED indicator color, sensor measure rate and sensor logging rate on this page. Also, user can delete sensor data here.
Exporting Logged Data 7. Exporting Logged Data 7.1. On the Sensor Setting above, tap the “Export Sensor Data” to share the sensor in a CSV format. User can access the data with any spreadsheet applications.
Removing an Ambient Sensor 8. Removing an Ambient Sensor 8.1. Tap the Ambient App Setting at the top right corner. 8.2. Press “Edit” to, choose Ambient Sensor to be removed, and press “Delete” to remove it from the App.
RTL Wire unit buzzer space Manufacturer reserves the right to update the contents of this manual and App.
Disposal of Your Old Product Your product is designed and manufactured with high quality materials and components, which can be recycled and reused. When this crossed-out wheeled bin symbol is attached to a product it means the product is covered by the European Directive 2002/96/EC. Please inform yourself about the local separate collection system for electrical and electronic products. Please act according to your local rules and do not dispose of your old products with your normal household waste.
xxx-xxxxxx xxx