RealGuide Getting started with your RealPad User Guide Get Real. Go Digital.
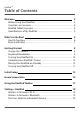
RealPadTM Table of Contents Welcome Before Using Your RealPad ........................................................................ Questions or Concerns ................................................................................ RealPad Tablet Overview ............................................................................ Specifications of My RealPad .................................................................... 4 4 4 4 4 What’s in the Box? 5 Front & Top View ........................
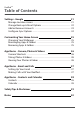
RealPadTM Table of Contents Settings - Google Manage Location Access ......................................................................... Change Back-up & Reset Options ........................................................ Add or Remove Accounts ....................................................................... Configure Sync Options ........................................................................... 21 21 22 23 24 Customizing Your Home Screen 25 Changing Your Wallpaper .............
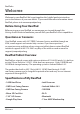
RealPadTM Welcome Welcome to your RealPad. We’ve put together this helpful guide to introduce you to the features of your new tablet. If you would like more information about RealPad, please visit www.aarprealpad.org. Before Using Your RealPad Before using your new RealPad, we encourage you to read through this Getting Started Guide to familiarize yourself with your RealPad’s basic capabilities.
RealPadTM What’s in the Box? • AARP RealPadTM • RealPad Getting Started Guide • AARP Membership Insert • USB Charging Adapter • Micro USB Cable What’s in the Box? 5
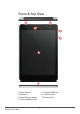
Front & Top View 5 4 3 1 2 6 7 1. Power Button 2. Volume +/3. Front Facing Camera 4. 3.5mm Headset Jack What’s in the Box? 5. Charger/USB Port 6. Touch Screen 7.
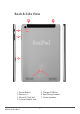
Back & Side View 5 4 1 6 2 3 7 1. Power Button 2. Volume +/3. Micro SD Card Slot 4. 3.5mm Headset Jack What’s in the Box? 5. Charger/USB Port 6. Rear Facing Camera 7.
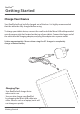
RealPadTM Getting Started Charge Your Device Your RealPad will not be fully charged out of the box. It is highly recommended that the tablet be fully charged before using. To charge your tablet device, connect the small end of the Micro USB cable provided onto the upper right slot located on the top of your tablet. Connect the larger end of the cable into the charging adapter, and plug the adapter into a power outlet.
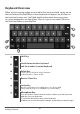
Keyboard Overview When you are viewing a page on your tablet that has a text field, simply tap on the text field and the RealPad on-screen keyboard will appear. Tap the keys on the keyboard to enter text. You’ll find helpful information about using your on-screen keyboard in our Help Video “How do I type on my tablet?” found in the Real Help folder on your RealPad.
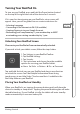
Turning Your RealPad On To turn on your RealPad, press and hold the Power button located on the top of the right hand side of the device for 3 seconds. If it is your first time turning on your RealPad, a setup screen will appear.
Turning Your RealPad Off Press and hold the Power button for three seconds. A shut down pop-up window will appear. Tap “Power off”. A confirmation popup window will appear. Tap “OK” to confirm, or tap “Cancel” to continue using your tablet. Tips: • Putting your RealPad into Airplane mode turns off your wireless radio so that your tablet does not send or receive data. When Airplane mode is on, you will not be able to send or receive email or browse the Web or use apps that require an internet connection.
RealPadTM Initial Setup Your RealPad has been designed for ease of use. When you first turn it on, you will be guided through a simple set-up process. There are 5 steps with descriptions for each. Please note: not all steps are required and can be skipped by tapping on the skip button located at the bottom of each page. Step 1: Choose your language and set up your Wi-Fi. In this step, you will choose your language and connect to your Wi-Fi network.
Step 3: Set up your Entertainment account for downloading and purchasing apps, books and movies from the Google Play Store. Google Play is Google’s App Store where you can download and purchase apps, books, movies, music and games for your tablet. You can choose to enter your credit card information to use for Google Play purchases during set-up, or skip and do later when you are ready to purchase products or services. Step 4: Redeem your complimentary 1 Year AARP Membership.
RealPadTM Home Screen Intro The main screen of your RealPad tablet is called the Home Screen. On it, you will find a collection of icons for commonly used applications or “apps” and application folders. 6 1 5 2 4 1. Google Search Bar 2. RealPad Toolbar 3. Navigation Bar Home Screen Intro 3 4. RealPad Toolbar Toggle 5. Apps & Folders 6.
1 Google Search Bar: The Google search bar allows you to easily search the Internet without opening the internet browser. Type the information you would like to look up or touch the microphone icon on the right side of the search bar to speak a command. 2 RealPad Toolbar: The RealPad toolbar includes folders of information for easy access.
4 RealPad Toolbar Toggle: Opens the RealPad Toolbar. Closes the RealPad Toolbar. 5 App & Folder Icons: Your RealPad Home Screen features icons for commonly used apps, as well as folders containing collections of apps such as Entertainment, Games and News. You can purchase and download new apps from the Google Play Store. You’ll find helpful information about downloading and installing apps in our Help Video “Intro to Apps” available in the Real Help folder on your RealPad.
RealPadTM Using the RealPad Toolbar AARP The AARP folder includes a variety of useful apps such as: AARP.org, AARP Publications, a link to relevant AARP Tools & Calculators and the Life Reimagined Learning Advisor. If you skipped the AARP membership offer during the initial set-up of your tablet, you’ll find a link to redeem the offer in this folder. To open, click on the redeem membership app inside the AARP folder.
RealPadTM Settings - RealPad Settings Settings can be found on your RealPad Toolbar. There are two categories of Settings on your RealPad - RealPad Settings and Google Account Settings. Both are accessed by clicking on the Settings folder in the RealPad Toolbar. RealPad Settings control core features of your tablet such as Wi-Fi, screen brightness, security and more. Google Account Settings include location-based services, data back-up and restore, accounts and more.
RealPadTM Settings - RealPad Wireless & Networks: Wi-Fi 1. Tap RealPad Settings. 2. Tap Wireless & Networks. Tap Wi-Fi. 3. If Wi-Fi isn’t already on, slide the Wi-Fi switch to the On position. 4. Your tablet scans for Wi-Fi networks. To connect to Wi-Fi, touch a network name. 5. Enter a password, if required. (Most times, a password is required) Wireless & Networks: Bluetooth To connect to a Bluetooth device, first turn on your tablet’s Bluetooth.
RealPadTM Settings - RealPad Pair Your Tablet to a Bluetooth Device: You must pair your tablet with a Bluetooth device, before you can connect to it. Once you pair your RealPad with a Bluetooth-enabled device, they stay paired until you unpair them. If the device you want to pair your tablet with isn’t found on the list, ensure that your tablet is turned on and set to be discoverable. 1. Tap RealPad Settings. 2. Tap Wireless & Networks. Make sure Bluetooth is on. 3. Touch Bluetooth.
RealPadTM Settings - Google Google Settings Settings can be found on your RealPad Toolbar. There are two categories of Settings on your RealPad - RealPad Settings and Google Account Settings. Both are accessed by clicking on the Settings folder in the RealPad Toolbar. RealPad Settings control core features of your tablet such as Wi-Fi, screen brightness, security and more. Google Account Settings include location-based services, data back-up and restore, accounts and other key ReadPad features.
For Google Apps When location access for your tablet is turned on, you can prevent Google apps from using this information with one easy setting – without affecting access by non-Google apps. To do so: 1. Go to Settings > Accounts > Google > Location Settings 2. Slide the switch to the Off position IMPORTANT: When you turn Location settings off, non-Google apps and Google’s location service will continue to receive your location. To change these settings, go to Settings > Personal > Location Access.
Automatic Restore Check this option to restore settings and other data when you reinstall an app. This feature requires that you are backing up your data with your Google Account and that the app is using the backup service.
Remove an Account You can remove any account and all information associated with it from your device, including email, contacts, settings and so on. To remove a Google account, touch its name under Settings > Accounts or Settings > Accounts >Google, then Menu > Remove account. For any other type of account go to Settings > Accounts > Account-name and look for the Remove option. Configure Sync Options If your tablet has multiple users, each has separate sync options.
RealPadTM Customizing Your Home Screen Changing Your Wallpaper You can customize the look and feel of your RealPad Home Screen by changing the wallpaper which is the image that displays in the background behind the apps and folders. Simply press and hold any empty space on the Home Screen until the Choose Wallpaper pop-up appears. Select from the available options.
RealPadTM App Basics - Camera, Photos and Videos Camera Shortcuts 1. Camera Settings 2. Take Photo/Video 1 4 2 3 5 3. Toggle between Camera & Video 4. Zoom In & Out (must pinch screen to show zoom) 5. Camera Features a. Exposure b. More Options c. Switch between Front/Back Camera Taking Photos & Videos 1. Point the camera on the back of your tablet at the subject you want to photograph. 2. Tap the camera icon to take a still image. Tap the video icon to start to shoot a video.
RealPadTM App Basics - Email & Calls Setting Up Your Email Follow the on-screen steps to set up your email account. You’ll find helpful information about setting up your email in our Help Video “Intro to Email” available in the Real Help folder on your RealPad. To set up your email, click the Email icon on your RealPad Home Screen. If you use Google’s Gmail, click the Gmail app icon which you will find in the Google folder on the desktop.
RealPadTM App Basics - Contacts & Calendar Contacts The People app is your address book. It allows you to store and manage contact information for your friends and family. The People app displays contacts from each of your Google Accounts that you choose to synchronize with your RealPad tablet. You will be able to add your own contacts as well. As an added convenience, you can mark a contact as a favorite.
RealPadTM Safety Tips & Disclaimer • It is extremely important that you keep your tablet dry at all times. To avoid damage, please keep your RealPad, battery and charger away from water and moisture, and don’t use your tablet or charger when your hands are wet. • Do not drop or strike your RealPad against a hard surface. • Never attempt to disassemble your RealPad or its accessories, as this will immediately VOID any and all warranties you have for your tablet and accessories.
Information to Users According to the FCC Part 15.19, 15.21, and 15.105 rules, for this EUT, the instructions or operation manual furnished the user shall include the following or similar statement, placed in a prominent location in the text of the manual: FCC RF Exposure Information and Statement The SAR limit of USA (FCC) is 1.6 W/kg averaged over one gram of tissue. Device types MID / MA7BX2 (FCC ID: ZL9-MA7BX2) has also been tested against this SAR limit.
www.aarprealpad.org Android, Google Play and other marks are the trademarks of Google Inc. ©2014 AARP. AARP and RealPad are trademarks of AARP. All other brands, product names, logos, and icons depicted herein are intended solely for the purpose of communicating the functionality of the RealPad. All such images and trademarks remain the property of their respective owners.