Quick Start Installation Guide
Table of Contents 1. Introduction ................................................................................................ 3 2. System Installation .................................................................................... 3 3. System Programming ................................................................................ 5 3.1. Keys Menu Navigation ................................................................ 5 3.2. Enter Engineer Programming mode ..........................
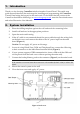
1. Introduction Thank you for choosing CommPact wireless intruder Control Panel. This quick start guide manual describes the main steps for installing and programming the CommPact Control Panel using the keypad on the main unit. To download the full version of the CommPact Installation Manual go to www.riscogroup.co.uk, enter the Downloads menu and select Electronics Line Manuals. 2. System Installation 1. Place the drilling template against the wall and mark the mounting holes. 2.
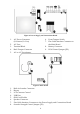
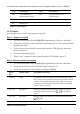
Figure 2: Power Supply and Connections Board 1. AC Power Connector (N=Neutral, L=Live) 6. Front Tamper Switch 2. AC Fuse 7. Flat-Cable Interface Connector to the Main Board 3. Terminal Block 8. Battery Connector 4. Back Tamper Connector 9. PGM Control Jumper (JP1) 5. AC to AC Transformer Figure 3: Main board 1. 2. 3. 4. 5. 6. 7. 8.
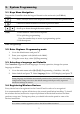
3. System Programming 3.1. Keys Menu Navigation Program the CommPact from the keypad located on the main unit (see Table 1). Enter / Save (to move to the displayed menu or to save the updated data) Cancel the current selection or return to previous menu Scroll up or down through the menu options / [1]-[0] 1. Enter numeric values where required. 2. For quick key programming. Press the number keys to access a programming option. 3. Edit descriptors. Table 1: Keypad usage 3.2.
3.4.1. Detectors The CommPact supports 33 security zones. Only one detector can be registered to each zone. Zones 1-32 are intended for wireless detectors by default. Zone 33 is an on-board hardwire zone (can be configured as NO, NC or EOL). Step 1: Register a detector 1. Go to the main menu and select [9]>[1]>[1] (Programming> Devices > Zones) 2. Using the arrow keys, select a specific zone and press '√'. The system initiates Registration mode. 3. Send two transmissions from the detector.
Quick Key Option Name Description and Notes 9>1>1>2 Zone Type The alarm this zone generates 9>1>1>3 Set Setting methods in which the zone is included. 1 (F): The zone is included in Full setting 2 (P): The zone is included in Part setting 3 (PE): The zone is included in Perimeter setting 9>1>1>4 Descriptor Descriptors help identify the device when you operate and program the system.
In addition the menu shows the detectors status using the abbreviations in Table 5. Item Description… Item Description… OK The transmitter is functioning correctly OS The transmitter is not synchronized TA Tamper condition NA The transmitter is inactive BT Battery low Table 5: Abbreviations 3.4.2. Keyfobs The CommPact Control System supports up to 19 keyfobs. Step 1: Register a keyfob 1. Go to the main menu, select [9]>[1]>[2] (Programming > Devices > Keyfobs) 2.
Step 3: Testing the keyfobs 1. Go to the main menu and press '√'. 2. Enter your Engineer code (default code '1111'). 3. Enter [7]>[07]>[2] (Service > Transmitters > TX Test) to initiate TX communication Test. Review the explanation in Detectors section. 3.4.3. Wireless keypads Step 1: Register a wireless keypad The CommPact supports up to four wireless keypads. 1. Go to the main menu, select [9]>[1]>[3] (Programming > Devices > Keypads) . 2. Select the keypad to register and press '√'.
Quick Key Option Name Description and Notes 9>5>1>1 Telephone No. Enter phone number. Use the "T",",","P","+","*","#". 9>5>1>2 Protocol Used to define the account’s communication protocol. For CMS accounts select one of the options: IP protocol, SMS Contact ID, SMS SIA, SIA, Contact ID key to enter Note: Set account 1 to IP protocol if you use GPRS 9>5>1>3 Communication Interface Program an account’s communication interface.
Note: Account number 3 is designed for using Follow me feature. It is the only telephone number that can be programmed by the user in the following location (only if defined as SMS or TWA): Main menu > '[5] Follow Me Number' 4. Enter the Follow Me telephone number and press '√' 5. Select the protocol from the following options: 6. 7. Two Way Audio Follow Me SMS Follow Me Voice Report Define the communication interface for Follow me: PSTN or GSM.
Code Number Authorization Level Description 1 Master Code With the master code, you can edit all other user codes except the Engineer code and the Central Station TWA Code. Caution: The default master code is 1234.
9. Press X and select another user. 10. Repeat stages 4–9 to set the code for additional users. Notes: To delete the code, enter: '0000' The engineer and master codes cannot be deleted. 3.9. Set GPRS Communication To establish GPRS communication: 1. Make sure the SIM card ID is installed inside the communication module.
Note If the end user is to perform the self registration on-line then the following CPID and CP Password steps are not required. Program the CPID 1. Go to the main menu and press '√'. 2. Enter your engineer code. 3. Enter [9] > [5] > [7] > [3] (Programming > Communications > Internet > CPID). 4. Enter an ID using the alphanumeric keypad. The ID length is up-to 16 characters. The ID must begin with a letter. 5. Press '√'. Program the Control Panel password 1. Go to the main menu and press '√'.
4. Testing the System It is important to fully test the system after installation. CommPact has several testing tools to verify that the system will operate optimally, including the wireless communication 1. 2. 3. Go to the main menu and press '√' Enter engineer code Decide which quick key should be selected as summarized in Table 10.
Electronics Line 3000 Ltd. Limited Warranty EL and its subsidiaries and affiliates ("Seller") warrants its products to be free from defects in materials and workmanship under normal use for 24 months from the date of production. Because Seller does not install or connect the product and because the product may be used in conjunction with products not manufactured by the Seller, Seller cannot guarantee the performance of the security system which uses this product.