
User's Manual


Testing and Registration
Transmission Testing and Detector Registration
,
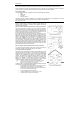
Before testing and registration, apply the battery power (See Attaching and Removing)
1. Set the receiver to Registration mode.
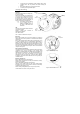
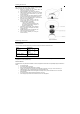
2. Press the test button (See Figure 2)
3. Make sure that the Registration procedure is completed (if necessary, press the test button again).
4. After registration, write the number of the zone to which the transmitter is registered on the sticker provided. Affix the
sticker on the rear of the detector for future reference.
5. Before permanently mounting the unit, test the transmitter at the exact mounting position. If necessary, relocate the
EL-2603NA to a better position for improved RF signal strength.
Smoke Testing the Detector
Smoke detectors should be tested in place annually using smoke or canned aerosol simulated smoke. Follow the instructions on the
canned smoke or use the following steps to test the detector with smoke:
1. Hold a smoldering punk or cotton wick close to the smoke entry openings.
2. Gently direct the smoke into the detector for 20 seconds or until an alarm is indicated.
,
Be sure to properly extinguish the smoke source after testing!
The detector LED should remain on and the detector will sound a temporal rhythm until the Test/Silence button is pressed. The
detector automatically resets when smoke is no longer present.
Testing the Alarm
The Test/Silence button on the detector performs the following three functions associated with detector sounding: testing (sounder test,
which is pressing the button to make sure that the alarm sound works properly), silencing the sounder during the alarm – (it will be
resumed after a few minutes if smoke is still present), silencing trouble chirp (it will be resumed after 24 hours if the trouble condition is
not corrected).
Testing the Detector Sensitivity
The detector provides a sensitivity level test mode that allows you to check the detector sensitivity using the Test/Silence button and
the LED indicator on the detector as follows:
1. Press the Test/Silence button on the smoke detector for 2 seconds. Once the test starts, the detector LED flashes
one to nine times.
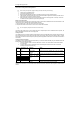
2. Count the number of times the LED flashes and use the following table to determine the status of the detector
sensitivity and what action to take, if any.
Flashes Obscuration %/ft
(approx)
UL
Indication Action
1 N/A Unserviceable
hardware fault
detected.
Reset unit and rerun sensitivity test. If the error persists,
replace the unit.
2-3 N/A Detector is not
sensitive enough.
Clean the unit. Reset unit and rerun sensitivity test. If the error
persists, replace the unit.
4 3.1
5 2.6
6 2.1
7 1.6
Detector is within
normal sensitivity
range.
N/A
8, 9 N/A Detector is too
sensitive.
Verify that the smoke chamber is snapped down securely.
Clean the unit and replace the smoke chamber.
After the flashes, if the sensitivity is within limits and all other tests pass, the detector goes into alarm and resets after 5 seconds. If the
sensitivity is not within limits or an unserviceable hardware fault has been detected, the detector LED extinguishes until the detector is
serviced.