
User manual


4 CEM+ Configuration Procedures 32
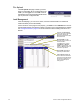
• After clicking Install, the software will be
uploaded to the CEM+. While the software
is being sent to the CEM+, the browser will
no longer respond. After several minutes,
there will be a pair of errors indicating that
the CEM+ is done transferring the file and is
now installing the software (and no longer
communicating with Internet Explorer which
is what causes the errors).
Step 6: After seeing the errors, it is safe to clear the
errors (click OK) and close Internet Explorer.
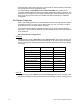
• The following screens will be seen on the face panel display during software
installation:
Step 7: Repeat for any remaining CEM+s in the system.
Delete All Racks [Power]
Step 1: Login as a Power User
Step 2: Delete the config from the local rack (the one you are logged into).
• [Web] Racks & Dimmers>Add Racks>Delete All Racks
• [FP] Rack>Delete All Racks
Step 3: Send the local rack’s configuration to the other racks. This will send the
“noconfig” configuration to the other CEM+s in the group and effectively delete
their configuration as well.
• Configuration>File Transfer>Backup
• [FP] Rack>Send Config to All
This operation clears the rack configuration from the local rack (the one you are logged
into), but does not clear everything from the CEM+. The network settings, and custom PIN
for the face panel remain intact.
Loading SW For
AF Card
CEM+
1.0.2
Loading SW For
Dimming Processor
Installing Software
<various messages>
Loading New SW
Please Wait...
ETC CEM+ R 1/ 4 G 1
[Rack OK]
While the software is being
downloaded.
While the individual components
are being decompressed and
installed.
While the CEM+ reboots with the
new software.
While theCEM+ transfers some
software to the dimming engine.
While the CEM+ transfers some
software to the Advanced
Features (AF) cards (if installed).
Installation is complete. The
CEM+ returns to its normal
resting display.