
User manual


appendix a installation 309
Installing Remote Interfaces
Remote Interfaces allow you to attach Expression peripherals to your net-
work. Each Remote Interface contains connectors for three types of net-
work cable (ThinNet, ThickNet and Twisted Pair). Choose the connector
that matches your cable type.
To install the Remote Interface, follow these steps:
1. Plug the network connector into the appropriate back panel
connector.
2. Plug the power cable into a grounded 120 VAC outlet.
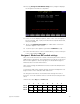
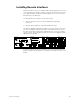
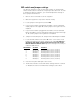
The Remote Interface back panel contains connectors for up to two mon-
itors, three DMX512 outputs and an RFU. The illustration below shows
the Remote Interface’s back panel and indicates the connector used by
each accessory. The front panel includes a connector for a digitizer and an
alphanumeric keyboard.
In order to activate the Remote Interface, you must first adjust the set-
tings of a number of DIP switches on the Remote Interface’s main circuit
board.
manufactured by
PUSH
PUSH PUSH PUSH
switched outlets
6.26A sb
6.26A sb
120 VAC 50/60 Hz
120 VAC 50/60 Hz
FUSE
FUSE
Electronic Theatre Controls, Inc.
Middleton, WI USA
Electronic Theatre Controls, Inc.
3030 Laura Lane, Middleton, Wisconsin 53562-1764
Product:
Model #:
Serial #:
ETCNet
CRT displays
optional I/O
RFU
DMX out
1-512
513-1024 1025-1536
parallel port
parallel printer
CRT 1
CRT 2