
User manual

308 Insight 2x user manual
ETCNet DIP switches on older consoles
In order to activate ETCNet on older consoles (with keyswitch style power
switches), you must first adjust the settings of the ETCNet cabling DIP
switches on the console’s logic board to indicate what kind of cable the
network uses. You will need to use a pin, or a similar fine-pointed object,
to set the switches.
Warning: Do not use a pencil to set the switches.
To set the DIP switches, follow these steps.
1. Loosen the knobs at the front of both ends of the front panel that
secure the face panel.
2. Raise the face panel and hold or prop it in upright position.
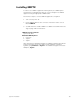
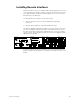
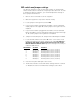
3. Locate the two sets of DIP switches on the left side of the main circuit
board. See illustration on page 288.
4. If the ETCNet cable is plugged into the RJ45 (Twisted Pair) connector
or the DB15 (ThickNet) connector, set the left-hand set of six
switches, labeled S1, to On. Set the other six (S2) to Off.
Or...
If the ETCNet cable is plugged into the BNC (ThinNet) connector, set
the right-hand set of six DIP switches, labeled S2, to On. Set the other
six (S1) to Off.
5. Close the face panel and secure it with the knobs.
6. Close the face panel and secure it with the knobs.