
User manual


290 Insight 2x user manual
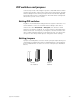
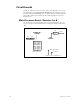
Installing console and monitors
Follow these steps to install Insight 2x and its monitors:
1. Place console on a hard, stable, flat surface. Leave at least six inches
of space behind console for ventilation and cable clearance
.
Console
should be at least six feet from dimmers and high-current AC lines.
Caution: Do not leave the console in a road case tray or on a soft sur-
face. This will inhibit proper ventilation.
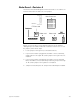
2. Move console power switch (by fan on back panel) to the Off position.
(Older consoles may have a keyswitch power switch on the face
panel. If so, insert the key into the power switch, and turn it to the Off
position.)
3. Connect the video cable from the monitor to the appropriate console
connector labeled CRT 1 on the back panel. Repeat for second moni-
tor, using CRT 2.
4. Insert the female end of the console power cord in the connector
labeled Power in on the console's back panel.
5. Insert the female end of the monitor power cord in the connector on
the back of the monitor.
6. Insert the male end of the monitor power cords in the console con-
nector labeled Switched AC Outlets
.
The switched AC outlets pro-
vide the same voltage the console is plugged into.
7. Insert the male end of the console power cord in a grounded 120 VAC
outlet
.
For 220 VAC operation, consult ETC.
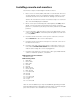
VGA monitor console connector
HD-DB15 female
VGA monitor pinout
1 Red video
2 Green video
3 Blue video
4 Ground
5 Ground
6 Red ground
7 Green ground
8 Blue ground
9 not connected
10 Ground
11 Ground
12 not connected
13 H. (H/V) sync
14 V. sync
15 not connected
Note: In some installations you may need additional grounding. An addi-
tional grounding location is provided on the rear of the console for this pur-
pose. This console is not certified for use in wet locations.