
User manual


chapter 14 macros 171
Using submasters in macros
Submaster bump buttons can function in macros in three different ways:
as a normal bump button; to always fade a submaster to full (regardless
of its current condition); or to always fade a submaster out (regardless of
its current condition)
.
To include a bump button that starts a timed submaster or changes the
direction of a running fade, press the submaster bump button while pro-
gramming the macro.
Use [S1], On Sub-Bump, to fade the submaster up, regardless of its cur-
rent setting. Use [S2], Off Sub-Bump, to fade a submaster out, regardless
of its current setting.
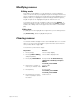
To create a macro that turns a submaster on for five seconds, then turns
it off, follow these steps:
Keystrokes:
Action:
1. Press [Setup] [8] [Enter].
Selects Macro editing mode
2. Press [4] [Enter].
Selects macro 4 to create
Prompt reads: Select operation(s) for
this macro – press ENTER MACRO
when done (Wheels and sliders are
not valid entries in macros)
3. Press [S7], More Soft-
keys, [S1], On Sub-
Bump.
Macro line reads: OnBump
Prompt reads:
Enter submaster number
4. Press [3] [Enter].
Macro line reads: OnBump3
5. Press [Macro Wait].
Macro line reads:
OnBump3 Mwait-0
6. Enter [5] and press
[Enter].
Macro line reads:
OnBump3 Mwait-5
7. Press [S2], Off Sub-
Bump.
Macro line reads:
OnBump3 Mwait-5 OffBump
Prompt reads:
Enter submaster number
8. Press [3] [Enter].
Macro line reads:
OnBump3 Mwait-5 OffBump3
9. Press [Enter Macro].
Records macro 4; leaves editing mode
10. Press [Stage] [M4].
Macro runs