
User's Manual


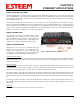
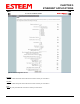

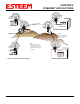
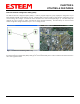

Table Of Contents
- Chapter 0 - Front Cover 195CM
- Chapter 0 - Table of Contents 195CM
- CHAPTER 1 – Introduction
- Before You Begin
- Model 195C/M Overview
- Three Configuration Phases
- Model 195C/M Hardware Description
- Modes of Operation Description and Examples
- Programming Examples
- CHAPTER 5 – Web Configuration
- Logging Into Web Configuration Manager
- Web Configuration Manager
- CHAPTER 6 – Serial Configuration and Applications
- Using USB Programming Port
- Using RS-232 Data Port
- ESTeem Mesh Network
- Rapid Spanning Tree Protocol (RSTP)
- Spanning Tree Protocols (STP)
- Redundant Backup
- CHAPTER 8 – Antenna Setups
- Antenna and Cable Configurations
- Weatherproofing Coaxial Cable Connections
- APPENDIX A – FCC Information
- APPENDIX B – Interface Ports
- APPENDIX C – Radio Configuration
- APPENDIX E – Troubleshooting
- APPENDIX F – 195C/M Specifications
- CHAPTER 1 – Introduction
- Chapter 1 - Introduction 195CM
- BEFORE YOU BEGIN
- MODEL 195C/M OVERVIEW
- The ESTeem Model 195C and 195M are wireless modem transceivers that can be used to build many types of Wireless Local Area Networks (WLAN). The ESTeem 195C/M series have multiple serial (RS-232, RS-422 and RS-485), Ethernet and 4/20mA sensor interfaces. The Model 195C and 195M can be configured for multiple modes of operation depending upon the needs of the wireless and wired network. The following interface configurations are provided as an overview of the basic network types, as all possible network configurations can not be listed. For further help in selecting the correct network type, please refer to Chapter 3 of this User’s Manual or call Customer Support at 509-735-9092.
- SERIAL APPLICATIONS
- ETHERNET APPLICATIONS
- Chapter 2 - Starting Out 195CM
- Chapter 3 - Example Applications 195CM
- Chapter 4 - Repeating 195CM
- Chapter 5 - Ethernet Configuration and Applications 195CM
- Chapter 6 - Utilities and Features 195CM
- ESTeem Network Configuration Utility (ENC)
- Note: The ESTeem Resource Disk is a stand-alone copy of the ESTeem Web site (Figure 2). Navigation of the Resource Disk is as simple as using your web browser. All technical documentation, User’s Manuals and the ESTeem Utility Program are available on the disk.
- Note: If the page does not auto load, open your web browser and set your address line to D:\index.html (Where D: is the drive letter for your CD-ROM drive).
- Note: This program is saved in a compressed file format.
- Note: The SSID, Mode of Operation and Modem ID will be adjusted through the ENC Utility or the Web Configuration Manager...
- Note: The ESTeem Resource Disk is a stand-alone copy of the ESTeem Web site (Figure 1). Navigation of the Resource Disk is as simple as using your web browser. All technical documentation, User’s Manuals and the ESTeem Utility Program are available on the disk.
- Note: If the page does not auto load, open your web browser and set your address line to D:\index.html (Where D: is the drive letter for your CD-ROM drive).
- Note: This program is saved in a compressed file format. Microsoft Windows XP® will open the file directly, but other operating systems will require a common compression program such as WinZip available for download at http://www.winzip.com
- Note: This Utility will only operate with an ESTeem Model 195C/M in EtherStation mode.
- Chapter 7 - Antenna Setup 195CM
- Apx A - Software Commands 195CM
- Apx B - Interface Ports 195CM
- Apx C - Model 192 Integration 195CM
- Apx D - FCC Information 195CM
- Apx E - 195C Specifications
- Apx F - 195M Specifications

CHAPTER 5
ETHERNET APPLICATIONS
USING THE USB PROGRAMMING PORT
Any terminal emulation program can be used for this configuration of the ESTeem 195C/M through the USB port. Most
Windows users will probably use either Hyper Terminal or the Terminal Emulation in the ESTeem Utility program.
Programming Using the USB Port
1. W
hen configuring the Model 195C/M for the first time you can use the ESTeem Configuration Menu to setup the basic
operating parameters such as assigning the IP Address, IP Net Mask, and Gateway IP Address.
2. Connect the USB cable between the USB connector on the Model 195C/M to an open USB port on the computer.
3. Plug the Model AA174 power supply into a wall socket and connect an Ethernet patch cable from the Model 195C/M Ethernet
port to the J1 (Data&PWR) port on the power supply. The Power LED on the front of the ESTeem should be illuminated.
4. If your computer is configured properly, you will see the ESTeem Model 195C/M booting sequence on your Terminal
Emulation program. Once the ESTeem boot sequence is complete (approximately 45 seconds) you will receive this message:
“Please press Enter to active this console.”
If you don’t see this message press the Reset button on the front panel of the Model 195C/M and/or check the programming
of your RS-232 port.
5. Press the Enter key and you will be at the Configuration Menu 195C/M login prompt. See Figure 1.
6. To enter the Model 195C/M Main Menu you will need to log into the system with a login name and password.
7. If this is not the first time configuration of the Model 195C/M, see your network systems administrator for the password.
8. At the 195C/M login prompt type admin for the login name and press the Enter key
(<Enter>). The login name is defined at
the factory and is not changeable by the user. Note that all characters are lower case.
If this is the first time the Model 195C/M has been programmed or the Password was not changed from the factory default values,
the factory default password is also admin. Enter admin for the password and press the Enter key (<Enter>). The ESTeem
Configuration Welcome Screen (Figure 2) will now be displayed. Note that all characters are lower case.
Figure 1: RS-232 Port Log-in Screen
Revised: 24 Jan 14 5-1 EST P/N AA107-195CM