
User's Manual Part 2


CHAPTER 3
STARTING OUT
Revised: 27 Jun 08 3-8 EST P/N AA107D
7. To enter the Model 195Ed Main Menu you will need to log into the system with a login name and password.
8. If this is not the first time configuration of the Model 195Ed, see your network systems administrator for the password.
9. At the 195Ed login prompt type admin for the login name and press the Enter key (<Enter>). The login name is defined at the
factory and is not changeable by the user. Note that all characters are lower case.
10. If this is the first time the Model 195Ed has been programmed or the Password was not changed from the factory default
values, the factory default password is also admin. Enter admin for the password and press the Enter key (<Enter>).
Note: All characters are lower case.
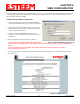
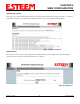
The ESTeem Configuration Welcome Screen (Figure 11) will now be displayed.
11. To set the IP address in the ESTeem 195Ed, type the letter A and press the Enter key. Enter the value for the IP address,
Netmask and default route and pressing the Enter key after each entry.
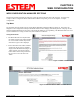
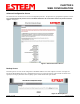
12. After the basic parameters have been entered into the Model 195Ed you will need to commit the changes to the Model 195Ed
(Figure 12). Press the C key and then the Enter and the changes will be saved to flash memory. You can use programming
features in the ESTeem Web Configuration Manager to configure the unit for your application. Proceed to Chapter 4.
Figure 11: RS-232 Welcome Screen
Figure 12: RS-232 Welcome Screen