
User's Manual

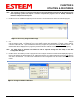
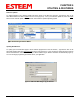
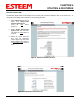
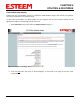

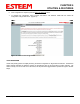

Table Of Contents
- 195Ea Chapter 0 - Front Cover 195Ea
- 195Ea Chapter 0 - Table of Contents
- 195Ea Chapter 1 - Introduction
- 195Ea Chapter 2 - Starting Out
- 195Ea Chapter 3 - Example Applications
- 195Ea Chapter 4 - Utilities and Features
- 195Ea Chapter 5 - Web Configuration Manager
- 195Ea Chapter 6 - Serial Configuration and Applications
- 195Ea Chapter 7 - Repeating and Mesh Networking
- 195Ea Chapter 8 - Antenna Setup
- 195Ea Apx A - FCC Information
- 195Ea Apx B - Specifications
- 195Ea Apx C - Interface Ports
- 195Ea Apx D - Radio Configuration
- 195Ea Apx E - Security
- 195Ea Apx F - Troubleshooting

CHAPTER 4
UTILITIES & FEATURES
Revised: 6 Sep 11 4-3 EST P/N AA107A
Note: This program is saved in a compressed file format. Microsoft Windows XP® will open the file directly, but
other operating systems will require a common compression program such as WinZip available for
download at http://www.winzip.com
3. Double click on the 195EDiscoverySetup<Current Version>.exe file listed in the window to install the program.
4. Connect the Model 195Ea to your computer either directly to the Ethernet card or through a HUB/Switch using a
CAT-5e Ethernet cable. The Ethernet port on the 195Ea supports Auto-Negotiation, so either a patch cable or
crossover cable will work. Open the ESTeem Discovery Program and press the Discover Modems button. The
Model 195Ea will be displayed in the program by the Ethernet MAC address and Current IP Address (Figure 4).
Note: The SSID, Mode of Operation and Modem ID will be adjusted through the ENC Utility or the Web
Configuration Manager...
5. Double-click on the 195Ea you want to program and the Configure IP Address window will be displayed (Figure 5).
Enter an IP address and Subnet Mask for the 195Ea that matches your network subnet and press the OK button to
save this to the ESTeem. You will receive notification that the Configuration was Successful and the 195Ea will
reboot.
Figure 4: Discovery Program Main Page
Figure 5: Change IP Address Window