
User's Manual
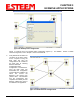
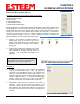
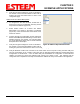
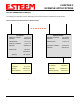
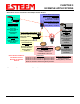
Table Of Contents
- 195Ea Chapter 0 - Front Cover 195Ea
- 195Ea Chapter 0 - Table of Contents
- 195Ea Chapter 1 - Introduction
- 195Ea Chapter 2 - Starting Out
- 195Ea Chapter 3 - Example Applications
- 195Ea Chapter 4 - Utilities and Features
- 195Ea Chapter 5 - Web Configuration Manager
- 195Ea Chapter 6 - Serial Configuration and Applications
- 195Ea Chapter 7 - Repeating and Mesh Networking
- 195Ea Chapter 8 - Antenna Setup
- 195Ea Apx A - FCC Information
- 195Ea Apx B - Specifications
- 195Ea Apx C - Interface Ports
- 195Ea Apx D - Radio Configuration
- 195Ea Apx E - Security
- 195Ea Apx F - Troubleshooting

CHAPTER 3
EXAMPLE APPLICATIONS
Revised: 6 Sep 11 3-14 EST P/N AA107A
5. Verify the encryption settings are correct for the 802.11
AP network in which the EtherStation modem will be
working and press the Finish button to return to the
configuration page.
Station Router and Station Masquerade
6. To configure the two other modems, double-click on
their icons to bring up the ESTeem Summary window
and press the Edit button (Figure 20).
7. Select Station Router for E-14001 and Station
Masquerade for E-14002 in the Mode of Operation
(Figure 26). Press the Next button at the bottom of the
window to continue.
8. Continue through the configuration screens setting the
Station Router/Masquerade addressing to match the IP
address ranges for your network. For help with setting
the router addressing please refer to Router Address
Examples later in this chapter.
9. Verify the encryption settings are correct for the 802.11
AP network in which the EtherStation modem will be
working and press the Finish button to return to the configuration page.
10. Verify all ESTeem modems are connected to the same switch as the computer running the ENC Utility and
send the configuration to all modems at the same time by selecting ESTeem>ESTeem Configuration>Send
Configuration to All ESTeems. Once the ENC Utility has downloaded the configuration for both ESTeem
195Eas, the status box around the ESTeems will change from yellow to blue. This indicates that the
configuration was completed successfully and the ESTeem 195Eas are ready to be installed in the application.
Figure 26: Mode of Operation Selection