
User Manual

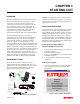
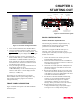
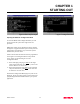
Table Of Contents

CHAPTER 2
APPLICATION PROGRAMMING
Revised: 2 Oct 01 2-2
SELECTING ETHERNET
CONFIGURATION
To begin setup of your wireless Ethernet network you
must first select the type of Model 192E configuration
required. The following are examples of networking
requirements and the type of configuration required for
each:
Networking Requirements Model 192E
Configuration
Link 802.11b wireless network cards
(EST P/N: WLANC11 or others) in
Infrastructure Mode
Access Point
(Figure 3)
Provide relay point for wireless
network cards (EST P/N: WLANC11
or others) to increase range of Wireless
Area Network (WLAN)
Access Point
Provide access to a cabled Ethernet
network from a wireless network
(WLAN)
Access Point
Communicate between two or more
Ethernet (10BaseT) ports using the
Model 192E
Ethernet
Bridge
(Figure 6)
Link two or more Ethernet HUBs using
the Model 192E
Ethernet
Bridge
Provide building to building Ethernet
access using Model 192E
Ethernet
Bridge
Provide wireless Ethernet links to both
remote 10BaseT Ethernet ports and
access to wireless network cards
Combined
Access Point
and Bridge
(Figure 10)
All possible Ethernet network configurations can not be
listed. If your application does not match any of the
above Networking Requirements, please consult with
your network system administrator or contact EST
Customer Support at 509-735-9092.
USING THE CONFIGURATION MENU
The ESTeem Model 192E Configuration Menu (Figure
1) is used to set the operating parameters of the wireless
Ethernet modem to operate in an Ethernet network. We
learned in Chapter 1- Starting Out how to configure a
terminal emulation program to access the Configuration
Menu through the RS-232 port on the ESTeem. If you
have not completed Chapter 1 or have questions on how
to access the Configuration Menu, please review that
section before proceeding.
Accessing Through Telnet
Looking at the Main Menu screen of the Configuration
Menu, you will notice the header lists the connected
ESTeem Model 192E’s serial number, current mode of
operation, current Service Set Identifier (SSID - if Access
Point) or Bridge IP address (Bridge Mode Only), and IP
address. Using the IP address, you can start a Telnet
session to the ESTeem through the Ethernet network to
access the Configuration Menu.
Note: If the ESTeem Model 192E is configured in
Ethernet Bridge mode, the Wireless IP and the Ethernet
IP addresses must be on unique Subnets (See Ethernet
Bridging Configuration for more information) to gain
access to the configuration menu through Telnet. Each
operating system has a different method of starting a
Telnet session. Please review the documentation on your
operating system or consult with your network system
administrator.
Changing Configuration Information
To move between menu items in the ESTeem Model
192E Configuration Menu you must first enter the
number next to the menu item and then press the Enter
Key (<Enter>). All commands must be followed by the
Enter key. For example, to review the Copyright
information on the ESTeem Model 192E, press the
number 5 key followed by the Enter key (5<Enter>).
The Configuration Menu will always prompt you if
further input is required or the input received was
invalid. To back out of most menu screens and return to
Figure 1: Configuration Menu