
User Manual
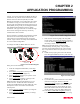
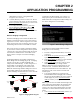
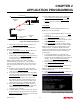
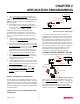

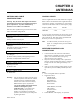
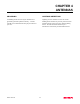
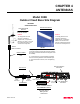
Table Of Contents

CHAPTER 2
APPLICATION PROGRAMMING
Revised: 2 Oct 01 2-6
7.
Select Current Ethernet IP Address (4<Enter>) to
assign the ESTeem an IP address.
Note: The Ethernet IP and the Wireless IP addresses
must NOT be the same.
8.
Select Current Ethernet IP Net Mask (5<Enter>) to
change the ESTeem Net Mask.
9.
If the bridge network is going to be using WEP
security codes, press Encryption Settings (6<Enter>)
to enter the Privacy Menu (Figure 5) otherwise leave
the setting at “False” and skip to Step 14.
Note: Setting the WEP security codes are highly
recommended for network privacy. They do require
extensive network administration, but if used correctly
they can provide the same level of security as a wired
network.
10.
If WEP security is going to be used in the bridge
network, select Encryption Enabled (1<Enter>) and
value will change to “True”.
11.
If you wish to keep clients without the correct WEP
code from entering your bridge network, set Exclude
unencrypted clients (2<Enter>) to “True” otherwise
set to “False”. If this value is set to “False”, the
Access Point will allow clients without the correct
WEP code and those with the correct WEP code to
join the network as long as all SSID codes match.
12.
Select 802.11 128bit WEP encryption (3<Enter>)
and set to “True” if the wireless cards will be using
128bit WEP encryption. If using 40bit WEP
encryption, leave at “False”.
13.
Load the WEP Key values in sections 4-12. Review
all your changes on the screen are correct and select
Return to previous menu (X<Enter>) to return to the
Access Point Configuration Menu.
14.
If all configurations appear correct, press Load
Values and Return to Main Menu (M<Enter>).
15.
Once at the Main Menu, press Save and Apply
Changes (7<Enter>) and Yes to reboot the
ESTeeem.
Client Bridge
To configure the ESTeem Model 192E as a Client
Bridge, please use the following:
1.
From the Configuration Main Menu, select Setup
(1<Enter>).
2.
Select Modes of Operation (1<Enter) to enter the
system configuration menu (Figure 4).
3.
Select Client Bridge (3<Enter>) to open the Client
Bridge configuration menu (Figure 9).
4.
Select Current SSID (1<Enter>) and type in the
SSID information that matches the Master Bridge.
Note: The SSID is the unique identification for your
wireless network. All ESTeem Model 192Es in the
bridge network MUST have the same SSID code. This
identification code is case sensitive and must NOT
contain spaces.
5.
Two unique IP addresses are required for the
ESTeem Model 192E in bridging mode. Both the
WLAN port and the 10BaseT port need a unique IP
number. Select Current Wireless IP Address
(2<Enter>) to assign the ESTeem an IP address.
6.
Select Current Wireless IP Net Mask (3<Enter>) to
change the ESTeem Net Mask.
7.
Select Current Ethernet IP Address (4<Enter>) to
assign the ESTeem an IP address.
Note: The Ethernet IP and the Wireless IP addresses
must NOT be the same.
8.
Select Current Ethernet IP Net Mask (5<Enter>) to
change the ESTeem Net Mask.
Ethernet Wired LAN
Ethernet Wired LAN
192E - Client
Brid
g
e
192E - Master
Brid
g
e
Ethernet IP Address (Example)
192.168.1.0
Ethernet IP Address (Example)
192.168.1.1
Wireless IP Address (Example)
192.168.2.1
Wireless IP Address (Example)
192.168.2.0
Figure 8: IP Addressing Diagram
Figure 9: Client Bridge Configuration