
User Manual
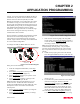
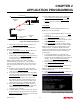

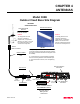
Table Of Contents

CHAPTER 2
APPLICATION PROGRAMMING
Revised: 2 Oct 01 2-5
128bit WEP encryption. If using 40bit WEP
encryption, leave at “False”.
11.
Load the WEP Key values in sections 4-12. Review
all your changes on the screen are correct and select
Return to previous menu (X<Enter>) to return to the
Access Point Configuration Menu.
12.
If all configurations appear correct, press Load
Values and Return to Main Menu (M<Enter>).
13.
Once at the Main Menu, press Save and Apply
Changes (7<Enter>) and Yes (Y<Enter>) to reboot
the ESTeeem.
Ethernet Bridging Configuration
The Ethernet Bridging network allows the Model 192E
modems to provide links between two or more Ethernet
segments on a network. Ethernet segments can be either
single network clients such as computers or PLCs or ties
into building LAN networks such as HUBs or switches.
This type of network can provide tremendous flexibility
in your wireless network configurations and also provide
a much greater range than available through the wireless
card network as described in the Access Point section.
Figure 6 shows an example of an Ethernet Bridging
network.
The Bridging Mode has two possible configurations,
Master Bridge and Client Bridge (Figure 6). A bridging
networks can only have one ESTeem Model 192E
configured as a Master Bridge. A 192E configured as a
Client Bridge can communicate with another 192E
configured as a Client Bridge, but the Ethernet data
MUST be routed through a Master Bridge first. The two
Client Bridge modems do not communicate directly,
therefore all bridge networks must have at least one 192E
configured as the Master Bridge. For example, in a
simple point to point wireless Ethernet network, one
Model 192E will be configured as a Master Bridge and
one will be configured as a Client Bridge.
Master Bridge
To configure the ESTeem Model 192E as a Master
Bridge, please use the following:
1.
From the Configuration Main Menu, select Setup
(1<Enter>).
2.
Select Modes of Operation (1<Enter) to enter the
system configuration menu (Figure 4).
3.
Select Master Bridge (2<Enter>) to open the Master
Bridge configuration menu (Figure 7).
4.
Select Current SSID (1<Enter>) and type in the
SSID information for your bridge network.
Note: The SSID is the unique identification for your
wireless network. All ESTeem Model 192Es in the
bridge network MUST have the same SSID code. This
identification code is case sensitive and must NOT
contain spaces.
5.
Two unique IP addresses are required for the
ESTeem Model 192E in bridging mode. Both the
WLAN port and the 10BaseT port need a unique IP
number (Figure 8). Select Current Wireless IP
Address (2<Enter>) to assign the ESTeem an IP
address.
Note: To gain access to the Model 192E through Telnet
while configured in Bridge Mode, the Wireless IP and
the Ethernet IP address must be on unique Subnets.
Contact your system network administrator for further
information on what IP address should be used in the
subnet.
6.
Select Current Wireless IP Net Mask (3<Enter>) to
change the ESTeem Net Mask.
Figure 7: Master Bridge Configuration
10
BASE-T
192E - Master
Bridge
Ethernet Wired LAN
Master Bridge
Programming
Terminal
HMI Terminal
Remote PLC
Remote PLC
Remote PLC
192E- Client
Bridge
192E- Client
Bridge
192E- Client
Bridge
192E- Client
Bridge
Figure 6: Bridging Mode Diagram