
User's Manual Part 3


8) Replace the 3 Hardware screws.
Shorting plug construction
If fewer than six sensors are used in your application, a shorting plug may be used for
each of the unused M.O.L.E. Profiler channels.
The following items will be needed to construct a Thermocouple:
• Thermocouple assembly, which includes: Thermocouple housing, 3 Hardware
Screws and 2 female pins (one marked with a green dot and one marked with a
white dot).
• A 1" bare copper buss wire. (Maximum wire size 24 gauge).
• Thermocouple crimping tool.
• Phillips (Crosshead) Screwdriver
Construct a shorting plug as follows:
1) Disassemble the Thermocouple housing by unscrewing the 3 Hardware screws.
2) Place one end of the copper wire into the T/C pin with the green dot and the other
end into the T/C pin with the white dot. Now crimp both pins with the T/C crimping
tool
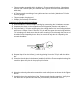
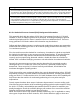
3) Place the female pins in the bottom (smaller) half of the Thermocouple housing. Be
careful to place the pins in the proper pin locations as shown in the Figure below.
4) Carefully place the two halves of the Thermocouple housing together. Verify that
the wire is not pinched and that the pin positions are correct.