WineCooler INSTRUCTION BOOKLET ERC3711WS 818 37 82--00/5 GB
Important Safety Instructions Your new Wine cooler may have other functions compared to your previous one. These warnings are provided in the interests of your safety. Ensure that you understand them all before installing or using the appliance. Your safety is of paramount importance. If you are unsure about any of the meanings or warnings contact the Customer Care Department. Keep the instruction booklet. It will come in handy if you later sell the appliance or give it to somebody else.
Scrapping old cabinets The symbol on the product or on its packaging indicates that this product may not be treated as household waste. Instead it shall be handed over to the applicable collection point for the recycling of electrical and electronic equipment. By ensuring this product is disposed of correctly, you will help prevent potential negativ consequences for the environment and human health, which could otherwise be caused by inappropriate waste handling of this product.
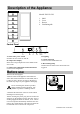
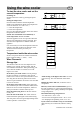
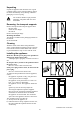
Description of the Appliance Modell ERC3711WS 1 1. 2. 3. 4. 1 1 Shelf Cover Drawer Ventilationgrille 1 1 2 3 4 Control Panel 12 A B C D E F A. Wine cooler power switch Switches the wine cooler on and off. D. Lighting E. Alarm off button Used to turn the audible alarm off. B. Temperature display Shows the average temperature in the middle of the wine cooler. F. Red warning lamp Flashes when the alarm in the cabinet has been triggered. C.
Using the wine cooler GB To start the wine cooler and set the correct temperature Switching on: Switch on the wine cooler by pressing the power switch. Setting the temperature Press the buttons until the desired temperature flashes in the temperature display (The temperature can be set between +6°C and +17°C.) "+" raises the temperature. "-" lowers the temperature. Once set, the temperature display shows the current temperature inside the cabinet.
Measuring the temperature If the temperature is measured using a standard, single thermometer, this should be put in a glass of water centrally placed inside the appliance. This will reflect the temperature inside the food products. Do not place the thermometer hanging or lying directly on the shelf. Switching off Switch off the cabinet by pressing the power switch. Keep the button pressed for approx. 1 second. Power to the cabinet is completely interrupted only when the power plug is disconnected.
washing-up detergent. Normal Operating Sounds · Follow the advice in the section "Saving energy" · The door gasket and coolant used in this · Hand over the cabinet packaging and discarded · fridges and freezers to a recycling station. Contact your local city office or your closest dealer for more information. When cleaning the cabinet, use a mild · · cabinet will not harm the ozone layer. All parts in the packaging can be recycled.
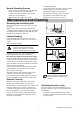
To change the light bulb Before replacing the light bulb, disconnect the power plug from the outlet. Fold the grille backward by unsnapping the front edge. Use a bulb of the same type, E14 socket, maximum rating of 25 W. When the appliance is not in use If the appliance is left on, e.g. while on holiday, ask somebody to check it once in a while to prevent the food inside from spoiling in case of a power failure. Disconnect the appliance from electricity supply.
Service and Spare Parts In the event of your appliance requiring service, or if you wish to purchase spare parts please contact your local Electrolux Service Force Centre by telephoning: 08705-929929 Your call be routed the Service Force Centre covering your post code area. For the address of your local Service Force Centre and further information about Service Force, please visit the website at www.serviceforce.co.
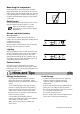
Unpacking Unpack the appliance and check that it is in good condition and free of any transport damage. Notify the dealer immediately of any damage. Hand the packaging over for recycling. Do not allow children to play with the packaging. The plastic film can cause suffocation. Removing the transport supports Remove the tape and the transport supports from · the door sides · inside the door hinges · the shelves Remove the transport hinge.
The appliance must be placed at a location whose ambient temperature corresponds to the climate classification*, for which the appliance is designed. * See on the rating plate on the inside of the appliance. The following table shows which ambient temperature is correct for each climate classification. Climate classification Check that the drain hose at the rear of the appliance discharges into the drip tray.
Electrical connection Any electrical work required to install this appliance should be carried out by a qualified electrician or competent person. This appliance must be earthed. The manufacturer declines any liability should these safety measures not be observed. Electrical Requirements Before switching on, make sure the electricity supply voltage is the same as that indicated on the appliance rating plate. The appliance is supplied with a 13amp plug fitted.
Electrolux 818 37 82-00/5 13
Electrolux 818 37 82-00/5 14
Electrolux 818 37 82-00/5 15
qÜÉ=bäÉÅíêçäìñ=dêçìé=áë=íÜÉ=ïçêäÇDë=ä~êÖÉëí=éêçÇìÅÉê=çÑ=éçïÉêÉÇ=~ééäá~åÅÉë=Ñçê=âáíÅÜÉåI=ÅäÉ~åáåÖ=~åÇ=çìíÇççê=ìëÉK jçêÉ=íÜ~å=RR=ãáääáçå=bäÉÅíêçäìñ=dêçìé=éêçÇìÅíë=EëìÅÜ=~ë=êÉÑêáÖÉê~íçêëI=ÅççâÉêëI=ï~ëÜáåÖ=ã~ÅÜáåÉëI=î~Åììã=ÅäÉ~åÉêëI ÅÜ~áå=ë~ïë=~åÇ=ä~ïå=ãçïÉêëF=~êÉ=ëçäÇ=É~ÅÜ=óÉ~ê=íç=~=î~äìÉ=çÑ=~ééêçñK=rpa=NQ=Äáääáçå=áå=ãçêÉ=íÜ~å=NRM=ÅçìåíêáÉë ~êçìåÇ=íÜÉ=ïçêäÇK MARIESTAD /AV © Electrolux plc 2005