Installation Instructions Built-In Coffee Maker Single Double Espresso Espresso E24CM75GSS E24CM76GSS Single Latté Double Latté Decaf Coffee Large Coffee Hot Cappuccino Water Steamer 102221 Rev.
Before You Begin READ THESE INSTRUCTIONS Note Installer: Leave these instructions with the owner. Owner: Read your Coffee Maker Use and Care Guide completely before use. It contains important safety information for operating this appliance. It also has many suggestions for getting the best results from your coffee maker. Read all instructions before installing the coffee maker. For your safety, please read and observe all safety instructions.
Finding Information Table of Contents Before You Begin....................................................... 2 Finding Information................................................ 3 Important Safety Instructions............4 Safety............................................................................ 5 Preparing for Installation....................................... 7 Planning the Location............................7 Installation................................................................
Safety Important Safety Instructions Safety Precautions Do not attempt to install or operate this appliance until you read the safety precautions in this guide. Safety items throughout this guide are labeled with a Warning or Caution based on the risk type. Definitions This symbol is the safety alert symbol. It is used to alert you to potential personal injury hazards. Obey all safety messages that follow to avoid possible injury or death.
Safety Warning To reduce the risk of fire, electrical shock, or injury when using your coffee maker, follow basic safety precautions including the following: Read all instructions before operating the coffee maker. IMPORTANT: Before performing any type of service or installation, make sure that electric power to the coffee maker is disconnected.
Safety General Safety Precautions (continued) Warning • Do not tamper with the controls. • Clean the coffee maker thoroughly according to the Flushing Out the Coffee Maker section in the use and care guide before operating it for the first time. • When installing or cleaning the mechanical parts of the coffee maker, exercise care with hands and arms around the metal edges. • Many metal surfaces behind the front panel and inside the brewing compartment are hot when power is on.
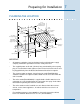
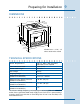
Preparing for Installation Planning the Location 4” X 12” (100mm - 300mm) Ventilation Cut-Out in Cabinet Back 1” Min. (26mm) 24” (610mm) 22 1/8” - 22 3/8” (562mm - 568mm) 3/4” (19mm) Min. Side Walls 20 3/4” (527mm) 3/4” (19mm) Level Support Platform Optimal Water and Electrical Supply Location Steam Barrier (provided) 1/8” (3mm) 17 7/8” (454mm) 22 3/16” (564mm) 3/4” (19mm) Min. Side Walls 8”” (203mm) Screw 8 places (provided) 1” Min.
Preparing for Installation IMPORTANT: • DO NOT install the coffee maker in an unrestrained, free-standing cabinet. • During normal operation, the user must have access to the top of the unit. The user needs to be able to pour coffee into the coffee bins on top and, on model E24CM75GSS, be able to remove the water tank for filling and cleaning. Install the coffee maker low enough so that the user can reach the top of the unit easily when it is slid out of the cabinet.
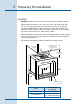
Preparing for Installation Dimensions 22 1/16 (56.0cm) 18 3/16” (44.0cm) 17 9/16” (44.5cm) 18 3/16” (46.2cm) 21 9/16” (54.8cm) 13/16” (2.0cm) 23 1/2” (59.6cm) All tolerances: + 1/16”, - 0” unless otherwise stated.
Installation Before You Start Remove the coffee maker from the packaging and inspect it for damage. Do not install a damaged maker. To prevent damage to the control panel door, do not set the appliance on the floor or counter prior to installation. Check to make sure all parts are included.
Installation Tools Needed for Installation • Phillips screwdriver • Measuring tape • Level • Drill with 1/16” drill bit Steam Barrier Installation • Position the steam barrier inside the top of the cut-out. Push it towards the back wall until the back edge lines up with the back of the cabinet. • Attach it with the eight (8) provided screws.
Installation Plumbing Installation CAUTION To prevent damage to the coffee maker due to hard water, prior to installation check the water hardness for the building where you will be installing the coffee maker. If necessary have a qualified water treatment specialist install a water treatment system. The water treatment system must be installed between the house plumbing and the coffee maker. Determine Water Hardness Before installing the coffee maker, determine the water hardness.
Installation To house water supply To coffee maker Filter head Everpure Filter Cartridge Electrolux ACCFILT-24 Filter Kit with Filter Installed 13
Installation Installing the Cabinet Glides The cabinet glides mount to the inside of the cabinet. The glides on the coffee maker slide into the cabinet glides. The guide system allows the coffee maker to slide in and out of the cabinet for loading the coffee bins and for maintenance. To install the cabinet glides: • Determine the number of metal shims required to mount the cabinet glide assemblies according to the chart and diagrams below.
Installation • Put the two (2) cabinet glide assemblies, and shims if necessary, as shown on the inside surfaces of the cabinet. Position them 3 1/2” (9.0cm) from the front edge of the cutout opening. • Insert the screws in the holes of the glides without tightening them completely. • Make sure the outside distance between the fixing angles is 22 1/8” (56.2cm) and that the glides are level. Change the number of shims or adjust the fixing angles as necessary.
Installation Installing the Unit in the Cabinet • While supporting the coffee maker from below, insert it into the cabinet cutout. As you insert it into the cabinet, line up the glides on the appliance with the cabinet glides. The appliance should glide on the rails when slight pressure is applied to the front of the coffee maker. If it does not glide smoothly, check the distance between the glides again. • As you slide the coffee maker into the cabinet the locking tab on the glides will engage.
Installation Connecting the Plumbing (E24CM76GSS) Warning • To prevent damage to the coffee system due to hard water, prior to installation, check the water hardness for the building where you will be installing the coffee maker. See page 12 • To avoid leaks, do not overtighten fittings. • Insert the 3/4” gasket into the 3/4” fitting on the water supply hose. Make sure it is properly seated. • Connect the 3/4” end of the hose to the water inlet on the back of the coffee maker.
Installation Verifying Operation Warning • Read the use and care guide completely before operation. • To keep the grinder from jamming, pour only roasted, unflavored coffee beans into the coffee bean container. • Plug the coffee maker into the dedicated, properly grounded, 3-prong power receptacle. • Test the lights by turning the light switch on and off. It is located on the brewing compartment ceiling, on the far right. • Turn on the power switch.
Installation Troubleshooting (Continued) 4. Check the Solutions to Common Problems section of the use and care guide. 5. Repeat the verification process. 6. If the appliance still does not work, contact an authorized Electrolux at the phone number inside the front cover. Installation Checklist Warning • To ensure a safe and proper installation, the following checklist should be completed by the installer to ensure that no part of the installation has been overlooked.
® 1-877-4Electrolux www.electroluxusa.com www.electroluxca.