Use & Care Guide Electric Slide-In Range 318 205 836 (1407) Rev.
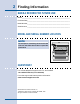
Finding Information Make a Record for Future use Brand_____________________________________________________________ Purchase Date______________________________________________________ Model Number______________________________________________________ Serial Number______________________________________________________ Model and Serial Number Location Note The serial plate is located along the interior side trim of the oven and visible when the door is opened. See picture below.
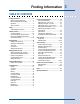
Finding Information Table of Contents Finding Information............................................... 2 Make a Record for Future Use........................... 2 Model and Serial Number Location.................... 2 Questions?.......................................................... 2 Table of Contents................................................ 3 Safety...................................................................... 4 Important Safety Instructions...........................
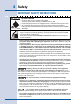
Safety Important Safety Instructions Tip Over Hazard • A child or adult can tip the range and be killed. • Verify the anti-tip device has been installed to floor or wall. • Ensure the anti-tip device is re-engaged to floor or wall when the range is moved. • Do not operate the range without the anti-tip device in place and engaged. • Failure to follow these instructions can result in death or serious burns to children and adults.
Safety • DO NOT TOUCH SURFACE UNITS, AREAS NEAR THESE UNITS, OVEN HEATING ELEMENTS OR INTERIOR SURFACES OF THE OVEN OR WARMER DRAWER (if equipped). Both surface units and oven heating elements may be hot even though they are dark in color. Areas near surface units may become hot enough to cause burns. During and after use, do not touch, or let clothing or other flammable materials touch these areas until they have had sufficient time to cool.
Safety • Never Leave Surface Units Unattended—Boilovers cause smoking and greasy spillovers that may ignite, or a pan that has boiled dry may melt. • Protective liners— Do not use aluminum foil to line oven bottom or any other part of the appliance. Only use aluminum foil as recommended for baking if used as a cover placed on the food. Any other used of protective liners or aluminum foil may result in a risk of electric shock or fire or a short circuit.
Safety IMPORTANT INSTRUCTIONS FOR CLEANING YOUR RANGE • Clean the range regularly to keep all parts free of grease that could catch fire. Exhaust fan ventilation hoods and grease filters should be kept clean. Do not allow grease to accumulate. Greasy deposits in the fan could catch fire. Refer to the hood manufacturer’s instructions for cleaning. • Cleaners/aerosols—Always follow the manufacturer’s recommended directions for use.
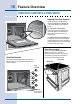
Feature Overview Your Slide-in Range Ceramic glass cooktop Touch glass control panel Large metal handle Curved glass oven door Warmer oven door window glass SINGLE ELEMENT 6” 1200W SINGLE ELEMENT Double ELEMENT 6” 1200W 5” 750W 7” 1800W DOUBLE ELEMENT Double ELEMENT 9” 1800W 12” 3000W 6” 1600W 9” 3000W
Feature Overview Your Slide-in Range Oven Door Latch Oven vent Broiling Element Oven Rack Support slideable Oven racks Convection Fan Oven Light Oven Rack support brackets Warmer oven rack BROILER PAN BROILER PAN Grid Convection Roasting rack 9
Feature Overview Oven rack supports & Oven Vents Installing Oven Rack Supports Always install oven rack support before turning on the oven (when the oven is cool). To install oven rack support, insert the supports by pushing them downward into the two brackets on each side of the oven interior, as shown below. To remove the oven rack support for a self-clean cycle, pull up the support to disengage them from the brackets. If the rack supports are not removed, the self-clean cycle won’t start.
Feature Overview 11 Removing and replacing oven racks Removing Sliding Oven Racks 1. With the rack in its closed position; grasp the rack and the sliders at once. 2. Slightly lift the rack and sliders and pull it to clear the first bracket. 3. Pull the rack and sliders until the second bracket stops the rack. 4. Lift the rack and sliders and carefully remove them from the oven. Refer to the care and cleaning section for directions on how to clean the racks.
Feature Overview Control pad functions 1 2 oven light 11 control lock 12 3 bake my favorite 4 5 6 broil conv bake conv roast lite clean med clean heavy rapid clean preheat 7 conv broil 13 14 15 116 keep warm 8 slow cook 9 10 debread hydrate proof 17 18 1 19 cook time end time conv convert 1 Light Pad- Used to turn the oven light on and off. 2 Bake Pad- Used to enter the normal baking mode temperature. 3 Broil Pad- Used to select the variable broil mode.
Feature Overview Control pad functions (Continued) 20 Upper Oven Pad- Used to activate the upper oven for cooking operation. 20 Warmer Oven Pad- Used to activate the warmer oven for warming operation. 21 User Preference Pad- Used to bring the user preference menu in the display. 22 Timer on-off Pads- Used to set or cancel the minute timer. The minute timer does not start or stop cooking.
Feature Overview Control pad functions 28 hi + ON OFF size med lo - 31 ON OFF size hi + 29 hi + 30 med 32 lo - ON OFF med lo - size ON OFF hi + hi + ON OFF med med lo - lo - 33 28 Burner Size Pad- Used to toggle between the available surface element burner sizes. 29 HI + Pad- Used to select the highest element temperature or raise the temperature currently displayed. 30 MED Pad- Used to select the medium element temperature.
Getting Started Setting clock at power up When the unit is first plugged in, or when the power supply to the range has been interrupted, the timer in the display will flash with "12:00". The clock cannot be set when the oven is on. If an invalid time of day is entered, the control will triple beep to prompt you to re-enter a valid time of day. To set the clock (example for 1:30): + - 1. Press 1 3 0 pads to set the time of day to 1:30.
Getting Started Oven light Your appliance includes "theater" style oven lighting feature that gradually lights both the upper and lower oven interiors to full brightness. The upper oven is equipped with 2 halogen lights and the lower oven is equipped with 1 incandescent light. The oven lights will turn on automatically when the oven door is opened. The oven light may be turned on when the door is closed by using the oven light pad located on the control panel.
Setting Surface Controls About the ceramic glass cooktop The ceramic cooktop has radiant surface elements located below the surface of the glass. The design of the ceramic cooktop outlines the area of the surface element underneath. Make sure the diameter of the pan matches the diameter of the element outline on the cooktop. Heat is transferred up through the surface of the cooktop to the cookware. Only flat-bottom cookware should be used.
Setting Surface Controls Surface cooking utensils GOOD • Flat bottom and straight sides. • Tight fitting lids. • Weight of handle does not tilt pan. Pan is well balanced. • Pan sizes match the amount of food to be prepared and the size of the surface element. • Made of material that conducts heat well. • Easy to clean. • Always match pot diameter to element surface diameter. POOR • Curved and warped pan bottoms. • Pan overhangs unit by more than 2.5 cm (1").
Setting Surface Controls 19 Setting the cooktop The cooktop controls provide display to help set power levels for the cooking zones located on the cooktop. These settings work the same way as traditional knob settings except the settings are made using a touch sensitive panel and show settings using LED style displays. Available cooktop settings Your control control provides different power level settings for each of the cooking or heating zones.
Setting Surface Controls Setting the cooktop (continued) Setting cooktop elements • Touch the ON OFF key to activate the desired heating zone. • If the heating zone has more than one element diameter size available, press the desired element ring size symbol. • Press the desired power level key once (hi+, med or lo-) for quick automatic settings or for more precise level settings use the hi+ or lo- keys. Each press of hi+ will increase or lo- keypad will decrease the power one level at a time.
Setting the Warmer Oven 21 Warmer oven operation To Operate the Warmer Oven The purpose of the warmer oven is to keep hot cooked foods at serving temperature. Always start with hot food. It is not recommended to heat cold food in the warmer drawer. All food placed in the warmer oven should be covered with a lid or aluminum foil to maintain moisture and softness. Do not cover crisp foods. Do not use plastic wrap to cover food. Plastic may melt onto the drawer and be very difficult to clean.
Cooking Modes Baking This mode is best used for your standard recipes. The hidden bake element is used to heat the air and maintain temperature. The upper oven can be programmed to bake at any temperature from 170°F to 550°F with a default temperature of 350°F. The lower oven can be programmed to bake at any temperature from 170°F to 450°F with a default temperature of 350°F. Upper Oven Baking Tips: • Always preheat your oven before using the bake mode.
Cooking Modes 23 Cook time Cook Time allows the oven to be set to cook for a set length of time and shut off automatically. The time remaining will always be shown in the timer section of the display. The oven will shut off and will beep when the countdown is finished. This feature can be used with Bake, Convection Bake, Convection Roast, Slow Cook, Keep Warm, Bread Proof and Dehydrate. To set a timed cooking (example is a 450°F Bake for 30 minutes): 1. Select oven by pressing UPPER OVEN 2.
Cooking Modes Broiling This mode is best for meats, fish and poultry up to 1” thick. Broiling is a method of cooking tender cuts of meat by direct heat under the broil element of the oven. The high heat cooks quickly and gives a rich, brown outer appearance. The oven can be programmed to broil at any temperature from 300°F to 550°F with a default temperature of 550°F. Broiling Tips: • For optimum browning, preheat the broil element for 2 minutes.
Cooking Modes 25 Convection baking This mode of cooking enables you to obtain the best culinary results when baking with multiple pans and racks. Multiple rack baking may slightly increase cook time for some foods but the overall result is time saved. Most foods cooked in a standard oven will cook faster and more evenly with Convection Bake. Convection baking uses the three elements and a fan to circulate the oven’s heat evenly and continuously within the oven.
Cooking Modes Convection convert The Convection Convert pad is used to automatically convert a standard baking recipe for convection baking. When set properly, this feature is designed to display the actual converted (reduced) temperature in the display. Convection Convert may ONLY be used with a Convection Bake cooking mode. It can be used with the features End Time and Cook Time (see their sections for directions).
Cooking Modes 27 Convection roasting This mode is best for cooking tender cuts of beef, lamb, pork and poultry. Use this mode when cooking speed is desired. The Convection Roasting gently browns the exterior and seals in the juices. Convection roasting uses the hidden bake element, the hidden convection element, the broil element and a fan to circulate the oven’s heat evenly and continuously within the oven.
Cooking Modes Convection Broiling Use this mode for thicker cuts of meat, fish and poultry. The Convection Broiling gently browns the exterior and seals in the juices. Convection broiling uses the broil element and a fan to circulate the oven’s heat evenly and continuously within the oven. The oven can be programmed for Convection Broiling at any temperature between 300°F to 550°F with a default temperature of 550°F.
Cooking Modes Keep warm This mode is best for keeping oven baked foods warm for serving after cooking has finished. The Keep Warm feature uses the hidden bake element to maintain the temperature within the oven. The oven can be programmed for Keep Warm at any temperature between 150°F to 190°F with a default temperature of 170°F. Keep Warm Tips for Upper Oven: • Always start with hot food. • Do not use the Keep Warm feature to heat cold food.
Cooking Modes Slow cook This mode may be used to cook foods more slowly, at lower oven temperatures and provide cooking results much the same way as a Slow Cooker or Crock-Pot. The Slow Cook feature is ideal for roasting beef, pork & poultry. Slow Cooking meats may result in the exterior of meats becoming dark but not burnt. This is normal. The Slow Cook mode uses the hidden bake element to maintain a low temperature in the oven. There are 2 settings available, high (HI) or low (LO).
Cooking Modes Dehydrating This mode dries foods with heat from the bake and the convection element. The heat is circulated throughout the oven by the convection fan. Dehydrating is used to dry and/or preserve foods such as fruits, meats, vegetables and herbs. This mode holds an optimum low temperature while circulating the heated air to slowly remove moisture. The oven can be programmed for Dehydrating at any temperature between 100°F to 225°F with a default temperature of 120°F.
Cooking Modes Bread proofing Proofing bread prepares the dough for baking by activating the yeast. This feature is ideal for proofing, or rising bread dough. The oven can be programmed for Bread Proofing at any temperature between 85°F to 100°F with a default temperature of 100°F. The temperature visual display is not available for this function. Bread Proofing Tips: • No need to preheat for this feature. • Proof bread until dough has doubled in bulk.
Electronic Control Settings User preferences The User Preferences menu includes all user defined options. This feature enables you to control the various options of the electronic controls. This menu features the Time of Day, Celsius or Fahrenheit display mode, Continuous Bake or 12 Hour Energy Saving modes, Clock display or No-Clock display, 12 Hours Time of Day or 24 Hours Time of Day, Audio Control, and Adjusting the oven temperature.
Electronic Control Settings User preferences (continued) Setting clock display — on or off The oven control can be programmed to display the time of day or not. The oven has been preset at the factory to display the time of day. Changing clock display between ON and OFF: 1. Press USER PREF - 2. Press lo + or hi 3. Press START until you get to the CLO on menu page. to toggle between displaying or hiding the clock. to accept the changes and go back to user preferences menu display.
Electronic Control Settings User preferences (continued) AUDIO CONTROL The Audio Control feature allows the oven control to be operated without sounds or beeps whenever necessary. If desired the control can be programmed for silent operation and later returned to operating with all the default sounds and beeps. The volume of the beeps can also be adjusted. To change the audio mode or audio volume: 1. Press USER PREF - + until you get to the AUd menu page. 2.
Oven Controls MY favorite The Favorite setting allows you to save your most frequently used or most complex cooking sequences. This feature will save the cooking mode, the target temperature and the cook time (if any). To save a Favorite (example is a 450°F Bake for 30 minutes): - Saving a Favorite can only be done for an oven which is currently in operation. UPPER 1. Select oven by pressing either UPPER OVEN OVEN . 2. Press BAKE . The default temperature will appear in the display. 3.
Oven Controls Sabbath feature (For use on the Jewish sabbath & holidays) - + The HI hi and LO pads are used to set the Sabbath feature. The Sabbath feature may lo only be used with the BAKE pad. The oven temperature may be set higher or lower after setting the Sabbath feature (the oven temperature adjustment feature should be used only during Jewish Holidays), however the display will not visibly show or provide any audible tones indicating whether the change occurred correctly.
Oven Controls Sabbath feature (continued) Note: You may change the oven temperature once baking has started. Press UPPER OVEN UPPER OVEN , BAKE , the numeric key pads for the temperature you want (example for 425°F press 4 , 2 , 5 ) and then press START TWICE (for Jewish Holidays only). Remember that the oven control will no longer beep or display any further changes once the oven is set for the Sabbath feature. 8.
Care & Cleaning 39 Using the self-clean feature Adhere to the Following Cleaning Precautions: • Allow the oven to cool before cleaning. • Wear rubber gloves when cleaning any exterior parts of the oven manually. During the self-cleaning cycle, the outside of the oven can become very hot to the touch. DO NOT leave small children unattended near the appliance. Before cleaning any part of the oven, be sure the oven is turned off or else push CANCEL pad. Wait until the oven is cool.
Care & Cleaning Starting Self-clean cycle A self-cleaning oven cleans itself with high temperatures (well above cooking temperatures) which eliminate soil completely or reduce it to a fine powdered ash you can whisk away with damp cloth. If you are planning to use the oven directly after a self-clean cycle remember to allow time for the oven to cool down and the oven door to unlock. This normally takes about one hour. To set the controls for a Self-Cleaning cycle: 1.
Care & Cleaning 41 General cleaning Cleaning Various Parts of Your appliance Before cleaning any part of the appliance, be sure all controls are turned OFF and the appliance is COOL. Remove spillovers and heavy soiling as soon as possible. Regular cleanings will reduce the number of major cleanings later. Surfaces How to Clean Glass, Painted and Plastic Body Parts and Decorative Trim For general cleaning, use hot, soapy water and a cloth.
Care & Cleaning Care and cleaning of stainless steel Special care and cleaning are required for maintaining the appearance of stainless parts. Please refer to the table provided at the beginning of the General Care & Cleaning section in this Use & Care Manual. To remove and replace oven door 1. Open the door to the fully opened position. 2. Pull up the lock located on each hinge support toward front of range. You may have to apply a little upward pressure on the lock to pull it up. 3.
Care & Cleaning 43 Oven light An interior oven light will turn on automatically when the oven door is opened. The oven light may be turned on when the door is closed by using the oven light switch located on the control panel. The lamp is covered with a glass shield. The glass shield can be remove to be cleaned manually or to change the oven light. THIS GLASS SHIELD MUST BE IN PLACE WHENEVER THE OVEN IS IN USE. To replace the light bulb: CAUTION: BE SURE THE OVEN IS COOL. 1.
General Care & Cleaning cOOKTOP cleaning AND MAINTENANCE Consistent and proper cleaning is essential to maintaining your ceramic glass cooktop Prior to using your cooktop for the first time, apply the recommended Cleaning Creme to the ceramic surface. A sample of that cleaning creme is supplied with your cooktop and it is available in most hardware stores. Clean and buff with a paper towel. This will make cleaning easier when soiled from cooking.
General Care & Cleaning Cleaning recommendations for the ceramic glass cooktop (continued) Caution ! Damage to the ceramic glass cooktop may occur if you use scrub pad. Plastic or foods with a high sugar content: These types of soils must be removed immediately if spilled or melted onto the ceramic cooktop surface. Permanent damage (such as pitting of the cooktop surface) may occur if not removed immediately.
Solutions to Common Problems Baking Problems For best cooking results pre-heat the oven when baking cookies, breads, cakes, pies or pastries, etc. There is no need to preheat the oven for roasting meats or baking casseroles. The cooking times and temperatures needed to bake a product may vary slightly from your previous appliance. Baking Problems and Solutions Chart Baking Problems Causes Solutions Cookies and biscuits burn on the bottom.
Solutions to Common Problems Important Before calling for service, review this list. It may save you both time and expense. This list includes common experiences that are not the result of defective workmanship or material in your cooktop. Oven Control Beeps and Displays an "F" ERROR Code • Electronic control has detected a fault condition. Push CANCEL pad to clear the display and stop the display from beeping. Reprogram the oven.
Solutions to Common Problems Self-cleaning cycle does not work • Make sure the oven door is closed. • Make sure you have removed the oven racks and the oven rack supports from the oven. • Controls not set properly. Follow instructions under “Using the Self-Clean Feature”. Oven smokes Excessively during broiling • Meat too close to the broiler element. Reposition the rack to provide more clearance between the meat and the broiler. Preheat broil element for quick searing operation.
Solutions to Common Problems Surface element does not heat • No power to appliance. Check/reset breaker or replace fuse. If the problem is a circuit overload, or improper connection of the armored cable supplied with the appliance, have this situation corrected by a qualified electrician. • Too low heat setting. Turn control to a slightly higher setting until element comes on. • Incorrect control is on. Be sure to use correct control for the element needed.
Solutions to Common Problems Brown streaks and specks on ceramic glass cooktop surface • Boilovers have cooked onto surface. Use razor blade scraper to remove soil. See instructions under General Care & Cleaning. • Cleaning materials not recommended for ceramic-glass cooktop have been used. Use recommended cleaners and cleaning method. See Ceramic-Glass Cooktop section in this Owner’s Guide. Areas of discoloration on ceramic glass cooktop surface • Mineral deposits from water and food.
Warranty Information 51 Your appliance is covered by a one year limited warranty. For one year from your original date of purchase, Electrolux will repair or replace any parts of this appliance that prove to be defective in materials or workmanship when such appliance is installed, used, and maintained in accordance with the provided instructions.