Installation and User Manual ISLAND COOKER HOOD eiQTMISLANDSLIM
CONTENTS Safety Precautions 2 Introduction 4 Dimensions 4 Unpacking your appliance 4 Product Overview – Parts Supplied 5 Options for Ventilation 6 Standard Installation 7 Installation for Minimum chimney length 9 Carbon Filter 11 Operation 12 Maintenance 13 Troubleshooting 15 Manufacturer Support 15 Environmental protection 15 Specification 16 1
SAFETY PRECAUTIONS Whilst this product complies with all safety requirements, incorrect or inappropriate use can lead to personal injury and potential damage to property. Please read the contents of this instruction booklet thoroughly before fitting or using this cooker hood. ⚫ The cooker hood must be installed in accordance with the installation instructions provided, making sure all measurements and guidance are followed.
⚫ If the supply cord is damaged, it must be replaced by the manufacturer, its service agent, or similarly qualified person in order to avoid an accident. ⚫ We advise this cooker hood should not be used by people (including children) with reduced physical, sensory, or mental capabilities, or by those who lack experience and knowledge, unless they have been given supervision and instruction on how to use the appliance by a person responsible for their safety.
INTRODUCTION Thank you for choosing an electriQ cooker hood. This instruction manual is designed to provide you with all required instructions related to the installation, use and maintenance of the appliance. In order to operate the unit correctly and safely, please read this instruction manual carefully before installation and usage.
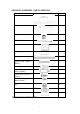
PRODUCT OVERVIEW - PARTS SUPPLIED Description Cooker hood Illustration Qty.
This hood supports both external venting or recirculation. The type of setup should be decided before commencing installation. EXTERNAL VENTING A flexible pipe is provided which allows the cooking odours to be extracted outside. If this is the chosen installation method consideration to the route of the vent pipe should be made. The mounting plate contains a hole allowing the vent pipe to be connected and routed through the ceiling.
STANDARD HEIGHT INSTALLATION Do not connect the hood to the mains supply before installing it. 1. Position the hanging plate on the ceiling and then mark the position of the screw holes with a pencil. Securely fix the hanging plate to the ceiling, using the 11 x ST4 (30 mm) screws. Please ensure that the bracket is fixed in a way it would support the weight of the hood. Depending on the construction of the ceiling, alternative fixings may be required.
5. On the top of the hood unit, where the air outlet vent is located, the 2 x air flaps should be carefully installed, bending very slightly so the lugs at each end fit into the holes This enables the flaps to pivot upwards when the unit is in operation, opening up the outlet fully for the air to pass through. Please note: The small spindles/lugs at each end of each flap fit into the holes on the housing, not the grooves above them: 6.
ALTERNATIVE INSTALLATION FOR MINIMUM CHIMNEY LENGTH Do not connect the hood to the mains supply before installing it. 1. Position the hanging plate on the ceiling and then mark the position of the screw holes with a pencil. Securely fix the hanging plate to the ceiling, using the 11 x ST4 (30 mm) screws. Please ensure that the bracket is fixed in a way it would support the weight of the hood. Depending on the construction of the ceiling, alternative fixings may be required.
5. Securely fix the angle bars to the hood using 16 x M5(10mm) screws, and connect the outlet with the exhaust pipe ( If venting externally) 6. Slide the inner chimney and outer chimney onto the angle bars 7. If externally venting, connect the exhaust pipe to the hanging plate. The angle bar should then be fixed to the hanging plate using the 8 x M5 screws.
CARBON FILTER (Available Separately) Activated carbon filters can be used to trap odours, and must be used if the unit is not vented externally. These are available from the same stockist the hood was purchased from under reference: eIQTMCARBONCURV Carbon CARBON FILTER INSTALLATION In order to install the activated carbon filters, the aluminium grease filter should be removed first.
OPERATION Touch control ON/OFF key Press this key to turn the power on and off. Fan Speed down key While the fan is operating, press this key to decrease the power one level. Digital display The current fan speed is shown on this display screen. Power up key While the fan is operating press this key to increase the power one level. Light key Press once to turn the lights on, press again to turn the lights off.
MAINTENANCE Before cleaning, switch the unit off and pull out the plug, or switch off at the relevant mains switch. If the unit has been hard-wired in. Make sure the unit has no power being fed to it. REGULAR CLEANING Use a soft cloth moistened with hand-warm mildly soapy water or household cleaning detergent. Never use metal pads, chemicals, abrasive material or a stiff brush to clean the unit.
LIGHT BULB REPLACEMENT Your cooker hood is supplied with 4 long life LED light fittings, Although these are designed to have a very long lifespan, should one fail, replacements are available from the supplier of the hood and the guide below can be followed to replace it. 1. Switch the unit off and ensure it is disconnected from the mains supply. 2. Remove aluminium grease filters, to prevent them from falling. 3.
TROUBLESHOOTING Fault Light on, but fan does not work Both light and fan do not work Cause The fan blade is jammed. The motor is damaged. Halogen light bulb blown Power cord loose Solution Switch off the unit. Repair to be carried out by qualified service personnel only. Replace the bulb with correct rating. Plug in to the power supply again. Switch off the unit. Repair to be The fan blade is carried out by qualified service damaged. personnel only. Switch off the unit.
SPECIFICATION The following shows how to reduce total environmental impact (e.g. energy use) of the cooking process). (1) Install the cooker hood in a proper place where there is efficient ventilation. (2) Clean the cooker hood regularly so as not to block the airway. (3) Remember to switch off the cooker hood light after cooking. (4) Remember to switch off the cooker hood after cooking. Information for dismantling Do not dismantle the appliance in a way which is not shown in the user manual.