USER MANUAL electriQ 12,000 BTU PORTABLE AIR CONDITIONER WITH HEAT PUMP AND WIFI ECOSILENT12HPW Thank you for choosing electriQ Please read this user manual before using this innovative Air Conditioner and keep it safe for future reference. Visit our page www.electriQ.co.
CONTENTS SAFETY 2 FEATURES AND PARTS LIST 4 INSTALLATION 5 OPERATION 7 REMOTE CONTROL 8 SMART INDICATOR 8 EMPTYING THE INTERNAL WATER TANK 9 WIFI APP CONTROL 10 SETTING UP THE APP 10 CONNECTING THE AIR CONDITIONER 13 CONTROLLING YOUR DEVICE 15 SMART SCENES 17 CLEANING AND MAINTENANCE 20 TROUBLESHOOTING 21 ERROR CODES 21 SUPPORT 22 TECHNICAL SPECIFICATION 23 1
SAFETY INSTRUCTIONS Important! • Carefully read the instructions before operating the unit • This appliance is for indoor use only. • Rating: This unit must be only connected to a 220-240 V / 50 Hz earthed outlet. • Installation must be in accordance with regulations of the country where the unit is used. • If you are in any doubt about the suitability of your electrical supply have it checked and, if necessary, modified by a qualified electrician. • This air conditioner has been tested and is safe to use.
• R290 refrigerant gas complies with European environmental directives. • R290 has a low GWP (Global Warming Potential) of 3. • The air conditioner contains about 300 g of R290 refrigerant gas. • Do not use or store in an unventilated space with an area smaller than 14.4 m2 per unit.
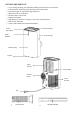
FEATURES AND PARTS LIST • • • • • • • • • 4 in 1 Cooling, Heating, Fan and Dehumidifier great for Rooms up to 20 sqm. 5 speed DC fan: balancing quiet operation with performance. SmartCool Logic for Improved Energy Efficiency. HEPA Filter for Air Purification 24 Hours Start / Stop Timer Digital Thermostat. Auto-Restart to retain the settings in the event of power failure.
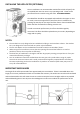
INSTALLATION WARNING: Before using this unit, please keep it upright for at least 3-4 hours. This unit can easily be moved from one room to another. While moving the unit please note that it must always be kept upright and then placed on an even surface. 1. Attach the fishtail connector to the end of the hose, by extending the end and twisting until firmly attached (At least 3 full rotations). 2.
INSTALLING THE HEPA FILTER (OPTIONAL) The air conditioner can accommodate a HEPA filter which will purify the air expelled back into the room in any operating mode. These can be purchased from the stockist using the code: FIL-ECOSILENTHEPA. The HEPA filter should be unwrapped and installed in the upper air inlet. To install, remove the upper filter frame from the air conditioner by pressing the two clips on the top of the filter frame.
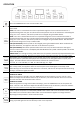
OPERATION Press the POWER button to turn the unit ON or OFF. Press the MODE button to cycle between the 5 modes, the indicator for the selected mode will be illuminated. COOL: The room is cooled with the cold air expelled through the front air outlet while hot air is expelled through the vent pipe. The desired room temperature can be set between 17 and 30 degrees using the + and – buttons, and the fan speed can be changed using the SPEED button.
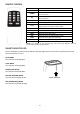
REMOTE CONTROL POWER TIMER Press to turn the unit on or off. Press to set the timer. Press to decrease the desired temperature or DOWN timer duration. Press to increase the desired temperature or UP timer duration. SLEEP Press the sleep button to enter sleep mode. SWING Press swing to turn the swing function on or off. Press to change between displaying the ⁰C/⁰F temperature in Celsius or Fahrenheit. FAN Press to enter fan / air purify mode. COOL Press to enter cool mode. HEAT Press to enter heat mode.
MULTI PROTECTIVE FUNCTIONS FROST PROTECTION In COOL, DRY or SMART COOL modes, if the temperature of the exhaust is too low, the machine will automatically stop operating until the temperature has risen. OVERFLOW PROTECTION When the water in the internal water tank exceeds the warning level, the machine will stop operating and sound an alarm with the LCD display showing “E7”. To resume operation empty the internal water tank.
WIFI SMART CONTROL BEFORE YOU START • • Ensure your router provides a standard 2.4ghz connection. If your router is dual band ensure that both networks have different network names (SSID). The provider of your router / Internet service provider will be able to provide advice specific to your router. • • Place the air conditioner as close as possible to the router during setup.
REGISTER THE APP 1. Press on the register button at the bottom of the screen. 4. A verification code will be sent by the method selected in step 3. Enter the code into the app. 2. Read the Privacy policy and press the Agree Button. 5. Type in the password you would like to create. This needs to be 6-20 characters, with letters and numbers. 11 3. Enter your email address or phone number and press continue to register. 6. The app is now registered.
SETTING UP YOUR HOME WITHIN THE APP TUYA is designed so it can work with a large number of compatible smart devices within your home. It can also be set up to work with multiple devices within different houses. As such during the setup process, the app requires that different areas are created and named to allow easy management of all your devices. When new devices are added, they are assigned to one of the rooms you have created. CREATING ROOMS 1. Press on the ADD HOME button. 2.
CONNECTING USING QUICK CONNECTION Before initiating the connection, make sure the unit is in standby mode, with the WIFI light flashing twice per second. If not follow the instructions for changing the connection mode. Also ensure your phone is connected to the WIFI network. (We advise turning mobile data off during setup) 1. Open the app and press “+” to add device 4. Enter your WIFI password and press confirm. 2. Select the type of device as “Air Conditioner” within the Large Home Appliance tab. 5.
CONNECTING USING AP MODE (ALTERNATIVE METHOD) Before initiating the connection, make sure the unit is in standby mode, with the WIFI light flashing once per second. If not follow the instructions for changing the WIFI connection mode. Also ensure your phone is connected to the WIFI network. (We advise turning mobile data off during setup) 2. Open the app and press “+” to add device 2. Select the type of device as “Air Conditioner” within the Large Home Appliance tab. 3.
CONTROLLING YOUR DEVICE THROUGH THE APP Add Device: Add a device to the app, and go through the setup process. THE HOME SCREEN Voice Control: Use to give verbal instructions to the app. Your Device: Press to enter the device screen. Home: Return to this screen when within the Smart or profile tabs. Profile: Provides the option for changing settings, and adding devices using a QR code provided by a friend.
DEVICE SCREEN The device screen is the main control screen for the air conditioner, providing access to the controls to amend the functions and settings Edit Name: Use to change the name of Back: Returns to the the air conditioner. Home Screen Current Room Temperature: Displays the current room temperature Desired Temperature Down Button: Use to decrease the desired temperature Desired Temperature UP Button: Use to increase the desired temperature.
SMART SCENES Smart Scenes is a powerful tool providing the option to customise the operation of the air conditioner based both on conditions within the room and outside influences. This gives the user the option of specifying much more intelligent actions. These are split into two categories Scene and Automation. SCENE Scene allows for a one touch button to be added to the Home screen. The button can be used to change a number of settings in one go, and can change all the settings within the unit.
AUTOMATION Automation allows an automatic action to be set up for the device. This can be triggered by the Time, indoor temperature, humidity of the room, weather conditions, and a range of other influences. 1. Press on the Smart Scene tab at the bottom of the Home screen 2. Press on the Plus in the top right corner to add a smart scene. 4. Setup is very similar to the scene setup on the previous page, and includes an extra section for specifying a trigger for the scene to start. 3.
PROFILE TAB The profile tab gives you the option to edit both your detail, and use the added features of the unit. CHANGING THE NAME OF YOUR DEVICE When in any of the device screens further settings for the device can be accessed, by pressing on the three dots in the top right hand corner. The top option within this allows you to change the name of the device to something relevant to the use of the product, such as “Living Room Air Conditioner”.
MAINTENANCE AND CLEANING PLEASE TURN OFF THE UNIT AND UNPLUG FROM THE MAINS BEFORE CLEANING OR PERFORMING ANY MAINTENANCE CLEAN THE SURFACE Clean the surface of the machine with a wet soft cloth. Do not use chemicals, such as benzene, alcohol, gasoline, etc; otherwise, as this may cause damage to the surface and or the internal workings of the machine AIR FILTER CLEANING If the filter screen is clogged with dust, the effectiveness of the air conditioner is reduced.
TROUBLESHOOTING Do not repair or disassemble the air conditioning. Unqualified repair will invalidate the warranty and may lead to failure, causing injuries and property damage. Only use it as directed in this user manual and only perform operations advised here. Problems Reasons Solutions Turn it on after connecting it to a socket with electricity. There is no electricity. The air conditioner does not work. The cooling effect is not good The display shows "E7".
APPENDIX Disposal: Do not dispose this product as unsorted municipal waste. Collection of such waste must be handled separately as special treatment is necessary. Recycling facilities are now available for all customers at which you can deposit your old electrical products. Customers will be able to take any old electrical equipment to participating civic amenity sites run by their local councils.
TECHNICAL DATA Model Cooling capacity: Input power: EcoSilent12HPW Cooling 3520 W Heating 3300 W Cooling 1330 W Heating 1230 W Air flow volume: 400m³/h Refrigerant: R290/300g Sound power level: 63dB(A) Thermostat: 17-30oC Maximum working pressure of suction/exhaust side: 1.0/3.5MPa Maximum Allowable Pressure 3.5Mpa Power Supply: AC 220-240V/50Hz Net Weight: 29kg Dimension(L*D*H): 428*365*718mm Unit must be vented outside when in Air Cooling mode.