HomeStation Level 2 Charger INSTALLATION AND OPERATION MANUAL Version 1.0.
ELECTRIFYHOME.
Contents INFORMATION o Copyright o About This Document o Intended Use o Charger – Intended Use o IMPORTANT SAFETY INSTRUCTIONS o EMC Compliance Statement: FCC Part 15 PRODUCT OVERVIEW o Included Component List o Recommended Tools INSTALLATION INSTRUCTIONS o Before Installing o Installation Steps o Installation with Hardwiring OPERATING INSTRUCTIONS CHARGER STATUS o Status Indicator o Indicator Definition o Understanding Status Indicator Patterns o Faults TROUBLESHOOTING SPECIFICAT
Information 1) Copyright Copyright © 2020 Electrify America, All Rights Reserved. This document is copyright protected. It may not be changed, reproduced, or distributed without prior agreement issued in writing by Electrify America. 2) About this Document These operating instructions describe how to operate the charger properly. For your personal safety, follow these operating instructions exactly. Hardwiring must be performed by a certified electrician.
7) The ambient operating temperature range for this device is -22°F (-30°C) to 122°F (50°C). Do not operate the charger outside this operating range. 8) Electrify America is not responsible for physical injury, damage to property or equipment caused by the installation, usage, repair, or maintenance of this product. 9) These operating instructions describe the usage of the charger in most commonly used installation and mounting scenarios.
This equipment has been tested and found to comply with the limits for a Class B digital device, pursuant to part 15 of the FCC Rules. These limits are designed to provide reasonable protection against harmful interference in a residential installation. This equipment generates, uses and can radiate radio frequency energy and, if not installed and used in accordance with the instructions, may cause harmful interference to radio communications.
Product Overview
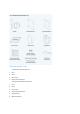
Recommended Tools 1 TOOLS FOR PLUG-IN INSTALLATION 1. Level 2. Pencil 3. Electric Drill 4. Philips-head Screwdriver 2 TOOLS FOR HARDWIRED INSTALLATION 1. Level 2. Pencil 3. Electric Drill 4. Phillips Head Screwdriver 5. Diagonal Cutter 6.
7. 8. Wire Stripper Ferrule Crimping Tool Installation Instructions Before Installing These installation instructions are intended for specialized electricians. Only qualified, specialized electricians should hardwire the charger. In addition to the charger installation instructions, follow all federal, provincial and local laws, regulations, ordinances, codes and safety standards. When considering installation locations, there are a few things to keep in mind: 1.
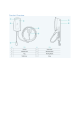
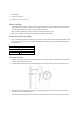
3. Plug-In Installation Note: Prior to mounting the charger, turn off the circuit breaker for the desired outlet and plug in the charger. This will allow for proper placement of the charger. Be sure the plug cord has a gentle curve and is not stretched. 1. When selecting a location to install the charger, make sure that when your electric vehicle is parked, the charge cable can easily connect to the vehicle.
Installation Steps This product must have a proper electrical ground connection. Proper electrical grounding reduces the risk of electric shock. This product is equipped with a power supply cable that includes an equipment grounding conductor. The power supply cable must be plugged into a compatible outlet that is properly installed and grounded in accordance with all local codes and ordinances. WARNING - Improper connection of the power supply cable can result in a risk of electric shock.
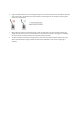
3 PLUG-IN INSTALLATION USING THE ATTACHED SUPPLY POWER PLUG Insert the power plug into the power outlet (NEMA 14-50 receptacle). Amperage Configuration with the Electrify America App 1. Download and install the Electrify America App on your smartphone (available for iOS and Android). 2. Ensure that your phone’s Wi-Fi is turned on. It is not required to be connected to a network. 3. Follow the instructions in the App to connect to your charger and configure your amperage setting.
4) Remove the left strain relief strap from the inside of the body. 5) Pull the wire down through the strain relief nut and remove the strain relief nut from the plug cable. Flip the cosmetic cover upward to separate from the body. Insert the new wire through the conduit, then into the body of the charger. NOTE: The conductor size shall be enough for 6 AWG. During installation be sure to use proper personal protective equipment and do not touch wiring terminals with your fingers 1. 2.
Use this method only if required by local code otherwise use the Electrify America app to set the amperage configuration. The amperage of the charger can be manually set by configuring the dipswitches as shown below. It is always preferable to configure the amperage via the Electrify America App. NOTE: The circuit breaker must be rated for 125% of the chosen operating current. Reattach the Cover 1. 2. 3. Secure the middle cover with the screws removed in the previous steps.
Charger Status If you are experiencing difficulty charging, a fault indicator light, or any other issue using the charger, please see section 7 (Troubleshooting) for assistance. If the issue persists, please contact Electrify America Customer Support at (833) 532-2778. Status Indicator The charger is equipped with an integrated LED ring to allow for clear communication of the charger’s status.
Red, solid Self-test error or general error. Disconnect the charger from power and reconnect to power after 10 seconds to power cycle the charger.
Troubleshooting SITUATION CAUSE ACTION Status indicator does not illuminate. Charger is not receiving power. Ask the certified electrician to check the power input is connected correctly and the power is within operating range of the unit. Disconnect the charger from power and reconnect to power after 10 seconds to power cycle the charger. If the problem persists, contact Customer Support at (833) 532-2778. Indicator does not flash blue after plugging in the vehicle connector.
Specifications Model Measurements H x W x D Cable Length Installation Type Weight Enclosure Rating Input Power AC Plug-In Cord Max. Current Rating Output Power Power Metering Charge Connector Charging Protocol Vehicle to Grid Protocol User Interface/HMI Wireless Communication Protocol AC Fault Monitor Short Circuit/ Overload Protection Plug and Charge Vehicle Communication Certifications Operating Temperature Storage Temperature Humidity HomeStation, EA2R040JPA10-00 15.75" x 8.66" x 6.75" approx.
Moving, Transportation and Storage WARNING: Improper moving or storage of this device may result in a risk of fire of electric shock. Do not lift or carry the charger by the cords. Do not allow the connector cable to drag or touch the ground when moving the charger. This device should be stored in a dry location between -40°F and 176°F. Cleaning The charger may only be cleaned with water; the use of lukewarm water is recommended. Do not use cleaning agents containing solvents.