Swimming Pool Heat Pump Owner’s Installation & Operations Manual 5005001B Version 2.
Page 2 TABLE OF CONTENTS Introduction 3 Installation 5 Location 5 Wind Tie Down 5 Water Plumbing 6 Electrical Hook Up 6 Bonding 7 Water Chemistry Maintenance 8 Heat Pump Features 9 Heat Pump Operation 10 Control On/Off 10 Pool/Spa Modes 10 Changing Set Point Temperature 11 Heater Running Time 11 Keypad Lockout 11 Defrost Cycle 11 Condensate Draining 11 Care & Maintenance 12 Cleaning 12 Winterising 12 Troubleshooting 13 Service 15
Page 3 INTRODUCTION Congratulations on purchasing the most advanced high efficiency, microprocessor-controlled pool and spa heat pump available. Your heater has been manufactured with the most state-of-the-art quality control equipment available today to ensure the highest quality product delivered to your door. A heat pump pool heater is a highly efficient, cost effective method of pool heating. Proper operation and care will result in many years of swimming enjoyment and pleasure.
Page 4 Please be sure to complete and mail in the Warranty Registration Card that is provided in the package with your heater. This card helps us to notify you about new information on your heater. Also, please take a moment and jot down the following information.
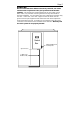
Page 5 INSTALLATION LOCATION The unit is designed for outdoor installation and shall not be placed in a totally enclosed area such as a shed or a garage unless ventilation is provided to ensure adequate air exchange for proper operation. Recirculation of cold discharge air back into the evaporator coil will greatly reduce heating capacity and efficiency of the unit and void the compressor warranty.
Page 6 WATER PLUMBING The piping sequence: pool pump / filter / heater / Chlorinator / Pool. In-line chlorinators must be down stream of the heater to minimize harm to the pool equipment. Rigid PVC piping is recommended and all joints should be secured with PVC glue. Make sure that the direction of the water flow through the heater is correct as indicated by the labels on the unit. When the piping installation is complete, operate the pool pump and check the system for leaks.
Page 7 BONDING Because all metals have different electrical potentials, ALL metal and electrical components of the pool system must be bonded together. This includes the metal framework of the pool, lights, pump, filter, heater, any automatic chlorine generator and any other metal or electrical equipment. On some older pools, this substructure bond wire may not exist. In this case, a 6 to 8 ft.
Page 8 WATER CHEMISTRY MAINTENANCE Not only is the water chemistry of your pool or spa important to the health of you and your family, it also directly affects the life of your heater. This is the most important item in the maintenance of the heater. If the water chemistry is improperly maintained or if the chemicals are improperly introduced into the water, this will damage the heater’s internal heat exchanger and could eventually cause a leak, rendering the heater inoperable.
Page 9 HEAT PUMP FEATURES CABINET – Your heat pump’s cabinet is made from a maintenance-free, rust-free plastic that is UV resistant. It will last for years and any dirt or dust may simply be wiped away with a cloth or sprayed off with a water hose. The use of a product such as Armor- All will restore its natural luster. DO NOT USE CLEANERS THAT CONTAIN ALCOHOL. CONTROL – State-of-the-art LCD readout control. Displays mode and temperature of the water for ease of operation. No programming to learn.
Page 10 HEAT PUMP OPERATION CONTROL ON/OFF When the unit is powered up, but in the OFF mode, the display will show “OFF”. To turn the unit on, press the Up arrow button until desired temperature is reached. To turn the unit off press and hold the Down arrow button until the display shows off. This point will be one level below 50 degrees. This is convenient for shutting the unit down for short periods of time. CAUTION: When the control is in the “OFF” mode, there is still high voltage to the unit.
Page 11 CHANGING SET POINT TEMPERATURE To change the set point temperature, press either the Up or Down arrow buttons on the control. The display will then show “POOL TEMPERATURE” on the top line and the current set point temperature in numbers on the bottom line.
Page 12 CARE & MAINTENANCE CLEANING There is not much maintenance that needs to be done on your heater. Making sure there is good airflow through the evaporator and proper drainage are the two main tasks. A garden hose with low-pressure water flow can be used to clean the evaporator coil. Keep all shrubs trimmed back away from the unit to allow sufficient airflow. CAUTION: Make sure all power is disconnected to the heater prior to washing. Clean the coil as needed.
Page 13 TROUBLESHOOTING A simple test to verify that your heater is functioning is to place your hand above the unit. There should be cool air blowing out the top after time delay has expired. The return water to the pool should be a few degrees warmer than water entering the heater. After about 15 minutes of run time, there should be water draining out of the base of the unit.
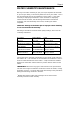
Page 14 Control Displays "HIGH REFRIGERANT PRESSURE" Control Displays "HP3 Water Lockout” Control Displays "HIGH WATER TEMPERATURE" Control Displays "EVAP SENSOR MALFUNCTION" Control Displays "WATER SENSOR MALFUNCTION" Pool is heating slowly or not getting up to temperature. Water flow restriction, valve is turned restricting flow. Water flow restriction, valve is turned restricting flow. Clean pump and filter. Adjust water valves. If problem persists, call factory for service. Clean pump and filter.
Page 15 SERVICE All service must be handled by an Authorised Service Center. Warranty may be void if a non-authorized service representative does service. Do not return the heater to your dealer, as they do not provide service. Before calling for assistance or service, please check the Troubleshooting section of this manual or call your dealer. This may save you the cost of a service call. If you still need help, follow the instructions below.