
Service Manual


MM-E 2072-09333-00
3-23
3-6.1.2.2 Replacing the Backup Battery
The backup battery is fastened by a clamp to the top of the LORD module, and its harness connects to
connector J4 on the module. Before starting, pay attention to the orientation of the battery.
1. Disconnect the battery harness from connector J4 of the LORD module.
2. Release the screw fastening the battery clamp, and then remove the battery.
3. Place the replacement battery in position, in accordance with its original orientation, and then
fasten it with the clamp removed in step 2 above.
4. Reconnect the battery harness to connector J4 on the LORD module.
3-6.1.2.3 Replacing the GPS Receiver
The GPS receiver is attached to the LORD shield by a pad, and connects by a flat cable to connector
J8 on the LORD module. Before starting, pay attention to the orientation of the GPS receiver on the
LORD shield.
1. Release the flat cable connected to the GPS receiver.
2. Pull the GPS receiver case, to separate it from the attachment pad on the LORD shield.
3. Place the replacement GPS receiver in the correct position on the shield, and press its case to
attach it to the shield.
4. Reconnect the flat cable from the LORD module to the GPS receiver.
3-6.1.2.4 Replacing the LORD Module
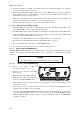
Refer to Figure 3-14.
Shield Screws
Heatsink Screws
Shield
Upper RFI Contacts
Lower RFI Contacts
LORD Module
LORD Base
Spread heatsink compound on these surfaces
Figure 3-14. Removal of LORD Module
1. Disconnect the battery harness from connector J4 of the LORD module.
2. Release the eight screws that fasten the shield. Keep screws and washers for reuse.
3. Remove the shield and upper RFI contacts.
4. Release the two heatsink screws. Keep screws and washers for reuse.
5. Pull the LORD module straight up, and remove it.