
Instruction manual


Help Menu will bring up a dialog box that includes the existing version number of the software.
Zoom drop down menu can be used to move from 20% to 100% within the work grid.
Help Menu:
4. Customizing Work Grid and Device Setup
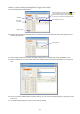
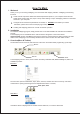
Directly click ''X-Mapping'' icon to get started, and the X-Mapping main setup dialog will show as following
for you.
4.1. Before building a pixel map, it is advisable to check how many pixels all devices will occupy when placed
to customize Work Grid. The Work Grid is large grey area to built a pixel map. The Width is horizontal pixel,
the Height is vertical pixel. And entering the Width and Height values are to customize Work Grid size,
respectively.
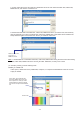
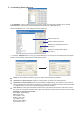
4.2. In this option, there are several optional features: , and .
To add a new device, simply follow these step;
1) Click the "Add Node" icon.
2) Enter Device Name, Output Port Number and Channel Number.
3) Click the "Save Node" icon to save the existing setting.
Node used Select Node Add New Node
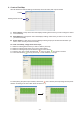
NOTE: the Width is an integer number from 1 to 800, the Height is an integer number from 1 to 600.
-16-
Work Grid
Node Used features to
enter a value of the nodes
quantity which is possible
to be used as needed.
(If you just want to use four
E-NODE 8, you MUST
enter "4" in the blank.)
Select Node is a drop down
menu that selects a desired.
The existing selected node
information will display in the
"Add New Node" option.
Add New Node is an option that is
used to add new node as needed,
respectively entering its name, total
output ports and total channels per
port.
*
For conveniently working, all nodes
have been added and set up by
default.
NOTE: