
Instruction manual


1. Welcome!
2. Installation
Create a mock map which defines the relationship between pixels on your computer screen and the
actual device panels, bars, dots, chips or strips. After creating a map in X-Mapping, allows it to download
and store in your computer.
Configure the Art-net devices parameters as needed, i.e. from Elation (For further
information, please refer to their accompanying manual).
Creating LED mapping patterns for use with X-software operation.
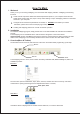
E-NODE 8
Thank you for your choosing X-Mapping of an innovative LED mapping software. X-Mapping has following
functions:
To install the X-Mapping program, simply double-click on the ''SETUP.EXE'' file and follow its installation
process.
The X-Mapping can be uninstalled via the ''Add or Remove Programs'' in the Control Panel.
All files ''LED Mapping Document'' which are created newly are ONLY located in the main
folder for the X-Mapping to work correctly. NEVER remove these new files from their folder location.
Important Note:
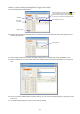
The File menu options included New, Open, Save, Save As, and Exit. The three commonly used menu
commands for opening and saving files are duplicated as buttons in tool bar;
The X-Mapping has four menus, three of which are always available: , and , but, Edit is not
available at present.
File View Help
View Menu allows to display/hide the Toolbar and the Status bar, or move the Work Grid.
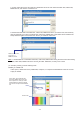
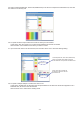
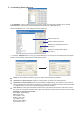
3. Overview(Menu & Toolbar)
The illustration below shows the main features of the menu and toolbar while programming a pixel map.
File Menu:
View Menu:
Menus
Tool bar
Zoom
New Open Save,,
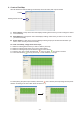
How To Map!
-15-