
- VIA!DJ_USERSGUIDE_REVB
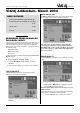


To record from the line-in connectors:
Once you have created a new session the Line-In Record
screen allows you to begin the recording process:
If your Line-in Source is the Analog Input, you will need to
set the recording Gain to an appropriate level. To achieve the
best quality recording try to play the loudest passage from the
music you are going to record and set the gain such that the
loudest peaks are in the yellow region of the signal level
meters. The Peak Level dB indicator shows the maximum
level reached so far.
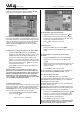
To adjust the recording gain setting for the Analog Input:
• Highlight the Gain (dB) option and press
✔Select
• Highlight the gain adjust option you wish to use. Left and
Right channel gain can be adjusted independently, or
select Level to adjust both channels simultaneously.
• Use the < or > keys to adjust the gain setting to ensure
that the loudest peaks in volume are in the yellow region
of the signal level meters. Press Clear at any time to
reset the peak level marker.
• Press
✔OK to confirm your settings and return to the
Line-In Record screen.
Note: If you have selected either the coaxial or optical
digital input as your line-in source the gain setting may
not be altered. The signal indicator in this case will show
whether a valid digital connection has been made. If the
signal indicator shows ‘protected’ the current digital
source has been copy protected and may not be recorded
onto your VIA!dj using the digital inputs.
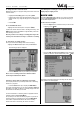
To edit the album details:
All the recordings made in this line-in recording session will be
placed in a new album. This album is automatically assigned a
name such as Album 4, Artist 7; it will also be placed in the
Unclassifiable genre. You can edit these details at any stage
in the recording session as follows on the next page:
• From the Line-In Record screen highlight the Album
option and press Edit.
(See screen in the next column)
To edit the album name and artist name:
• Highlight the item you want to edit and press Edit.
• Edit the album name and artist name using the alpha
numeric keys on your VIA!dj remote control or by using
the text grid on the VIA!dj front panel.
• Press OK to confirm the new name.
To edit the genre:
• Highlight the Genre option and press Edit.
• Select a genre, then press
✔Select key to confirm your
choice.
To edit the names of any tracks you have already
recorded:
• Highlight the Edit tracks option and press
✔Select.
• Highlight the track name you wish to edit and press
Edit.
• Edit the track name using the alphanumeric keys on your
VIA!dj remote control or by using the text grid on the
VIA!dj front panel.
• Press
✔OK to confirm the new name.
For more information on entering and editing names see the
chapter called Entering and Editing names, p.23-24.
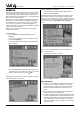
To begin recording a new track:
• From the Line-In Record screen, press Start.
At any time while the Line-In Record screen is visible you can
press II Pause to pause the recording. You can resume the
recording again by pressing Start.
Recording will begin immediately; the track will automatically
be named “Session Track 1”.
Each recording session is limited to a maximum duration; the
[Remaining] indicator shows how much time remains for this
session. To change the maximum recording duration:
• Highlight the Time [Remaining] option and press Edit.
• Use the < or > keys to increase or decrease the dura-
tion. The amount of recording time available at the cur-
rent quality setting is displayed above.
• Press
✔OK to confirm the new setting.
Note: the maximum recording length for a single track is approxi-
mately 3 hours. If this duration is exceeded a new track will be
created automatically and recording will continue.
ELAN HOME SYSTEMS
USER GUIDE
Page 32 © ELAN Home Systems 2004 • All rights reserved. 02/04