INSTALLATION & OPERATING MANUAL Access system with finger scan
Index of contents SCOPE OF SUPPLY ..............................................................3 DEVICE OVERVIEW.............................................................4 INSTALLATION ...................................................................5 OPERATION ........................................................................8 POSSIBLE PROBLEM AREAS AND SOLUTIONS...................12 TECHNICAL DATA .............................................................13 FURTHER INFORMATION ............
Scope of supply 1. Scope of supply • • • • • • • • • Outside unit (“OU”) Mounting plate for inside and outside unit Inside unit (“IU”) 4 screws and pins for outside unit External power supply User list Warranty card Installation – and operating manual Quick user guide Mounting plate IU Mounting plate OU Inside unit Power supply Screws and pins Warranty card Quick user guide 1.
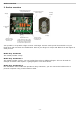
Device overview 2. Device overview serial interface (only for ekey TOCAhome pc display connecting clamp for power supply marking arrows 4 operation keys sensor status display clamp 1 and 2 (connection with outside unit) ekey TOCA home comes with one relay, ekey TOCAhome 3 and TOCAhome pc with three relays in order to connect door openers etc. clamp 3 and 4 (connection with outside unit) Your product is set up with a finger scanner.
Installation 3. Installation 3.1. Wall fastening of outside unit Install the Mounting plate (as shown in the directly on the wall. The ideal installation approximately 135 cm / 52 inches (upper fingerprint reader is ergonomically positioned for finger surface as it is being swiped. 180 cm 135 cm The unit can be mounted to a standard electrical mounting set“ accessory. The mounting holes assemblage on a standard electrical outlet you can work with pins or wooden screws or the wall.
Installation 3.4.
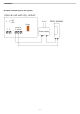
Installation Example: Connecting to a door opener Internal unit with dry contact C NC NO 110 V~ Relay Channel1 1 2 C NO NC Power supply -7- Door opener
Operation 4. Operation 4.1. Using the operation keys of inside unit Programming is carried out by the usage of 4 keys: Å Æ OK ESC ESC Å Æ OK OK serves to enter the menu and to confirm your input. Å and Æ serves to change the values in the display and respectively for navigation respectively as shown in the illustration of programming menu in chapter 4.3. ESC serves to cancel the current selection.
Operation 4.3. Programming menu . (blinking) Normal operation Control keys for the internal unit 00 ... 99 Enter the security code Enter the left number of your security code followed by the OK key. Enter the right number of the security code. The initial standard code is 99. Press OK. Should you key in the wrong code 3 times, the system will be locked for 30 mins. Eu enroll user This menupoint is used to enroll fingers in the system.
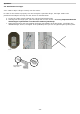
Operation 4.4. Enrolment of a finger 4.4.1. How to swipe a finger correctly over the sensor In order for the reader to properly scan and recognize a particular finger, the finger needs to be positioned and swiped correctly over the sensor as outlined below: a. Locate the reader sensor between the 2 green illuminated arrows. b. Starting from the finger joint, place the finger flat over the sensor. It is very important that the whole finger is placed flat over the senor and not just the tip. c.
Operation 4.4.2. How to Enrolment of a finger 1. Press the OK key in the inside unit. 2. By using the keys Å and Æ enter the left number of the security code (standard setting is 9) 3. Press OK 4. By using the keys Å and Æ enter the right number of the security code (standard setting is 9) 5. Press OK 6. In the display „Eu“ (enrol user) is illuminated 7. Press OK 8. The display shows “1“. A flashing dot next to the number signals that this user number is already in use. Example: “1.
Possible problem areas and solutions 5. Possible problem areas and their solutions Problem Reason Solution The enrolment of a finger is not successful The finger has not been drawn consistently starting from the finger joint over the senor. The finger has been drawn too soft or too strongly over the sensor. The finger has been drawn too fast or too slowly over the sensor. Draw the finger consistently over the sensor. Draw the finger gently, but not too softly over the finger.
Technical data 6. Technical data • • • • • Connections o Connection between inside and outside unit o 1x (3x version TOCAaccess light+) relay 250V~ 5A o 9VAC with supplied external adaptor Memory o 99 fingers possible o No loss of data after power failure Security o Coupling between inside and outside unit o Extremely low rate of false identification power consumption o max.
Further information Please find further information on our homepage www.ekey.net. There you can find up-to-date hints and FAQ’s.
Notes 7.
Copyright by ekey biometric systems, subject to changes, errors excepted. No responsibility is accepted for the correctness of the information given. ekey biometric systems GmbH & Co KG Lunzerstraße 64 A-4030 Linz www.ekey.