ekey home en Operating instructiOns 01
English Translation of the original instructions – ID132/221/0/140 Table of contents General ......................................................................................... 2 Note ......................................................................................... 2 Product liability and limitation of liability ........................................ 2 Warranty and manufacturer's warranty .......................................... 2 Notices, symbols and abbreviations .......................
General ekey biometric systems GmbH operates a quality management system in compliance with EN ISO 9001:2008 and is certified accordingly. Note This manual forms a component of the product. Ensure that it is stored in a safe place. Please contact your dealer for further information about the product. Product liability and limitation of liability Safe operation and function of the machine can be impaired in the following situations.
Symbols: 1. Step-by-step instructions Reference to sections of this manual Reference to the mounting instructions Reference to the wiring diagram □ Listing without specified order, 1. level ekey home FS UP Product names Abbreviations: AP Wall-mounted FAR False Acceptance Rate FRR False Rejection Rate FS Finger scanner IN integra SE Control panel UP Outlet-mounted Safety information DANGER All ekey home devices are to be operated with safety extra-low voltage (SELV).
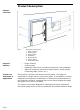
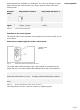
Product description System overview Fig. 1: Overview of the system 1 2 3 4 5 6 7 Scope of delivery Proper use and areas of application □ □ □ □ Finger scanner Power supply Control panel Distributor Motorised lock Cable transfer Connecting cable Finger scanner; Control panel; Operating instructions, mounting instructions, wiring diagram; Optional: matching accessories (cable transfer, power supply, connecting cable, covers, etc.). This product is a finger scan access control system.
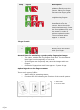
Function of the finger scanner Finger scanner 1 Front phalanx 2 Fingerprint Fig. 2: Fingerprint The finger scanner detects the fingerprint by means of a line sensor and subsequently processes it. It then compares the result with the stored fingerprint image. The finger scanner only works correctly and reliably with the front phalanx print. Draw your finger steadily and evenly over the sensor in the correct position.
Step Figure Description 2. Place the joint of the front phalanx directly onto the sensor. Place your finger flat onto the finger guide. 3. Stretch out the neighbouring fingers. 4. Move your finger evenly downwards over the sensor. Move the whole hand simultaneously. Draw the front phalanx fully over the sensor in order to achieve optimal results. The movement takes approx. 1 second. 'Finger Touch': Step Figure Description Briefly touch the sensor with your finger. 1.
Control panels are available in 2 makeups. You can only operate a single finger scanner per control panel. Any finger scanner works with every control panel. Product name ekey home CP mini 1 ekey home CP micro 1 Top hat rail mounting 1 relay, 1 input Integration into doors 1 relay. Control panels Figure Mounting types Table 2: Control panel makeups Function of the control panel The control panel is the actuator of the system. It serves to switch one or more relays.
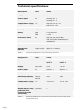
Technical specifications Description Unit Value Supply VAC/VDC 8-24 Power input W Heating off: 1 Heating on: 3 Temperature range °C WM, IN:-25 to +70 OM:-20 to +70 Memory Fingerprints 99 Safety FAR FRR 1:10,000,000 1:100 Protection class IP WM, IN: 54 (front side) OM: 33/43/64 (depending on installation) Speed s 1-4 Operational lifetime Finger scans approx.
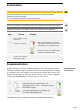
Installation ATTENTION Mount and cable the product correctly before connecting power. Possible property damage! Do not connect the power supply beforehand! Mount the system in accordance with the supplied mounting instructions. Cable the system in accordance with the supplied wiring diagram. Step Action Display 1. Ensure safe installation of the devices. Close the covers. - 2. Connect the power supply to the mains.
Storing administrator fingers and configuring normal mode You must store 4 administrator fingers. You cannot use administrator fingers as user fingers. Use fingers that are not intended to be used for opening doors as administrator fingers. We recommend storing 2 fingers of 2 different people for this purpose. Step Action Description Display Draw administrator finger 1 over the sensor in order to record it. 1. Status LED lights up green, the function LED lights up green. Status LED lights up red.
Step Action Description Display Draw the user finger over the sensor. 3. Status LED and function LED light up green. Status LED lights up red. The user finger was not accepted. Repeat the procedure beginning at step 1. 4. No action required. - - - Status LED lights up blue. The user finger was stored. The system is in normal mode. Use The primary purpose the product is to open doors. The system is in normal mode. Step Action Description Display Draw a stored user finger over the sensor.
Step Action Description Display Draw any administrator the finger over the sensor. 1. Status LED lights up blue, the function LEDs flash green. Status LED lights up red. The administrator finger was not recognised. Repeat step 1. - - 2. Wait for 5 seconds. Status LED lights up blue, the function LEDs flash red/green. 3. Carry out a 'finger touch' on the sensor. Status LED lights up blue, the function LEDs flash left red, right green. 4. Draw the user finger to be deleted over the sensor.
Step Action Description Display right green. 4. 5. No action required. 6. 7. No action required. Draw the same administrator finger over the sensor as in step 1. Status LED flashes red, the function LEDs flash green. - Status LED lights up blue. Draw any user finger over the sensor in order to verify. No finger should now be able to gain access. Status LED lights up red. - Status LED lights up blue. All user fingers were deleted. The system is in normal mode.
Step Action Description Display in step 2. 5. 6. No action required. Wait for 5 seconds. Status LED lights up orange, the function LEDs flash green. - The upper status LED flashes green. The finger scanner has been reset to its default settings. You can now recommission the system. Via the control panel Resetting to the default settings is only possible with the ekey home CP mini 1 and is initiated via the control panel. This can only be undertaken for the ekey home CP micro 1 at the factory.
equipment in suitable packaging. Improper packaging can lead to the warranty being voided. Maintenance The system is largely maintenance-free. The sensor surface is essentially self-cleaning due to repeated use (swiping of fingers). However, if the finger scanner becomes soiled, clean it with a damp (not wet), nonabrasive cloth. Use clean water without adding detergent. Treat the sensor surface with care.
austria ekey biometric systems GmbH Lunzerstraße 89, A-4030 Linz Tel.: +43 732 890 500 2500 office@ekey.net germany ekey biometric systems Deutschland GmbH Liebigstraße 18, D-61130 Nidderau Tel.: +49 6187 906 960 deutschland@ekey.net switzerland & Liechtenstein ekey biometric systems Est. Landstrasse 79, FL-9490 Vaduz Tel.: +41 71 560 54 80 office@ekey.ch eastern adriatic region ekey biometric systems d.o.o. Vodovodna cesta 99, SLO-1000 Ljubljana Tel.: +386 1 530 94 89 info@ekey.