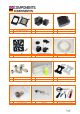
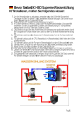
EN CPU Water Block with AMD plate EN Pump EN Radiator D CPU Wasserkühler mit AMD Montagehalterung D Pumpe D Radiator EN Fan EN Standalone/Combo Reservoir EN Tube D Lüfter D Ausgleichsbehälter/AGB-Pumpenaufsatz D Schlauch EN Fittings EN Water additive and Distilled water EN CPU Backplate D Anschlüsse D Wasserzusatz und destilliertes Wasser D CPU Backplate EN CPU mounting mechanism EN Thermal compound - grease EN Needed hardware for installation D CPU-Kühler Montagem
- - - -
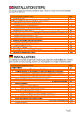
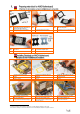
AMD Mounting plate Intel Mounting plate Allen key EN D Anleitung gilt für Kühler mit wechselbarer Montagehalterung EN D EN Screw back all 4 screws. Do not use high force! EN D Die vier M4-Schrauben wieder einschrauben. D EN D EN D 1 If you have water block with changeable mounting plate take the allen key and take next step. Unscrew stock retention plate screws Die Schrauben an der vorhandenen Halterung entfernen.
EN D For Intel LGA 1155/1156 socket use all parts Benötigte Teile für die Installation. EN D EN Place PVC washer, metal washer and M4 nut on CPU mounting screw EN D Von der Vorderseite Plastik-Unterlegscheiben, Metall-Unterlegscheiben und Muttern an den Schrauben anbringen. D EN For Intel LGA 1366 socket use only metal backplate and POM standoffs EN D Für Sockel 1366-Mainboards wird nur die Metallene Backplate, zusammen mit den Abstandhaltern benötigt.
EN D EN D EN D EN D Apply thermal grease in cross pattern (stands for all CPU sockets) Wärmeleitpaste auf der CPU verteilen. EN Peel off protective label from the base of the CPU block EN Place CPU water block and place 4 springs and 4 Thumb nuts D Schutzfolie von der Unterseite des Kühlers entfernen. D CPU-Kühler auf der CPU platzieren und Unterlegscheiben, Federn und Rändelmuttern auf den Schrauben anbringen.
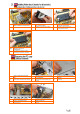
EN D EN D 2 Place 2 screws, hold them with one hand and prepare 120mm fan Zwei Schrauben von Hand fixieren. Align mounting screws with threads in radiator and screw in the screws Nun die Schrauben mit einem Schraubenzieher fest-ziehen. EN D While holding the screws install 120mm fan Lüfter von vorne über die Schrauben schieben. EN D EN Screw in all 4 screws to fasten the radiator with fan EN D Die restlichen beiden Schrauben ebenfalls fixieren.
EN To mount the radiator on the back of the case use EK-UNI RAD Holder EN D Wie im vorigen Beispiel den EK-RAD Holder für die Installation verwenden. D EN EN Place the o-ring (gasket) into the channel EN O-Ring in der vorgesehenen Aussparung platzieren. D D Die vier Schrauben von der Vorderseite der Pumpe entfernen.
EN Install the Pump mounting plate so it sticks on to the one mounting screw. EN D Halterungsplatte an der Unterseite anbringen, und mit der Schraube ausrichten. D EN D EN D EN D Install mounting bracket from the pump delivery. Pumpen-Halterungsteil an der Rückseite anbringen. Alternatively follow the encased instruction manual for EK-DCP mounting plate KIT Alternativ folgen Sie die beiligende Bedienungsanleitung für EK-DCP Montageplatte KIT. Schraube an der gegenüberliegenden Seite anbringen.
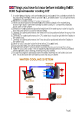
EN If you don’t have the right place to install reservoir, you can use EK-UNI Holders 50/70. EN D Wenn nicht genügend Platz für die Installation eines AGB vorhanden ist, sind die EK-UNI Halterungen eine optimale Lösung. D EN D EN D EN D 4 5 Examine the water loop diagram Schauen Sie sich die Wasserkreislaufskitze an. Install the tube on fitting Überwurfmutter über den Schlauch schieben und den Schlauch auf der Anschlusstülle anbringen.
EN D EN D Take the cabled with adaptors from the pump delivery. Kabeladapter aus dem Lieferumfang verwenden. Take a short piece of a cable or cut a raw, uncoated paper clip Ein kurzes Stück Kabel oder eine Büroklammer verwenden, um den 24-Pin Stecker des Netzteiles zu überbrücken. EN D Connect pumps Male 3-PIN connector to Female Connector of the cable. Den 3-Pin Anschluss der Pumpe mit dem entsprechenden Anschluss des Adapters verbinden.
EN Close the reservoir combo EN Shake and tip the PC case to remove air caught in the radiator. You may need to refill the liquid. EN Leave your PC case for 24 hour leak test, to ensure the system is leak free to avoid liquid spill over running PC hardware. Nun sollte die Pumpe 24 Stunden betrieben werden, um sicher zu stellen, dass der Kreislauf komplett dicht ist. D Deckel wieder auf dem Ausgleichsbehälter aufschrauben.