GETTING STARTED Interwrite Mobi™ for Windows and the Mac
We at eInstructionTM are proud of our family of Interwrite products. We strive to continue to bring you the best the technology has to offer. We urge you to visit our Web site, where we will post the latest information regarding any updates and changes we have made that would impact the instructions in this Getting Started document. www.eInstruction.com Click on any of the Interwrite products to access product information, software downloads, documentation, and training information.
Table of Contents Interwrite Mobi 1 About This Guide 1 Product Overview 1 Installation Overview 2 Setting Up Your Interwrite Mobi 3 Charging the Interwrite Mobi and Interactive Pen 4 Attaching the Tether to the Tablet and the Pen 4 The Electronic Interactive Pen 5 Installing the Software on Windows 6 Installing the Software on the Mac 7 Installing the USB Workspace RF Hub 8 Keeping Track of the Workspace RF Hub 8 Connect the Interwrite Devices 9 Viewing Device Manager Using the Dev
Getting Started Interwrite Mobi™ 1 Interwrite Mobi™ About This Guide This Getting Started guide describes how to set up your Interwrite Mobi and Interactive Pen, install the Interwrite Workspace software, and establish a communication connection with the PC or the Mac. It ends with an overview of the Interwrite Workspace software. Product Overview The Interwrite Mobi is a tablet system featuring the patented digitizer and pen-input technology.
2 Interwrite Mobi™ Getting Started Workspace Software The operation of your Mobi is facilitated by the Interwrite Workspace software. The software is installed as part of the process of establishing communication between the Mobi and the computer and is covered in this guide. The Workspace software has two operational modes: Lesson Mode and Office Mode (Windows only). An Interwrite Mobi, acting as an input device to the computer, remotely controls the computer from anywhere in the room.
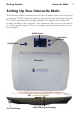
Getting Started Interwrite Mobi™ 3 Setting Up Your Interwrite Mobi The Interwrite Mobi communicates with the computer using radio frequency technology. The RF communications module is built into the Interwrite Mobi. The Tablet communicates through its built-in RF module with another RF module installed on the computer. The Interwrite Mobi runs on Li-ion batteries, which provide about 40 hours of wireless operation before they have to be recharged.
4 Interwrite Mobi™ Getting Started The first thing you should do when you unpack your new Interwrite Mobi and Interactive Pen is charge them. Charging the Interwrite Mobi and Interactive Pen Before you use your Interwrite Mobi and Interactive Pen for the first time, they should be charged for about three hours. Whenever the Tablet battery is low and needs to be recharged, the Tablet Battery Status Icon will flash slowly. 1 Place the Interactive Pen in the Pen Tray.
Getting Started Interwrite Mobi™ 5 The Electronic Interactive Pen The Interactive Pen is an input device to the computer. You will use it to write and draw in Lesson Mode and to control mouse movements in Mouse Mode by moving the tip of the Pen just above (in prox of) or touching the Tablet’s workspace surface. When the Pen Tip is in prox or touching the Tablet’s workspace, it simulates the same effects you would get using the left mouse button both in Windows and on the Mac.
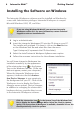
6 Interwrite Mobi™ Getting Started Installing the Software on Windows The Interwrite Workspace software must be installed on Windows by a user with Administrator privileges. Interwrite Workspace is compatible with Windows 2000, XP, and Vista. If you are using Windows 98/Me/NT, you must use Interwrite Workspace version 5.0. For more information, contact Technical Support to order an installation CD. 1 Log in as Administrator. 2 Insert the Interwrite Workspace CD into the CD drive on your PC.
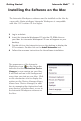
Getting Started Interwrite Mobi™ Installing the Software on the Mac The Interwrite Workspace software must be installed on the Mac by a user with Admin privileges. Interwrite Workspace is compatible with Mac OS X version 10.4 or higher. 1 Log in as Admin. 2 Insert the Interwrite Workspace CD into the CD-ROM drive on your Mac. An Interwrite Workspace CD icon will appear on your desktop. 3 Double-click on the Interwrite icon on the desktop to display the CD’s contents.
8 Interwrite Mobi™ Getting Started Installing the USB Workspace RF Plug the USB RF Hub into one of the USB ports on your computer. The RF Hub performs the following functions: • Supports multiple slates and boards, up to 128 devices simultaneously connected • Supports up to a minimum of 10 devices communicating simultaneously • Connect button to support quick connection and pairing of devices without software interaction, the target responsiveness is to connect within 5 seconds.
Getting Started Interwrite Mobi™ Connect the Interwrite Devices The computer automatically detects a cabled Interwrite DualBoard or Interwrite Panel. However, the wireless Interwrite Devices need to be discovered in order for it to communicate via radio frequency. Complete the following steps to connect the Mobi and the computer. 1 2 3 4 Insert the RF Workspace Hub into the USB port on your computer. Press the button on the Hub to activate it. The Hub will flash for two minutes as it waits for the Mobi.
10 Interwrite Mobi™ Getting Started Using the Device Manager Main Window Once Device Manager is selected from the menu, the Device Manager main window opens. From this window, you can connect devices, view properties, identify connected devices, lock or unlock pads, and perform other management functions. The following table identifies the icons associated with the Device Manager main window. Icon Name Used To Add Bluetooth Locate and connect Bluetooth devices to the Workspace software.
Getting Started Interwrite Mobi™ 11 Operating the Mobi The Interwrite Mobi provides the freedom to interact with a projected presentation from anywhere in the room. You can write annotations and run applications remotely, giving you the opportunity to engage others and encourage participation.
12 Interwrite Mobi™ Getting Started Operating the Buttons To operate any of the three buttons, push down or use the Pen vertically above the button and touch the Pen Tip to the button and hold for several seconds. On/Off Button Press the On/Off Button for three seconds to activate the Mobi. The Mobi will go into Sleep Mode after X minutes of inactivity. Navigation Buttons The Navigation Buttons to the right of the KWIK screen allow for moving through the KWIK Screen options.
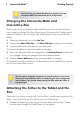
Getting Started Interwrite Mobi™ Working with the Mobi KWIK Screen Use the following screens to configure the KWIK screen within Interwrite Response or the Classroom Performance System (CPS). While using the Mobi, use the navigational buttons to scroll through the selected reports. KWIK Screen Settings within CPS Select the checkbox to view the CPS report on the KWIK screen. KWIK Screen Settings within Interwrite Response Select the checkbox to view the Response report on the KWIK screen.
Interwrite Mobi™ 14 Getting Started Replacing the Interwrite Mobi Battery Pack The Interwrite Mobi’s battery pack is accessed from the back of the Tablet. Battery Connector Battery Cover Battery Connector Complete the following steps to replace the battery: 1 Turn your Interwrite Mobi over and push down on the Tab and lift the Battery Cover away from the back. 3 Lift the Battery Pack out of the compartment. 4 Discard the old Battery Pack, following the proper disposal procedures.
Getting Started Interwrite Mobi™ 15 Getting Started with Interwrite Workspace The purpose of this document is to give you a feel for the Interwrite system by showing you how to select and use a tool in Lesson Mode. The Annotation Tools of Lesson Mode consist of freehand tools, text tools and drawing tools. Of the freehand tools, the Pen tool is the most frequently used Interwrite Workspace Tool. The following pages describe how to select and configure the Pen tool.
Interwrite Mobi™ 16 Getting Started Begin an Interwrite Workspace Session 1 When you are ready to begin an Interwrite Workspace session, turn on your Interwrite Mobi. The Mobi must be active and connected. You can verify this in Device Manager. 2 You can start Workspace Lesson Mode in one of three ways: • By using your electronic Interwrite Pen to click on the Interwrite Workspace icon • On the Windows Task Bar or the Mac’s Menubar to display the Device Manager Menu.
Getting Started Interwrite Mobi™ The Interwrite Workspace Toolbars Lesson Mode Office Mode Minimize Toolbar Minimize Toolbar Workspace Menu Workspace Menu Mouse Mode tool Mouse Mode tool Lesson Mode Annotate Over Desktop Office Mode Lesson Mode Annotate Over Desktop Office Mode Selection tool Selection tool Pen tool Previous Page Highlighter tool Eraser tool Shape tool Line tool Type Text tool Undo Previous Action Clear Create Blank Page Create Grid Page Gallery tool Previous Page Next Page
Interwrite Mobi™ Getting Started Using the Pen Tool The attributes of the Pen tool can be changed by selecting different options from the Properties Bar at the bottom of the Annotation Window. Select the Pen tool’s Down Arrow to display its Tool Settings Menu. Properties Bar The Pen tool Properties Bar provides options to change line color, width, transparency, and line ends and line styles. Each attribute change is displayed in the Preview Box.
Getting Started Interwrite Mobi™ Presentation Files The presentation file is made up of your annotated pages. The Page Creation and Capture tools are used to create the pages in the presentation file and the Annotation Tools are used to create the annotations. The presentation file is automatically saved as a .GWB file. As soon as Interwrite Workspace goes into Annotation Mode, an untitled presentation file is created.
20 Interwrite Mobi™ Getting Started Distributing Presentation Files The Interwrite Workspace presentation files you create can be printed for local distribution, or emailed to anyone, anywhere. Use the Page Sorter tool to review the presentation file. The pages in the presentation file can be sorted, moved, duplicated, merged, and deleted using the Page Sorter tool.
Getting Started Interwrite Mobi™ 21 Battery Handling and Precautions • Always charge batteries prior to first use. • Never short-circuit batteries or reverse polarity. • Do not incinerate or dismantle batteries. Cell components are corrosive and may be harmful to skin and eyes. • Do not pull on battery lead wires or connectors. Excessive force on the leads or connectors can damage the welding joints and other connections. • Do not mix with other battery types.
22 Interwrite Mobi™ Getting Started Handhabung des Akku und Vorsichtsmaßnahmen • Laden Sie den Akku vor dem ersten Gebrauch stets auf. • Schließen Sie den Akku niemals kurz und verändern Sie niemals seine Polarität. • Verbrennen und demontieren Sie keine Akkus. Bestandteile des Akku sind ätzend und können schädlich für Haut und Augen sein. • Ziehen Sie nicht an Akkuanschlussdrähten oder Anschlussklemen.
Getting Started Interwrite Mobi™ 23 Limited Warranty for the Interwrite Mobi IeInstruction warrants these products to be free from defects in material and workmanship under the following terms. Complete and return the enclosed warranty registration card to ensure that your products are covered by this warranty. Coverage Parts and labor are warranted for one (1) year from the date of the first consumer purchase for the Interwrite Mobi, electronic Pen, Tablet Charger, and accessories.
24 Interwrite Mobi™ Getting Started
Corporate Headquarters Western Office 308 N Carroll Blvd. Denton, TX 76201 8224 East Evans Road Scottsdale, Arizona 85260 Tel: 888.707.6819 Tel: 480.948.6540 Fax: 940.565.0959 Support: 480.443.2214 Fax: 480.948.5508 European Headquarters 36 rue Alfred Nobel 93600 Aulnay sous bois France TEL: +33 (0)6 07 12 70 08 FAX: + 33 48 68 60 63 www.eInstruction.com/support Support: 480.443.2214 Copyright© 2008 eInstruction Workspace is a trademark of eInstruction, Inc.