
User Manual


Welcome Page 7 of 54
file://C:\TEMP\~hhA856.htm 8/12/02
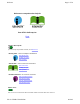
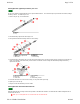
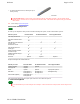
b. Attach one mounting bracket (B) to the back of the MeetingBoard tablet using Phillips screws (A) as shown below.
c. Attach the other mounting bracket to the wall using hardware appropriate for the wall structure (this hardware is not included) as
shown below.
d. Hang the tablet by interlocking the mounting brackets as shown below.
Next: Assemble the electronic pen(s).
2b. Mount the tablet on the optional floor stand
CAUTION: To avoid damage to the controller, do not rest the MeetingBoard tablet on the controller housing (located on the
rear of the tablet near one corner). Do not scratch or damage the tablet's writing surface.
WARNING: Never nail or drill the MeetingBoard tablet. Doing so will damage the unit and void your warranty.
IMPORTANT: To avoid damage to the tablet or injury, two people should carry out this mounting procedure.
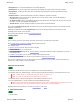
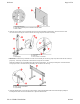
a. Attach each mounting bracket to the back of the tablet using Phillips screws as shown below.
A Screw, M4-0.7x10mm pan head w/internal tooth washer
B Mounting bracket
C Tablet levelers
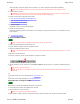
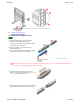
A Note: This hardware not included. Hole spacing on
bracket matches 16" and 24" wall stud spacing.
A Tablet
B Wall