
User Manual


Welcome Page 20 of 54
file://C:\TEMP\~hhA856.htm 8/12/02
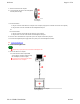
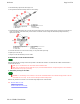
2. Feed black battery replacement end through cover.
3. Feed yellow and black wires through notches in inner housing.
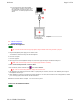
4. Push black battery replacement end of cord into area where batteries were (see below), making sure the yellow wire is toward the pen
tip for correct polarity. Hold silver battery contact located on underside of inner housing with thumb while pushing black battery
replacement into place.
5. Push strain relief into hole at end of inner housing. Do not push all the way through.
6. Replace pen cover and cap.
7. Plug the cord into the POINTER jack on the tablet.
SchoolPad 300: install the Bluetooth hub
Install the Bluetooth hub according to instructions provided on the Bluetooth CD-ROM. The Bluetooth hub enables SchoolPad 300s to
communicate with the PC.
Note: Up to 7 SchoolPad 300s can communicate with one Bluetooth hub.
Note: Each SchoolPad 300 must be within 25 feet (7m) of its intended Bluetooth hub. Reception depends on local conditions,
and performance may vary in your facility.
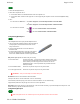
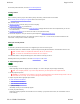
1. Attach the pen tray to the tablet
CAUTION: To avoid damage to the controller, do not rest the SchoolBoard tablet on the controller housing (located on the rear
of the tablet near one corner). Do not scratch or damage the tablet's writing surface.
Attach the tray brackets to the bottom rear of the tablet using Phillips screws as shown below.
Next: Mount the tablet on a wall.
or
Mount the tablet on the floor stand.
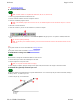
B Cover
C Cap
D Black battery replacement
E Black wire
F Yellow wire
G Strain relief
H Notches
I Inner housing
D Black battery replacement
E Black wire
F Yellow wire
I Inner housing
J Pen tip
K Silver battery contact