
User Manual


GB
- 19 -
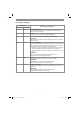
4. In section 10 „Charger indicator“ you will fi nd
a table with an explanation of the LED indica-
tor on the charger.
If the battery pack fails to become charged, ple-
ase check
•
whether there is voltage at the socket-outlet
•
whether there is proper contact with the char-
ging contacts in the battery charger (8).
If the battery still fails to become charged, please
return
•
the charger and charging adapter
•
the battery pack
to our Customer Service Department.
To ensure that items are properly packaged
and delivered when you send them to us,
please contact our customer service or the
point of sale at which the equipment was
purchased.
When shipping or disposing of batteries and
cordless tools, always ensure that they are
packed individually in plastic bags to prevent
short circuits and fi res.
To ensure that the battery pack provides long ser-
vice, you should take care to recharge it promptly.
You must recharge the battery pack when you
notice that the performance of the device drops.
Never allow the battery pack to become fully di-
scharged. This will cause it to develop a defect.
6.2 Torque setting (Fig. 4 / Item 1)
The cordless screwdriver is fi tted with a mechani-
cal torque selector.
The torque for a specifi c size of screw is selected
with the set-collar (1). The correct torque depends
on several factors:
•
on the type and hardness of material in ques-
tion
•
on the type and length screws used
•
on the requirements needing to be met by the
screwed joint.
The clutch disengages with a grating sound to
indicate when the set torque is reached.
Important! The tool must be at a standstill when
you set the torque with the setting ring.
6.3 Drilling (Fig. 4 / Item 1)
For drilling purposes, move the set-collar to the
last step „Drill“. In this setting the slip clutch is in-
active. The maximum torque is available in drilling
mode.
6.4 Forward/Reverse switch (Fig. 5 / Item 2)
With the slide switch above the On/Off switch you
can select the direction of rotation of the battery-
powered drill/screwdriver and secure it against
being switched on accidentally. You can choose
between clockwise and anticlockwise rotation. To
avoid causing damage to the gearing it is advisa-
ble to change the direction of rotation only when
the tool is at a standstill. The On/Off switch is blo-
cked when the slide switch is in centre position.
6.5 On/Off switch (Fig. 5 / Item 3)
Infi nitely variable speed control is possible with
the On/Off switch. The further you press the
switch, the higher the speed of the battery-powe-
red drill/screwdriver.
6.6 LED lamp (Fig. 5/Item 9)
The LED lamp (9) can be used in poor lighting
conditions to illuminate the area where you want
to drill or screw. The LED lamp (9) will be lit au-
tomatically as soon as you press the ON/OFF
switch (3).
6.7 Changing the tool (Fig. 6)
Important. Set the changeover switch (2) to its
centre position whenever you carry out any work
(for example changing the tool, maintenance
work, etc.) on the cordless screwdriver.
•
The cordless screwdriver is fitted with a
quick-action chuck (7) with an automatic
spindle stop.
•
Open the chuck (7). The chuck opening (a)
must be large enough to hold the tool (drill bit
or screwdriver bit).
•
Select the suitable tool. Push the tool as far
as possible into the chuck opening (a).
•
Tighten the chuck (7) and then check that the
tool is secure.
6.8 Screwdriving
We recommend using self-centering screws (e.g.
Torx screws, recessed head screws) designed for
reliable working. Be sure to use a bit that matches
the screw in shape and size. Set the torque, as
described elsewhere in these operating instruc-
tions, to suit the size of screw.
Anl_TC_CD_12_Li_SPK9.indb 19Anl_TC_CD_12_Li_SPK9.indb 19 08.04.2021 13:32:1108.04.2021 13:32:11