
Operating instructions


12
GB
misuse. The user / operator and not the
manufacturer will be liable for any damage or injuries
of any kind caused as a result of this.
Please note that our equipment has not been
designed for use in commercial, trade or industrial
applications. Our warranty will be voided if the
machine is used in commercial, trade or industrial
businesses or for equivalent purposes.
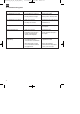
4. Technical data
Mains connection 230V ~ 50 Hz
Power rating 300 W
Max. pumping rate:
With 25,4 mm (1”) hose 4,600 l/h
With 16 mm rain barrel pipe 1,750 l/h
Max. delivery head 11 m
Max. immersion depth 7 m
Max. water temperature 35 °C
Hose connection 26,4 mm (G 3/4) AG
Max. size of foreign bodies: Ø 2,5 mm
Switching point height: ON max. approx. 50 cm
Switching point height: OFF min. approx. 15 cm
5. Before putting the equipment into
operation
5.1 Assembly (Figs. 3 to 6)
1. Screw the aluminium tube (Item 6) to the pump
connection (Fig. 3).
2. Screw the aluminium tubes (Items 6, 7 and 8)
together (Figs. 4 and 5).
3. Screw the aluminium tube (Item 9) to the
connection (Fig. 6).
5.2 Fitting the pump to the barrel
Use the attachment hook to fit the pump to the rain
barrel (Fig. 6, Item B).
Note!
When installing, never hang the equipment by the
discharge line or by the power cable. The equipment
must be hung up with the provided carry handle or it
must rest on the bottom of the shaft. To ensure that
the equipment works properly, the bottom of the shaft
always must be free of sludge and other
accumulations of dirt. If the water level is too low, the
sludge in the shaft can quickly dry out and hinder the
equipment from starting. It is necessary therefore to
check the equipment regularly (carry out trial start-
ups).
Note:
The pump shaft should measure at least
40 x 40 x 50 cm so that the floating switch can move
freely.
5.3 Mains connection
The equipment you have purchased comes with an
earthing-pin plug. The equipment is designed for
connection to a socket outlet with earthing contact for
230 V ~ 50 Hz. Make sure that the socket-outlet is
sufficiently fused (at least 6 A) and in good working
order. Insert the power plug in the socket-outlet and
the equipment is ready for operation.
Important!
To rule out danger, this work must be left strictly to a
specialist electrician or Customer Service.
6. Operation
You can put the equipment into operation after you
have thoroughly read the installation and operating
instructions. Pay attention to the following points:
Make sure that the equipment is set up securely.
Check that the discharge line is fitted correctly.
Make sure that the electrical connection is 230 V
~ 50 Hz.
Check that the electrical socket-outlet is in good
working order.
Make sure that no moisture or water can ever
reach the power connection.
Make sure that the equipment does not run dry.
To withdraw water, open the stopcock (Fig. 6,
Item A).
To switch off the equipment, pull the power plug
out of the socket outlet.
Setting the ON/OFF switching point:
The ON/OFF switching point can be infinitely
adjusted with the height adjustment facility. For this
purpose you must first slacken the screw (Fig. 7,
Point 5). The switching differential can be infinitely
adjusted by extending or shortening the floating
cable.
The floating switch must be fitted so that the
switching point height: ON and the switch point
height: OFF can be reached easily and with little
force. Check this by placing the equipment in a
container filled with water and carefully raising
and lowering the floating switch with your hand.
You can then see whether the equipment
Anleitung_RG_SP_300_RB_SPK1:_ 27.04.2011 15:27 Uhr Seite 12