
User Manual


GBGB
- 20 -
•
Switch the appliance off when it is not in use.
•
Wear protective gloves.
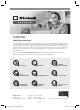
5. Before starting the equipment
Caution! Do not t the battery until the equipment
has been fully assembled and all the settings
have been actuated. Always wear protective
gloves when working on the equipment to protect
yourself against injury. Carefully unpack all parts
and check that they are complete (Fig. 1).
5.1 General information on assembly
a) Fig. 2-3: Push the tube (7) onto the handle
housing (2a) as far as the bead (7a) and
screw it tight with the assembly nut (6).
b) Fig. 4: Hook the carabiner (A) of the shoulder
strap (8) into the strap attachment (B).
c) Fig. 4a: The additional handle consists of the
handle (N), the hexagon screw (P) and the
lock (F). It is tted to the handle attachment
(U) as illustrated. Push the hexagon screw (P)
into the handle (N) and screw it tight to the
lock (F).
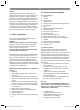
5.2 Adjusting the additional handle
(Fig. 5-6)
(a) Setting the tilt of the additional handle
Open (a) the lock (F). Set the desired tilt of the
additional handle (9). Close (b) the lock (F).
b) Shifting the additional handle
Open (a) the lock (H) and slide the additional
handle (9) into the required position. Close (b) the
lock (H).
5.3 Using the shoulder strap
Warning! Always use the shoulder strap when
working with the equipment. Switch o the equip-
ment before you take o the shoulder strap (risk
of injury).
1. Hook the carabiner (Fig. 4/Item A) into the
strap holder.
2. Slip the shoulder strap (Fig. 7/Item 8) over
your shoulder.
3. Adjust the length of the shoulder strap so that
the strap attachment is at waist level (Fig. 7).
4. The shoulder strap is equipped with a buckle.
Press the hooks together (Fig. 8) if you need
to put down the equipment quickly.
5. To change the strap position on the equip-
ment, press together the two metal loops (Fig.
•
Battery pack (not included in delivery with
Art. No. 34.108.00, 34.108.20)
•
Charging unit (not included in delivery with
Art. No. 34.108.00, 34.108.20 )
•
Original operating instructions
•
Safety instructions
3. Proper use
Hedge trimmer
The hedge trimmer mounting kit is allowed to be
used only on the supplied motor head.
Caution! This hedge trimmer is suitable for cutting
hedges, bushes and shrubs. Caution! Do not use
this equipment to cut grass.
The equipment is to be used only for its prescri-
bed purpose. Any other use is deemed to be a
case of misuse. The user / operator and not the
manufacturer will be liable for any damage or inju-
ries of any kind caused as a result of this.
Please note that our equipment has not been de-
signed for use in commercial, trade or industrial
applications. Our warranty will be voided if the
machine is used in commercial, trade or industrial
businesses or for equivalent purposes.
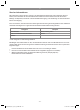
4. Technical data
Cutter bar length: ................................... 450 mm
Max. cutting length: ................................ 400 mm
Tooth spacing: .......................................... 16 mm
Cuts/min: ..................................................... 1700
Lithium-ion battery
Voltage: .................................................. 18 V DC
Capacity: ................................................... 3.0 Ah
Charging time: ............................................. 1.0 h
Charging unit
Input voltage: .....................200-250 V ~ 50-60 Hz
Power rating: .............................................. 72 W
Output voltage: ....................................... 20 V DC
Output current: ............................................... 3 A
Danger!
Sound and vibration
Sound and vibration values were measured in
accordance with ISO 22868.
L
pA
sound pressure level ................... 81.05 dB(A)
K
pA
uncertainty .............................................3 dB
L
WA
sound power level measured .... 98.23 dB(A)
K
WA
uncertainty .............................................3 dB
L
WA
sound power level guaranteed ..... 102 dB(A)
Wear ear-mus.
The impact of noise can cause damage to hea-
ring.
Total vibration values (vector sum of three direc-
tions) determined in accordance with ISO 22867.
Handle under load
Vibration emission value a
h
≤ 2.5 m/s
2
The quoted total vibration value and the quoted
noise emission values were measured in ac-
cordance with standardized test procedures and
can be used to compare one electric tool with
another. They can also be used for a provisional
assessment of the level of exposure.
Warning!
The vibration and noise emission levels during
actual use may vary from the values quoted,
depending on the way in which the electric tool is
used and, in particular, on the type of workpiece
being processed.
For the operator’s protection it is essential to spe-
cify safety measures based on an estimate of the
exposure to vibrations during the actual condi-
tions of use (all stages of the operating cycle must
be considered in this connection, e.g. times in
which the electric tool is OFF and times in which
the tool is ON but operating without load).
Try to keep the exposure to vibrations and noise
as low as possible. Examples of measures for
reducing the exposure to vibrations include the
wearing of gloves when using the tool, the limiting
of work time and the use of accessories that are
in good condition.
Keep the noise emissions and vibrations to a
minimum.
•
Only use appliances which are in perfect wor-
king order.
•
Service and clean the appliance regularly.
•
Adapt your working style to suit the appliance.
•
Do not overload the appliance.
•
Have the appliance serviced whenever ne-
cessary.
Anl_GE_HH_18_Li_T_SPK9.indb 20Anl_GE_HH_18_Li_T_SPK9.indb 20 19.02.2021 06:38:3419.02.2021 06:38:34