
User Manual


GB
- 13 -
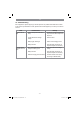
4. Technical data
Mains voltage: ................................230V ~ 50 Hz
Rated input current ...................................1.37 A
Power rating: ............................................. 262 W
Rated output voltage: .............................12 V d.c.
Switch
position
Automatic Normal
Switch
position N
4,6A arith.
7A eff .
6,6A arith.
11A eff .
5-200 Ah
Switch
position S
10A arith.
15A eff .
14,5A arith.
22A eff .
20-300 Ah
5. Before starting the equipment
Most motor vehicle manufacturers recom-
mend that the battery should be discon-
nected from the vehicle’s electrical system
before being charged. We would like to point
out that even standard vehicles are fi tted with
a whole host of electronic equipment (such
as ABS, ASR, injection pump and on-board
computer). Any voltage peaks that occur may
cause defects in these electronic modules.
Therefore the battery should be disconnec-
ted from the electrical system before being
charged.
Please also refer to the instructions in the
owner’s manuals for the car, radio, navigation
system, etc.
Notes on automatic charging
The charger is an automatic charger, i.e. it is
suitable in particular for charging maintenance-
free batteries and for the long-term charging and
maintenance-charging of batteries which are not
in constant use, e.g. for boats, lawn mowers and
the like. Battery gassing is prevented because
the charging voltage is limited to 14.1 V (2.35 V/
cell). The charging operation does not need to be
monitored.
5.1 Charging the battery:
•
Release or remove the battery stoppers (if
fitted) from the battery.
•
Check the acid level in the battery. If neces-
sary, top up the battery with distilled water (if
possible). Important. Battery acid is aggres-
sive. Rinse off any acid splashes thoroughly
with lots of water and seek medical advice if
necessary.
•
Fig. 2:
A= Automatic
Move the upper switch to position “A” for
maintenance-free and non-maintenance-free
batteries.
N= Normal
Move the upper switch to position “N” only for
non-maintenance-free batteries.
•
Fig. 3:
N= Normal
Move the lower switch to position “N” for char-
ging with normal charging current.
S= Fast
Move the lower switch to position “S” for char-
ging with a higher charging current.
•
First connect the red charging cable to the
positive pole of the battery.
•
Then connect the black charging cable to the
bodywork of the vehicle away from the battery
and the petrol pipe.
•
Warning! Under normal circumstances the
negative battery pole is connected to the
bodywork and you proceed. In exceptional
cases it is possible that the positive battery
pole is connected to the bodywork (positive
earthing). In this case connect the black
charging cable to the negative pole on the
battery. Then connect the red charging cable
at a point away from the battery and the petrol
pipe.
•
After the battery has been connected to the
charger, you can connect the charger to a
socket supplying 230V~50Hz. Do not connect
it to a socket that supplies any other mains
voltage. Important. Charging may create
dangerous explosive gas and therefore you
should avoid spark formation and naked fla-
mes whilst the battery is charging. There is a
risk of explosion!
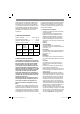
Fig. 4:
Calculating the charging time
The charging time depends on the charge status
of the battery. If the battery is fully discharged,
the approximate charging time can be calculated
using the following formula:
Battery capacity in Ah
Charging time/h =
Amp. (arithmetic charging
current)
24 Ah
Example = = 9,6 h max.
2,5 A
Anl_CC_BC_22_E_SPK1.indb 13Anl_CC_BC_22_E_SPK1.indb 13 01.03.16 10:3301.03.16 10:33