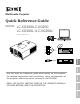
Multimedia Projector Quick Reference Guide MODEL LC-XG300/LC-XG250 LC-XG300L*/LC-XG250L* Deutsch READ THE SAFETY INSTRUCTIONS IN THE OWNER’S MANUAL (CD-ROM) BEFORE USING THE PROJECTOR. Italiano Use this book as a reference guide when setting up the projector. For detailed information about installation, setup, and operation of the projector, refer to the owner’s manual on the CD-ROM. Español Français English (*Models without lens.
To the Owner Safety Precaution Before installing and operating the projector, read this manual thoroughly. The projector provides many convenient features and functions. Operating the projector properly enables you to manage those features and maintains it in good condition for many years to come. Improper operation may result in not only shortening the product life, but also malfunctions, fire hazard, or other accidents.
Safety Instructions All the safety and operating instructions should be read before the product is operated. Do not install the projector near the ventilation duct of airconditioning equipment. Read all of the instructions given here and retain them for later use. Unplug this projector from AC power supply before cleaning. Do not use liquid or aerosol cleaners. Use a damp cloth for cleaning. This projector should be operated only from the type of power source indicated on the marking label.
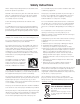
Air Circulation Openings in the cabinet are provided for ventilation. To ensure reliable operation of the product and to protect it from overheating, these openings must not be blocked or covered. CAUTION Hot air is exhausted from the exhaust vent. When using or installing the projector, the following precautions should be taken. – Do not put any flammable object or spray can near the projector, hot air is exhausted from the air vents. – Keep the exhaust vent at least 3’ (1 m) away from any objects.
Installing the Projector in Proper Directions Use the projector properly in specified positions. Improper positioning may reduce the lamp life and result in severe accident or fire hazard. This projector can project the picture upward, downward, or backward, perpendicular to the plane of the screen as shown in the figure below. CAUTION Make sure that the Fan control settings are set properly when setting up the projector with upward/downward inclination of over 20 degrees to the horizontal plane.
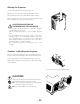
Moving the Projector Use the hand grip when moving the projector. Replace the lens cap and retract the adjustable feet to prevent damage to the lens and cabinet when carrying. When the projector is not in use for an extended period, put it into a suitable case to protect the projector. CAUTION IN CARRYING OR TRANSPORTING THE PROJECTOR – Do not drop or bump the projector, otherwise damages or malfunctions may result. – When carrying the projector, use a suitable carrying case.
Front r q w e r t Filter Speaker Lens Release Button Top Controls and Indicators Maintenance Cover WARNING: FOR MAINTENANCE USE ONLY. DO NOT OPEN. y Lens Cap (for LC-XG300/XG250) t e qw CAUTION Do not turn on the projector with the lens cap attached. High temperature from light beam may damage the lens cap and result in fire hazard.
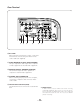
Rear Terminal q w e r t o q 5 BNC INPUT JACKS Connect the component or composite video output signal from video equipment to VIDEO/Y, Cb/Pb, and Cr/Pr jacks or connect the computer output signal (5 BNC Type [Green, Blue, Red, Horiz. Sync, and Vert. Sync.]) to G, B, R, H/V, and V jacks. i u y y S-VIDEO INPUT JACK Connect the S-VIDEO output signal from video equipment to this jack. w COMPUTER INPUT TERMINAL (ANALOG) Connect the computer (or RGB scart) output signal to this terminal.
Rear Terminal ✽ !4 !3 !2 !1 !0 English !0 R/C JACK When using the wired remote control, connect the wired remote control to this jack with a remote control cable (not supplied). !1 AUDIO MONITOR OUTPUT JACK (VARIABLE) This jack outputs the audio signal from computer or video equipment to external audio equipment. !2 MONITOR OUTPUT TERMINAL (ANALOG) This terminal outputs the video signal from computer to external video equipment.
Top Control q i w o e !0 r !1 t !2 y u q WARNING TEMP. indicator Blinks red when the internal temperature of the projector exceeds the operating range. w LAMP REPLACE indicator Lights yellow when the projection lamp reaches its end of life. e ON/STAND-BY button Turn the projector on or off. i WARNING FILTER indicator – Blinks orange indicating the filter needs cleaning. – Lights orange when clogging of the filter is detected, urging immediate cleaning.
Remote Control r e w q t y !2 u !1 i o q STAND-BY button Turn the projector off. w Wired Remote jack Connect the remote control cable (not supplied) to this jack when using as a wired remote control. e Signal Emission indicator Lights red while the laser beam is being emitted from the laser light window or a signal is being sent from the remote control to the projector. o Point ed 7 8 ( VOLUME + / – ) buttons – Select an item or adjust the value in the On-Screen Menu.
Remote Control @6 !3 @5 !4 @4 !5 @3 @7 !6 @2 !7 For PIN code and remote control code. @1 !8 @0 !9 !3 MENU button Open or close the On-Screen Menu. @0 FOCUS button Adjust the focus. !4 P-TIMER button Operate the P-timer function. @1 NO SHOW button Temporarily turn off the image on the screen. !5 D.ZOOM button Select the Digital zoom +/- mode and resize the image. @2 KEYSTONE button Correct keystone distortion. !6 ZOOM ed buttons Zoom in and out the images.
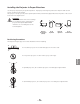
Remote Control Battery Installation 1 Open the battery compartment lid. 2 Install new batteries into the compartment. Press the lid downward and slide it. 3 Replace the compartment lid. Two AAA size batteries For correct polarity (+ and –), be sure battery terminals are in contact with pins in the compartment. To insure safe operation, please observe the following precautions : ● Use two (2) AAA or LR03 type alkaline batteries. ● Always replace batteries in sets.
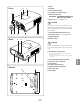
Lens Installation When replacing the lens or using an optional lens, install the lens by following the instructions below. Ask the sales dealer for detailed information of the optional lens specifications. Red dot Attaching the lens to the projector 1 Remove the lens mount cover. 2 Fit the lens to the projector by aligning the red dot on the lens with the red dot of the projector. 3 Slowly turn the lens clockwise until it clicks. Make sure that the lens is fully inserted to the projector.
Positioning the Projector (for LC-XG300/XG250) For projector positioning, see the figures below. The projector should be set perpendicularly to the plane of the screen. ✔Notes: •The brightness in the room has a great influence on picture quality. It is recommended to limit ambient lighting in order to obtain the best image. •All measurements are approximate and may vary from the actual sizes. (Inch Diagonal) 32.8' (10.0m) 22.0' (6.7m) 300” Max. Zoom 230” Min. Zoom 16.4' (5.0m) 10.8' (3.3m) 200” 3.
Connecting the AC Power Cord This projector uses nominal input voltages of 100–120 V or 200–240 V AC and it automatically selects the correct input voltage. It is designed to work with single-phase power systems having a grounded neutral conductor. To reduce the risk of electrical shock, do not plug into any other type of power system. If you are not sure of the type of power being supplied, consult your authorized dealer or service station.
Connecting to a Computer (Digital and Analog RGB) Cables used for connection • VGA Cable (HDB 15 pin)* • USB Cable • DVI-Digital Cable • Audio Cables (Mini Plug [stereo] x 2) • BNC Cable (*One cable is supplied; other cables are not supplied with the projector.
Connecting to Video Equipment (Video, S-Video) Cables used for connection • Video Cables (RCA x 1) • Audio Cables (Mini Plug [stereo] x 2) • S-VIDEO Cable • BNC Cable • Audio Cable (RCA x 2) (Cables are not supplied with the projector.
Connecting to Video Equipment (Component and RGB Scart) Cables used for connection • Audio Cables (Mini Plug [stereo] x 2) • Scart-VGA Cable • BNC Cable • DVI-Digital Cable (Cables are not supplied with the projector.
Turning On the Projector 1 Complete peripheral connections (with a computer, VCR, etc.) before turning on the projector. 2 Connect the projector’s AC power cord into an AC outlet. The POWER indicator lights green. 3 Press the ON/STAND-BY button on the top control or the ON button on the remote control. The LAMP indicator lights red and the cooling fans start to operate. The preparation display appears on the screen and the count down starts.
Turning Off the Projector 1 Press the ON/STAND-BY button on the top control or the STAND-BY button on the remote control, and “Power off?” appears on the screen. 2 Press the ON/STAND-BY button or the STAND-BY button on the remote control again to turn off the projector. The LAMP indicator turns off and the POWER indicator starts to blink green. After the projector is turned off, the cooling fans operates for 90 seconds. During the POWER indicator is blinking, you cannot turn on the projector.
How to Operate the On-Screen Menu The projector can be adjusted or set via the On-Screen Menu. For each adjustment and setting procedure, refer to the respective sections in this manual. 1 Press the MENU button on the top control or the remote control to display the On-Screen Menu. 2 Use the Point 7 8 buttons to select a Menu icon. Use the Point ed buttons to select an item to in the selected menu. 3 Press the SELECT button to show the item data. Use the Point 7 8 buttons to adjust the values.