DIVA T/A ISDN Modem User’s Guide
Fourth Edition (July 1998) 206-152-04 DIVA T/A ISDN Modem is a trademark of Eicon Technology Corporation. Microsoft, Windows, and Windows NT are registered trademarks of Microsoft Corporation. CompuServe is a registered trademark of CompuServe Incorporated. Hayes is a registered trademark of Hayes Microcomputer Products, Inc. Changes are periodically made to the information herein; these changes will be incorporated into new editions of the publication.
Table of Contents Introduction .......................................................................................... 5 What You Need .................................................................................... 7 Using EZ-ISDN or ISDN Ordering Code (IOC) to order your ISDN Line ....................................................................................................... 8 Connecting the Cables..........................................................................
Appendix B: Troubleshooting the DIVA T/A .................................. 106 LED Status Indicators on the DIVA T/A ........................................ 106 ISDN LEDs .................................................................................... 106 Common Problems ......................................................................... 109 Dumping the DIVA T/A Memory................................................... 113 DIVA T/A Firmware Specifications.........................................
Introduction DIVA T/A is an external ISDN modem available in S/T and U interface versions. It provides easy and affordable high-speed Basic Rate Interface (BRI) ISDN connection to the Internet or to your office LAN. With the DIVA T/A, Small Office Home Office (SOHO) users and telecommuters can combine the higher performance of ISDN with the simplicity of a terminal adapter. The DIVA T/A supports all standard modem AT commands.
Note: The DIVA T/A can work independently from your PC. If the DIVA T/A is turned on, your analog devices can use your ISDN line regardless of whether the DIVA T/A is connected to your PC. Ease of Use You can connect the DIVA T/A to any computer (PC or notebook) equipped with a serial port. You can easily configure it using the Setup Wizard (under all versions of Windows), using a VT100 interface (under DOS and OS/2), and using AT commands (under all platforms).
What You Need To install the DIVA T/A, you need the following: Item Description DIVA T/A Package • • • • • • • • DIVA T/A ISDN Modem DIVA T/A software (CD) ISDN cable (RJ-45) Serial cable (RS-232) A/C Adapter Phone Adapters (RJ11) for France and UK only DIVA T/A QuickStart Guide DIVA T/A Release Notes PC or Notebook DIVA T/A can be attached to any PC or Notebook computer. Remote Access Client Software Supplied as part of operating platform or by Internet Service Provider (ISP).
Using EZ-ISDN or ISDN Ordering Code (IOC) to order your ISDN Line (North America only) We highly recommend that you use our toll free ISDN ordering service to make sure you get the correct ISDN line the first time. This service is free to our customers. Dial 1-888-800-DIVA. EZ-ISDN / IOC simplifies the ordering of your ISDN line. It lets you use simple codes to order pre-configured packages of ISDN features and services.
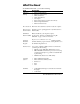
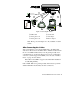
Connecting the Cables To connect the cables to your DIVA T/A: 1 Turn off your computer before you connect the cables. 2 Connect the RJ45 end of the ISDN cable (see ➀ in Figure 1 on page 11) to the jack labeled ISDN on the rear of the DIVA T/A. See below to complete the connection: • Integrated NT1 (U) model Connect the other smaller end (RJ11) of the ISDN cable to your ISDN wall jack. • S/T Interface model Connect the other end of the ISDN cable to an NT1 interface, whether part of the ISDN service (e.
Termination Switch available on S/T models for Australia only 100 On ISDN Phone 1 Phone 2 Serial Reset Off ISDN Jack Å Á À Â Ã Phone Ä A/C adapter Fax Desktop computer Figure 1: Connecting the Cables ➀ ISDN cable ➁ Analog device #1 ➂ Analog device #2 ➃ Serial cable ➄ A/C adapter ⑥ Phone Adapter Note: Phone ports and adapters are only available on certain models.
"D" LED not glowing steadily (International Firmware) If the “D” LED is not glowing steadily, your ISDN cables may be improperly connected, the ISDN line is not activated, or may indicate an idle condition. Please check all of these items, and, if the “D” LED is still not glowing steadily, refer to the “Customer Service” section on page 117 for information on contacting Eicon Technology. If the "D" LED is glowing steadily, go to the section “What’s Next?” on page 12 and continue.
You may not have to enter SPID information for the DIVA T/A to function properly if your ISDN line is configured for noninitializing mode. The DIVA T/A features automatic noninitializing mode support, which enables the interface to operate without programming a SPID, or to retain basic service if SPID initialization fails. However, your local telephone company has to turn this feature on. As you lose functionality, we do not recommend this operation mode.
Windows 95 Note: This install procedure is for the original release and Service Pack 1 (SP1) version of Windows 95. If you are using Windows 95 Service Release 2 (OSR2), go to “Windows 95 (OSR2)” on page 15. To verify the version installed on your machine, go to Control Panel/System Properties and select the General tab. If you have the original or SP1 version of Windows 95 installed, one of the following screens appears: Note: If you are using Dial-Up Networking, make sure you are using version 1.2.
4 In the Install From Disk window, enter the drive letter of your CD drive (or use the Browse button to locate your CD drive) and click OK. 5 Go to page 25 and continue at the section “Installing the DIVA T/A Software.
Windows 95 (OSR2) Note: This install procedure is for Windows 95 Service Release 2 (OSR2). If you are using original release or Service Pack 1 (SP1) version of Windows 95, go to “Windows 95” on page 13. To verify the version installed on your machine, go to Control Panel/System Properties and select the General tab. If you have Windows 95 OSR2 installed, you should see the letter “B”, as below: Note: If you are using Dial-Up Networking, make sure you are using version 1.2.
5 Enter the drive letter of your CD drive (or use the Browse button to locate your CD drive) and click OK. 6 In the update Device Driver Window, click Finish. 7 Go to page 25 and continue at the section “Installing the DIVA T/A Software.
Windows 98 WARNING! It is very important to follow the steps, exactly as described below, to install the DIVA T/A software. The setup file for ISDN modems (mdmisdn.inf), supplied on the Microsoft Windows 98 CD, contains incorrect information about the DIVA T/A ISDN Modem (incorrectly referred to as Eicon T-A External). Using this setup file will cause the DIVA T/A to operate incorrectly. DO NOT use the Add New Hardware applet (found in Control Panel) to install the DIVA T/A.
4 Select the Search for the best driver for your device option and click Next. 5 Select “CD-ROM drive” and click Next. 6 Click Next.
7 Click Finish and go to page 25 and continue at the section “Installing the DIVA T/A Software.
Windows NT 4.0 Note: Before you begin installing the DIVA T/A, we suggest that the Remote Access Service (RAS), also known as Dial-Up Networking, be installed with at least one modem (any modem will do; it is only needed to install the DIVA T/A and can later be removed). 1 Power on your PC with the DIVA T/A ISDN Modem connected (see “Connecting the Cables” on page 9). 2 Insert the DIVA T/A CD into your computer's CD drive. 3 From the Start menu, go to Settings, then Control Panel.
4 Select Don’t detect my modem; I will select it from a list, then click Next. Important: Make sure that you select the choice above and do not let Windows NT choose its own modem driver. If you let Windows NT select the modem driver, you will not be able to communicate with the DIVA T/A. You will then have to delete the Windows NT installed modem and begin the install process again from Step 3.
6 Select the Eicon DIVA T/A ISDN Modem, then click Next. 7 Select the appropriate COM Port the DIVA T/A is connected to. Click Next, then click finish. 8 Close the Modem Properties window. 9 After closing the Modem Properties window, you are prompted to configure Dial-Up Networking, as the install Modem list has changed. Click Yes to configure Dial-Up Networking. 10 From the Remote Access Setup window, remove any unused devices that use the same COM port as the DIVA T/A, and then click Add.
Windows NT 3.51 If you are going to use the DIVA T/A with RAS, RAS must already be installed with at least one modem (any modem will do, it is only needed to install the DIVA T/A and will later be removed). If this is the case, follow the steps below. If you do not want to use RAS, continue at “Installing the DIVA T/A Software” on page 25. 1 Power on your PC with the DIVA T/A connected (see “Connecting the Cables” on page 9). 2 Insert the DIVA T/A CD into your computer’s CD drive. 3 Open any text editor.
Windows 3.x/WFW 3.11 If you are installing the DIVA T/A ISDN Modem on a system without a CD drive, it is possible to make disks from the DIVA T/A CD. To create the disks, follow the instructions in the MAKEDISK.TXT file located in the \WIN16\MAKEDISK directory of your DIVA T/A CD. If you are going to use the DIVA T/A with RAS for WFW, RAS must already be installed with at least one modem (any modem will do, it is only needed to properly install the DIVA T/A and will later be removed).
Installing the DIVA T/A Software Before you proceed, make sure you have completed the preinstallation procedure relevant to your software platform. To find the procedure relevant to your platform, see page 12. Note: There is no Setup Wizard for DOS or OS/2. If you are using DOS or OS/2, go to the section “Using the VT100 Configuration Tool” on page 60. The DIVA T/A Setup Wizard installs all necessary DIVA T/A files on your system.
2 From the CD Setup screen, select “Start DIVA Terminal Adapters Installation Now”; this starts the Setup Wizard. Note: The CD Setup screen also gives you the choice to view the online DIVA T/A User’s Guide, Reference Guide, or Release Notes, before installing the DIVA T/A software. 3 Click Next in the Setup Wizard’s “Welcome” screen.
4 Specify where you want to install the DIVA T/A software. Click next to install in the default directory (the default directory differs according to your platform); otherwise, click the browse button and select a directory, then click Next. The Setup Wizard installs all necessary files. 5 Click Finish. The software installation is complete. You must now configure your DIVA T/A with one or more configuration profiles. Do one of the following: • Windows 3.x users. If you are using Window’s 3.
6 On the Configuration Wizard, click Next; follow the Configuration Wizard’s on-screen instructions (if a working configuration is detected, you are notified and allowed to skip the Wizard). Note: Context sensitive help is available on all the Configuration Wizard’s screens. For more details about a particular field displayed on the screen, click the Question Mark “?” icon at the top right corner of the screen, then click on the field you’re having trouble with.
The Wizard closes and the Eicon DIVA Terminal Adapters program appears (see “The Windows 95/98/NT Eicon DIVA Terminal Adapters Program” on page 30 for more details). The installation under Windows 95/98/NT is complete and your DIVA T/A is ready to use. • • If you want to configure additional profiles or configure advanced ISDN parameters for the profile you created above, go to the section “Using the Windows 95/98/NT Configuration Tool” on page 33.
The Windows 95/98/NT Eicon DIVA Terminal Adapters Program Note: This section applies to Windows 95/98 and NT users only. The Eicon DIVA Terminal Adapters Program provides you with a variety of convenient utilities. To access the Eicon DIVA Terminal Adapters program, do one of the following: • Click the • From the Windows taskbar click Start, then select Programs\Eicon DIVA T/A ISDN Modem\Eicon DIVA Terminal Adapters. icon on your taskbar (Windows 95/98 only).
Menu Options The menu bar provides you with a variety of shortcuts and utilities. You can launch commands from drop-down menus or by clicking icons. Displaying Icons on the Toolbar To display icons on the Menu bar select View\Toolbar (some icons appear by default). The Toolbar pick list displays four options: Basic, Advanced, View, and Tools. Click an option to have its associated icons displayed on the tool bar (a check mark to the left of an option indicates the option is selected).
Click or Select To perform this Action File\Details Displays a panel that contains details about your DIVA T/A. Use it if you need to determine details about your configuration (such as your firmware version). File\Delete Deletes the device currently selected. File\Import Profiles Imports a profile file (.PRF), which contains three profiles plus other configuration parameters. The file is imported to the selected device.
Using the Windows 95/98/NT Configuration Tool This section shows you how to use the Windows 95/98/NT Configuration Tool to configure one or more configuration profiles. About Configuration Profiles A profile is a set of parameters that define a particular ISDN setup. When you run the Windows 95/98/NT Configuration Wizard for the first time, you configure a profile with the default name Profile 0.
• Advanced. Advanced ISDN parameters such as Dynamic Bandwidth Allocation (DBA), and Data Over Voice (DOV). This information is optional. Using Context Sensitive Help Context sensitive help is available on all the Configuration Tool’s screens. For more details about a particular field, click the Question Mark “?” icon at the top right corner of the screen, then click on the field you’re having trouble with.
Configuring Profiles under Windows 95/98/NT Follow the steps below to configure a profile: 1 Do one of the following: • Click the • From the windows taskbar click Start, then select Programs\Eicon DIVA T/A ISDN Modem\Eicon DIVA Terminal Adapters. icon on your taskbar (Windows 95/98 only). 2 From the Eicon DIVA Terminal Adapter Program, click the DIVA T/A icon; the Profiles Window appears.
4 From the Protocol tab, select the ISDN connection protocol that you want to use (it must match the protocol on the receiving system). Follow the guidelines below. Note: the sample above depicts the International version of the DIVA T/A Configuration Tool. If you’re using the North American version the V.110 option is not accessible.
• Multilink PPP does not support the callback feature used by some servers. • When using Multilink PPP for incoming calls, only SPAP or PAP authentication is supported. • (Windows NT only) If you want to support incoming calls with Windows NT RAS Server, you must enable the parameter “Allow clear text authentication” in the RAS Server setup. Refer to the RAS online help for information on how to configure this parameter. 5 Select the Location tab.
Specify your ISDN Switch Type, Telephone Number(s), and Service Profile ID (SPID). Use the table below as a guideline. Parameter Description and Values Switch Type Specifies the ISDN switch type used by your ISDN service provider. North America: For most locations use Auto-Detect (Default).
Parameter Description and Values X.25 DTE Address Available with AO/DI support only An X.25 DTE Address identifies a node on an X.25 network. The address is a series of one to fifteen digits. Every X.25 node has an X.25 address. Your service provider assigns this value at subscription time. 6 If your DIVA T/A is equipped with analog device ports, select the Phone Lines tab; otherwise go to step 7.
Specify information about Phone 1 and Phone 2. Use the table below as a guideline. Parameter Description This phone line is used for a fax/modem only Selecting this option: • Enables “3.1KHz Audio”. This specifies that the ISDN network has to preserve the quality of the 3.1KHz voice band that is required for data audio signals such as Faxes and Modems. • Disables calling features such as: Call Forward, Call waiting, Caller ID, and 3-Way Conferencing.
7 If you have enabled AO/DI, select the X.25 tab, otherwise go to step 8. Configure the X.25 options you want implemented on your DIVA T/A. Use the table below as a guideline. Parameter Description X.25 Version There are two X.25 CCITT recommendations available for selection, 1984 and 1988. This information is provided by your Service Provider and should match the X.25 recommendation supported on the switch you are connecting to. Request Reverse Charging Determines who is charged by the X.
Parameter Description Select Default to use the Throughput Class specified in your network subscription, or select one of the values between 75 and 9,600 bps. If you select a bps value, the local and remote DTEs can negotiate to use a lower value on a per-call basis. Fast selection Increases the amount of Call User Data that you can include in the Call Request packet to 128 bytes, and specifies the type of response requested from the host.
Parameter Group number Description Specifies the number of the closed user group you have subscribed to. Obtain this number from your system administrator or network subscription. Others Lets you request additional facilities that are not listed in the Common Facilities group box. Specifies the code for additional facilities that you want to request each time the destination makes an X.25 call. Enter facilities as hexadecimal octets (eight-bit bytes). 8 Select the BACP tab.
Configure the BACP options you want implemented on your DIVA T/A. Use the table below as a guideline. Parameter Description BACP/BOD (Bandwidth Allocation Control Protocol/ Bandwidth on Demand) Note: Only applicable if your ISDN connection protocol is Multilink PPP. Activates the DIVA T/A's automatic traffic monitor for Multilink PPP connections. When activated, this DIVA T/A function monitors the send-and-receive traffic volume.
Parameter Description Initial Billing Interval: Specifies the length of the first billing interval (in seconds). For example, if your provider charges a fixed $X for the first 5 minutes enter 300. Note: Set the timer to 0 disables it. The Billing Interval timer is also, effectively disabled. Default: 60 seconds. Billing Interval: Specifies the increments your Service Provider uses to bill subsequent usage of your ISDN line (usage after the initial Billing Interval expires).
Parameter 2nd Bchannel Description Delay before opening: Specify the amount of time (in seconds) the throughput on your 1st Bchannel must exceed the Opening Threshold before the 2nd B-channel is added to the AO/DI connection. For example, if you specify 5 seconds, and the Opening Threshold is 70%, once the throughput on the 1st B-channel reaches 70%, there will be a delay of 5 seconds before the 2nd B-channel is added to the AO/DI connection.
9 Select the Advanced tab. Note: The above screen depicts the North American version of the software; if you are using an International version of the software, the Data Over Voice (DOV) field does not appear. Configure the advanced options you want implemented on your DIVA T/A. Use the table below as a guideline. Parameter Description and Values DBA (Dynamic Bandwidth Allocation) Note: Only applicable if your ISDN connection protocol is Multilink PPP.
Parameter Description and Values Data Over Voice Note: Available on North American models only. Specifies Data Over Voice Bearer Capability as the outgoing call type. If voice calls are less expensive than data calls in your tariff area, you can select this option. DOV calls are data calls made over a BRI line using Voice Bearer Capability. For DOV to work, the remote device to which you are connecting must support incoming DOV calls. Update Time Resets the DIVA T/A’s clock and calendar.
Using the Windows 3.x/WFW 3.11 Configuration Tool The DIVA T/A Windows Configuration Tool allows you to view the DIVA T/A version and firmware properties, download updated versions of the firmware, and configure dialing and communication information. Note: AO/DI is not supported on the Windows 3.x/WFW 3.11 configuration tool. To configure AO/DI, you should use the AO/DI AT commands as described in the Reference Guide.
2 The Properties screen opens. From this screen, verify the firmware version currently loaded on your DIVA T/A. 3 To download a new firmware version, see the section “Updating the DIVA T/A Firmware” on page 70. Update Time The DIVA T/A supports Caller ID (North America only). If you have a phone with call display and are receiving calls with the incorrect time or date, click the Update Time button. The DIVA T/A uses the PC clock to update its date/time.
Profile Configuration The DIVA T/A configuration settings are organized into profiles and saved in the unit’s non-volatile memory. Your DIVA T/A comes equipped with a factory profile which requires only your ISDN information to establish a Multilink PPP connection. After configuring the profiles, you must specify which profile is to be the default profile. The default profile automatically loads upon startup of the DIVA T/A.
2 Select a profile from the list (Profile 0, Profile 1, or Profile 2), and click Configure Profile. Note: You can change a profile name by clicking Rename Profile, then typing the new name. 3 The Profile Configuration Tool appears: Note: The screen above depicts the North American version of the configuration tool; if you are using an international version of the software, the screen does not contain Service Profile ID fields.
Configure the following parameters: Parameter Description Local Switch Type Specifies the ISDN switch type used by your ISDN service provider. North American firmware: For most locations, the default North America (AutoDetect) should be used. If the ISDN Switch Type cannot be automatically detected, specify National ISDN-1 (NI-1) or AT&T (5ESS) International (Excluding North America) firmware: Europe (Euro ISDN), Japan (INS-Net64), and Australia (TPH1962).
Parameter Description and Values Connect using this Note: To obtain maximum Multilink PPP protocol performance, you need a PC equipped with a UART 16650 (you might need to install a (Continued) fast com port card), which supports COM port speed of 230.4 kbps (versus 115.2 kbps with 16550). Note: Multilink PPP does not support the callback feature used by some servers. Warning: When using Multilink PPP for incoming calls, only SPAP or PAP authentication is supported.
4 If your DIVA T/A is equipped with analog ports, click the Phone Lines button to open the Phone Lines window; otherwise go to step 5 and continue. (See also, “Analog Device Support” on page 98.) Note: The above screen depicts the International Version of the Configuration Tool; if you are using the North American version of the software, the Region field does not appear on your screen. Configure the parameters as required.
Parameter Description Enable distinctive Changes the sound of the phone’s ring. ring This lets you distinguish calls received on Phone line 1 from calls received on Phone Line 2. Notes: • Select Distinctive Ring on only one phone, otherwise both will ring the same. • If your modem, fax, or telephone has difficulty detecting incoming voice calls, try toggling the distinctive ring feature. Region (International/Euro firmware only) Specifies the country where you are located.
6 In the Advanced window, configure the advanced parameters. Use the table below as a guideline. Note: The above screen depicts the North American version of the software; if you are using an International version of the software, the Data Over Voice (DOV) field does not appear. Parameter Description BACP/BOD (Bandwidth Allocation Control Protocol/ Bandwidth on Demand) Note: Only applicable if your ISDN connection protocol is Multilink PPP.
Parameter Description and Values DBA (Dynamic Bandwidth Allocation) Note: Only applicable if your ISDN connection protocol is Multilink PPP. Note: Only available on models equipped with analog device ports. When activated this function lets you initiate or receive telephone calls on your regular (nonISDN) telephone without interrupting your current connection. It releases one B-channel, as required for analog device calls, without interrupting the data link.
Parameter Description ISDN Cost Reduction Timers (Continued) Billing Interval: Specifies the increments your Service Provider uses to bill subsequent usage of your ISDN line (usage after the initial Billing Interval expires). For example if your Provider charges $Y per minute for each minute following the Initial Billing Interval, enter 60. Note: Setting the timer to 0 disables it. The Initial Billing Interval remains in effect. Default: 60 seconds.
Using the VT100 Configuration Tool The section below describes how to configure your DIVA T/A under DOS and OS/2. The VT100 Configuration Tool is incorporated in the DIVA T/A firmware. Use it to configure basic ISDN-specific parameters. Note: AO/DI is not supported on the DOS/OS/2 VT100 configuration tool. To configure AO/DI, you should use the AO/DI AT commands as described in the Reference Guide.
3 Enter the following command at the prompt and press Enter: AT@MENU The main VT100 Configuration Tool screen opens: *-----------------------------------------------------------------------------* | DIVA T/A ISDN Modem – North American Version 1.7.
Key Function F2 Selects a specific field. Press F2, and enter the letter corresponding to the field you want to edit. F4 Toggles between text (default) and graphics modes. ESC Cancels your configuration setting (if a change was made) or moves to the previous menu level (if no change was made). 4 From Open Profile in the Main Menu, use the pull-down list to select the profile you want to configure.
Configure the following parameters: Parameter Description Switch Type Specifies the ISDN switch type used by your ISDN service provider. North American firmware: For most locations, Auto-detect should be used. If the ISDN Switch Type cannot be automatically detected, specify National ISDN-1 (NI-1) or AT&T (5ESS). International (Excluding North America) firmware: Europe (Euro ISDN), Japan (INS-Net64), and Australia (TPH1962).
Parameter Description Directory Number Specifies your ISDN number(s). You can st nd specify either one or two ISDN numbers (1 /2 Number) st nd (1 and 2 ). Specify two numbers if your ISDN provider assigns two different numbers. (North America only) In most instances, Directory Numbers will be automatically detected with AutoSPID. For more information on AutoSPID, refer to page 96.
The following parameters can be configured: Parameter Description Use modem/fax only (Phone 1 and 2) Enabling this option causes the following: • Enables “3.1KHz Audio”. This specifies that the ISDN network has to preserve the quality of the 3.1KHz voice band that is required for data audio signals such as Faxes and Modems. • Disables calling features such as: Call Forward, Call waiting, Caller ID, and 3-Way Conferencing. (North America only) • Disables Dial Access (North America only).
Parameter Description Region Specify the country in which you are situated. This ensures that the DIVA T/A implements the ring pattern (and other analog device parameters) suited to your country. If your country is not listed, use the default, International. If problems persist, advanced users might also want to try and configure this parameter using the AT commands AT*F and AT!L. The DIVA T/A ISDN Modem Reference Guide documents these commands.
The following parameters can be configured: Parameter Description Enable DOV (Data Over Voice) Specifies Data Over Voice Bearer Capability as the outgoing call type. If voice calls are less expensive than data calls in your tariff area, you can select this option. DOV calls are data calls made over a BRI line using Voice Bearer Capability. For DOV to work, the remote device to which you are connecting must support incoming DOV calls.
Parameter Enable BACP/BOD (Bandwidth Allocation Control Protocol/ Bandwidth on Demand) Description Note: Only applicable if your ISDN connection protocol is Multilink PPP. Activates the DIVA T/A’s automatic traffic monitor for Multilink PPP Connections. When activated, this function monitors the send-and-receive traffic volume, and opens or closes your second B-channel as the traffic volume warrants.
Parameter Description and Values Initial Billing Interval Billing Interval (Continued) Billing Interval: Specifies the increments your Service Provider uses to bill subsequent usage of your ISDN line (usage after the initial Billing Interval expires). For example if your Provider charges $Y per minute for each minute following the Initial Billing Interval, enter 60. Note: Setting the timer to 0 disables it. The Initial Billing Interval remains in effect. Default: 60 seconds.
Updating the DIVA T/A Firmware This section contains procedures for loading new firmware. Updating Firmware under Windows 3.x/WFW 3.11 Warning: When you update your DIVA T/A firmware, the current profile configurations might get erased. It is recommended, therefore, that you record your current settings and SPID numbers before updating (use the Windows Configuration Tool to view your current settings). Follow these steps: 1 Start the DIVA T/A Configuration Tool. 2 Select the DIVA T/A and click Properties.
3 Click Yes when prompted if you want to continue. 4 Select the device with the required firmware and click OK (if necessary click Have Firmware, and specify the path to the firmware; click Open). 5 Click Yes when prompted if you want to continue. The new firmware will download to the device. This will take a few minutes. 6 Click OK when the download is complete. The device will automatically be refreshed.
Updating the DIVA T/A INF file (Windows 3.x/Windows NT 3.51) Note: This section only applies if you are using RAS. To update the DIVA T/A INF file: 1 Open any text editor. 2 Open the file MODEM.INF found in the Windows/System directory for Windows 3.x or Windows\System32\RAS directory for Windows NT 3.51, and remove all sections relating to the DIVA T/A ISDN Modem. 3 Open the updated file WFWNTEI2.INF. 4 Copy the contents of WFWNTEI2.INF and append it to the end of the MODEM.
Using the DIVA T/A Once you have installed and configured DIVA T/A, you can dial into your office LAN or access the Internet. Before attempting this, make sure that your PC is equipped with remote-access client software such as Dial-Up Networking, Shiva PPP client, or Microsoft RAS client software.
SecurID Connectivity To connect using SecurID, refer to the section appropriate to the protocol and operating system you are using. Using V.120 on Windows 95/98 The following example demonstrates how to use V.120 on Windows 95/98 to connect using SecurID: 1 Ensure you have configured V.120 on your DIVA T/A. 2 From the Dial-Up Networking group, right-click the connection on which you want to implement SecurID, and select Properties. 3 Under the “Using” field, click Configure.
Using PPP and Multilink PPP If you want to use PPP or Multilink PPP to access a SecurID server, ask your administrator: • what type of remote access server device they use (Shiva or Ascend) • if the server supports PPP or Multilink PPP If these conditions are not met, you cannot use PPP or Multilink PPP with SecurID.
Each time you attempt to make your connection, there is one more step to complete. You have to add the command "&%n" after the phone number entry, where n is your token, as shown below: If you have trouble logging into a SecurID server, contact your administrator or Internet Service Provider (ISP).
Dialing with Multilink PPP When you establish a Multilink PPP connection, each B-channel connects to a remote-directory number. In some ISDN implementations each B-channel connects to a unique number. If this is the case, enter both numbers and separate them with the character “~” or “&”.
Dialing with AO/DI When you establish a Multilink PPP connection, each B-channel connects to a remote-directory number. In some ISDN implementations each B-channel connects to a unique number. If this is the case, you should enter both numbers and separate them with the character “~” or “&”. To establish a Multilink PPP connection using AO/DI, you also need to enter your X.25 DTE Address. For example, to make a Multilink PPP connection to the numbers 1514-555-2345 and 1-514-555-2346, with an X.
For Windows 95/98 only. If you use “~” or “&” to separate the Phone-Numbers, deselect the “Use Country and area code” parameter on the Properties tab of Dial-Up Networking. Manually enter the Country Code, Area Code, and PBX Prefix (if required) for both numbers. If both B-channels connect to the same number, the number need only be entered once. Contact your Internet Service Provider (ISP) if you are not sure whether you need one or two remote numbers.
Establishing a Connection Go to the section that corresponds to your platform and follow the procedure. Windows 95/98 1 Double-click the Dial-Up Networking icon. 2 Double-click Make New Connection. The Make New Connection Wizard opens: Select the Eicon DIVA T/A ISDN Modem from the Select a modem field, and then click Next. 3 Enter the ISDN number and Country Code of the location you wish to call, click Next, then click Finish. 4 Double-click the newly created My Connection icon.
5 Enter your user name and password, and click Connect. 6 If you successfully establish the connection, you can communicate with the remote host. If you do not establish the connection, verify your Server Type and TCP/IP settings and alter them as required. Windows NT 4.0 1 In the Dial-Up Networking folder, double-click the Make Connection icon. 2 Click New.
3 The Phonebook Entry Wizard opens. Click Next. 4 Check each applicable statement, then click Next. 5 Enter the phone number you want to call, then click Next.
6 Click Finish. 7 Click Dial. 8 Enter your user name and password, then click OK. 9 If you successfully establish the connection, you can communicate with the remote host. If you do not establish the connection, verify your configuration and TCP/IP settings and alter them as required.
Windows NT 3.51 Note: The following example assumes you are using RAS. 1 In the Remote Access Service group, double-click Remote Access. 2 Click Add. 3 Enter the name and phone number you want to call, then click OK.
4 Click Dial. 5 Enter your user name and password, then click OK. 6 If you successfully establish the connection, you can communicate with the remote host. If you do not establish the connection, verify your configuration and TCP/IP settings, and alter them as required.
Windows 3.x The following example assumes you are using the Shiva PPP protocol stack. Note: If your workstation is configured as a Windows for Workgroups Remote Access Service (RAS) client, you must configure the V.120 rate adaption protocol on both the DIVA T/A workstation and on the remote device (RAS Server ISDN adapter). If you are using the Shiva PPP protocol stack (or similar), then you can use PPP or MLPPP. 1 Ensure that the ShivaRemote connection software is installed on your computer.
4 Select the Tools menu, and choose Port Setup. Select the DIVA T/A as the modem, then click OK. 5 Click Options.
6 Ensure that IPX and/or IP are enabled, then click OK. 7 Click Connect. 8 If you successfully establish the connection, you can communicate with the remote host. If you do not establish the connection, verify your configuration and TCP/IP settings, and alter them as required.
DOS 1 Ensure that the ShivaRemote connection software (or similar) is installed on your computer. 2 Enter the following command: C:\SHIVA\CONNECT 3 From the Tools menu, choose Port Setup and select the COM port. 4 Select Modems. Enter “Eicon DIVA T/A ISDN Modem” in the Modem Name field and set the speed to 115200 bps (or 230400 if your COM port supports it), then select OK. 5 Click Options. 6 Enable IP and/or IPX (as required), then select OK.
7 Enter your user name, password, and the phone number you want to dial, then click Connect. 8 If you successfully establish the connection, you can communicate with the remote host. If you do not establish the connection, verify your configuration and TCP/IP settings, and alter them as required.
OS/2 1 Double-click Programs, then double-click Internet Modems. 2 Double-click Dial Other Internet Providers. 3 Click Add Entry.
4 Enter your Login ID, Password, and the Phone Number you want to dial. 5 Click Connect Info, then enter your Domain Name server, your Host Name, and your Server Name. 6 Click Modem Info. Select a Modem from the drop-down list, and then select the COM port assigned to the DIVA T/A ISDN Modem.
7 Click Dial to place your call. 8 If you successfully establish the connection, you can communicate with the remote host. If you do not establish the connection, verify your configuration and TCP/IP settings, and alter them as required.
Connecting to the World Wide Web To connect to the World Wide Web, follow the instructions in the section “Establishing a Connection” on page 80; when the procedure instructs you to enter a dial-up number, enter the number of your Internet Service Provider (ISP). Once you are successfully connected to your ISP, go to your desktop and click the icon representing the “Browser” you want to use. The “Browser” opens and you are ready to explore the World Wide Web.
RVS-COM Support (For Windows 95/98 and Windows NT only) The DIVA T/A supports both the Lite and Full versions of RVS-COM 1.38. RVS-COM adds the following features to your DIVA T/A: • File Transfer/ISDN Eurofile Transfer. Easy file transfer and Eurofile transfer. • Fax/Softfax. Fax Group 3 reception/transmission integrated into the Windows e-mail systems using fax modems. • E-mail. Direct e-mailing from the Windows e-mail systems between PCs including all mail contents. • Host Mode/Answerphone.
Automated SPID Selection (AutoSPID) (North America only) AutoSPID is a new National ISDN protocol feature that enables the DIVA T/A to download a list of Service Profile Identifiers (SPIDs), Directory Number (DN) and Call Type (CT) information from the ISDN line. It also enables the DIVA T/A to determine whether other devices currently initialize the SPIDs. Note: Check with your ISDN service provider to determine if they support the AutoSPID feature.
Non-Initializing Terminal Mode (North America only) Non-Initializing Terminal (NIT) mode is a new ISDN protocol feature that enables the DIVA T/A to operate without SPIDs. You can use NIT only if your ISDN provider supports it. To configure the DIVA T/A for Non-Initializing Terminal mode, deselect the SPID checkbox in the Windows Configuration Tool, or specify “Yes” for the Non-Initializing parameter in the VT-100 Configuration Tool.
Analog Device Support (Only available on some models) The DIVA T/A has two analog device ports that let you connect analog devices such as ordinary telephones, answering machines, fax machines, and modems. Calls to and from these analog devices are carried over your ISDN line. You also get additional calling features such as Call Forwarding etc. For more information on these calling features see page 100.
Multilink PPP with AO/DI support In the case of Multilink PPP with AO/DI support, both analog devices can still be used as AO/DI uses the ISDN D-channel X-25 packet service to maintain an "always on" connection between you and your Service Provider. Low bandwidth requirements can be met using this constant connection, such as sending and receiving e-mail, credit card verification, etc. For example, while a MLPPP data connection is in progress using both B-channels, one of your telephones rings.
Calling Features (North America only) Note: If you did not use EZ-ISDN or IOC to order your line, verify that the DIVA T/A’s default settings are compatible with those of your ISDN provider before using this feature. Refer to the section “Feature Key Values” on page 102 for more information. Note: To use Calling Features, your ISDN line must support the following: Additional Call Offering (ACO) and Flexible Calling (FC).
hold and the second call is answered. You can press the receiver button to toggle between the 2 calls. If your phone includes Caller ID (see below), the phone will display the number of the second incoming call (the call waiting). Note: DIVA T/A uses a proprietary code to disable Call Waiting (**70). You must use this code in place of the one specified by your ISDN provider. To disable Call Waiting: Pick up the phone, wait for a dial-tone, and then press **70.
Call Transfer (implicit) Call Transfer allows you to disconnect from a Three-Way Conference call and leave the other two people connected. It works as follows: Establish a Three-Way call as described in the section above. Hang up. The other two people remain connected. Feature Key Values To access Calling Features, the DIVA T/A supplies the ISDN switch with certain codes called Feature Keys. Not all ISDN providers use the same Feature Keys (unless you are using an EZ-ISDN or IOC line).
4 Type following commands: AT*K1=n where n is the value provided by your ISDN provider for 3-Way Conferencing. AT*K3=n where n is the value provided by your ISDN provider for Call Drop. AT*K5=n where n is the value provided by your ISDN provider for Message Waiting Indicator. 5 Save the new settings so that they are available every time you start the DIVA T/A. Type the following command: AT&Wn where n is the number of the Profile (0, 1, or 2) to which you want to save.
Appendix A: ISDN Line Termination This section applies to S/T interface users in Australia and North America. It provides instructions that help you set up termination scenarios. Termination requirements vary according to the number of devices connected to the NT1, and the distance between the devices and the NT1. Single ISDN Device If the NT1 is connected to a single ISDN device (e.g. DIVA T/A), follow the appropriate procedure below.
Multiple ISDN Devices If the NT1 is connected to more than one ISDN device, follow the appropriate procedure below. 75 meters or more If the connection spans 75 meters (250 feet) or more, set the DIVA T/A 100 Ω switch to the On position. Set the other ISDN devices to 100 Ω of resistance, and the NT1 to no resistance. Consult the manuals provided with the other ISDN devices and NT1 for more detailed instructions. Note: Some NT1s do not support connections over 75 meters (250 feet).
Appendix B: Troubleshooting the DIVA T/A This section provides information that will help you to troubleshoot DIVA T/A problems.
D LED LED Indicator Description Off • Flashing • Steady • The ISDN physical interface is not activated. The LINK LED might provide additional status information. The ISDN physical interface is activated and initializing. Continuous flashing indicates an error in the initialization process. No data transmission is possible. • In the case of continuous flashing, AT status commands can be used to identify the problem. Note: Check your SPID. Most often, problems result from incorrectly entered SPIDs.
PHONE LEDs 1, 2 LEDs LED Indicator Description Off • No call activity on the specified voice channel. Flashing • An outgoing or incoming connection is being established on the specified voice channel. Steady • There is a connection on the specified voice channel. SERIAL LEDs TX-RX LED LED Indicator Description Off • There is no data being transferred on the serial port. On (intermittent) • Data is being transferred on the serial port.
Other LEDs FAULT LED LED Indicator Description Off • The unit is operating within normal parameters. Flashing • Indicates a hardware fault condition. Steady • Indicates a software fault condition. POWER LED LED Indicator Description Off • The unit is powered down. Steady • The unit is powered up. Common Problems Listed below are possible solutions to common problems: SecurID is not working with the DIVA T/A. Depending on the server type, the DIVA T/A might support SecurID.
The DIVA T/A has trouble detecting incoming voice calls on the analog device lines. There might be a problem with distinctive ring. Open the Configuration Tool and disable distinctive ring in the Phone Lines panel. After installation, the modem speed cannot be set higher than 115,200 bps (Windows 95/98 or Windows NT 4.0) Remove and re-install the INF file as described in the section “Windows 95” on page 13, "Windows 98" on page 17 or “Windows NT 4.0” on page 20.
When you pick up the phone you do not get a dial tone. Make sure the ISDN line has voice capability. If you are using the S/T version, try removing other ISDN equipment on the line. Try using a different SPID and DN on the phone port. If the problem persists, contact Eicon Technology. The LINK LED does not go on. Make certain that the cable in the ISDN connection has the right interface: U or S/T.
4 Type following commands: AT*Vn=1 where n is the number of the analog device. 5 Save the new settings so that they are available every time you start the DIVA T/A. Type the following command: AT&Wn where n is the number of the Profile (0, 1, or 2) to which you want to save. 6 To restart the DIVA T/A, type: Type ATZn where n is the number of the profile number (0,1 or 2) you want to be active.
Dumping the DIVA T/A Memory If a software fault condition occurs while you are using the DIVA T/A, you need to capture a memory dump of the DIVA T/A.
DIVA T/A Firmware Specifications Software Feature Supported on the DIVA T/A WAN Protocols • PPP (Point-to-Point Protocol) • Multilink PPP • Always On/Dynamic ISDN (AO/DI) • ISDN (Q.921/Q.931: NI-1, AT&T 5ESS Custom, EuroISDN, TPH1962/TS.013, and INS-Net64) • V.120 Rate Adaption • V.
Software Feature Supported on the DIVA T/A Management and Configuration • • • • • Plug and Play • Windows Plug and Play External COM Device Compliant SPID Wizard Windows Configuration Tool VT-100 Terminal Emulation AT Commands Firmware upgrades using XModem Download or the Windows Configuration Tool DIVA T/A ISDN Modem User’s Guide 115
DIVA T/A Hardware Specifications Hardware Feature ISDN Interface Supported on the DIVA T/A • 1 ISDN BRI U or ISDN BRI S/T (RJ45) Analog device Interfaces • 2 Analog Ports (RJ11) (selected models only) Console Port • RS-232 Asynchronous • 1200 bps to 230.4 kbps • Automatic Baud Rate Detection Non-Volatile Configuration • 4 KB non-volatile memory for storing configuration profiles Physical Dimensions • 1.5H x 6.0D x 8.5W inches (4.0H x 15.4D x 21.7W cm) Weight • 1.3 lbs (0.
Customer Service To obtain technical support, contact either Eicon Technology or your Eicon Technology supplier, depending on your location. From some regions, you can save time and long-distance charges by faxing Eicon Technology a description of your situation. Customer Services personnel will then call you with a solution or a request for additional information.
International Regulatory Information and Conditions of Use Regulatory Information for the United States: FCC Warning Declaration of Conformity We: Eicon Technology Inc. 2155 Chenault Drive Suite 503 Carrollton, Texas USA 75006 1-800-80-EICON (972) 417-5515 Fax: (972) 417-5610 Declare under our sole legal responsibility that the product to which this declaration relates, are in conformity with Part 15 of the FCC Rules.
This equipment cannot be used on telephone company-provided coin service. Connection to party line service is subject to state tariffs. If this equipment causes harm to the telephone network, the telephone company will notify you in advance that temporary discontinuance of service may be required. If advance notice isn’t practical, the telephone company will notify the customer as soon as possible. Also, you will be advised of your right to file a complaint with the FCC if you believe it is necessary.
Regulatory Information for Europe This equipment displays the CE 168 mark to show that it has been tested and found to be in full compliance with the requirements of the Terminal Equipment, EMC and Low Voltage Directives (91/263/EEC, 89/336/EEC and 72/23/EEC, as amended by Directive 93/68/EEC). The CE 168 mark signifies that this product is approved for connection to ISDN within the EU and EEA. Safety Status: SELV No voltages within this equipment exceed SELV levels.
Limited Warranty Eicon Technology Corporation warrants to the original purchaser of this Eicon Technology Product that it is to be in good working order for a period of five (5) years from the date of purchase from Eicon Technology or an authorized Eicon Technology dealer.
Product Comment Form DIVA T/A ISDN Modem User’s Guide 206-152-04 We value your comments. Please use the tables below to rate this product.