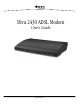
Diva 2430 ADSL Modem User’s Guide www.eicon.
Fourth Edition (March 2001) 206-362-04 Diva and Eicon are either registered trademarks or trademarks of Eicon Networks Corporation. Microsoft, Windows, and Windows NT are either registered trademarks or trademarks of Microsoft Corporation in the United States and/or other countries. Adobe and Acrobat are either registered trademarks or trademarks of Adobe Systems Incorporated in the United States and/or other countries. Apple and Macintosh are trademarks of Apple Computer, Inc.
Contents Introduction ...............................................................................................................................4 Introducing the Diva 2430 ADSL Modem................................................................................................................. 5 Package Contents .................................................................................................................................................... 6 Setup ..................................
Introduction In This Section Introducing the Diva 2430 ADSL Modem.................................................................5 Package Contents ........................................................................................................
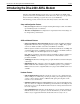
Introduction: Introducing the Diva 2430 ADSL Modem Page 5 Introducing the Diva 2430 ADSL Modem The Diva 2430 ADSL Modem provides fast access to the Internet via ADSL and is perfect for home users and small office / home office users. It is easy to set up and has many features that will help you get the most out of your ADSL line. The following provides a brief overview of the many features of the Diva 2430.
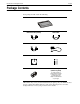
Introduction: Package Contents Page 6 Package Contents Your package should contain the following. Diva 2430 Ethernet Cable (Yellow) USB Cable ADSL Phone Cable Power Adapter CD-ROM Quickstart Microfilters* Phone Adapter (where required) In certain countries, a phone adapter is provided to enable you to connect your Diva 2430 to the telephone outlet standard for your region. *Microfilters may or may not be included with your package.
Setup In This Section Overview.......................................................................................................................8 Connecting Microfilters ..............................................................................................9 USB Setup ..................................................................................................................10 Ethernet Setup ..................................................................................................
Setup: Overview Page 8 Overview This chapter explains how to connect the Diva 2430 to a single computer or to a local area network. Connecting to Both Ports Once you connect a computer to either the USB or Ethernet port, you can connect a second computer to the unused port without reconfiguring the device. However, to ensure proper operation, connect only one computer and verify that the device is working correctly before connecting a second computer.
Setup: Connecting Microfilters Page 9 Connecting Microfilters Before installing the Diva 2430, be sure to install microfilters on all telephone devices, if required. Contact your ADSL provider if you are unsure if microfilters are needed for your installation. About Microfilters A microfilter is a small device designed to reduce interference between ADSL signals and your regular telephone signals.
Setup: USB Setup Page 10 USB Setup Note: The USB port can only be used with systems running Windows 98, Windows 2000, or Windows Me. If you are using Windows 98, Windows 2000, or Windows Me, you have the option of connecting the device to your computer’s USB port. This is described in the following procedure. Once set up, you can then connect a second computer that supports Ethernet to the Diva 2430’s Ethernet port.
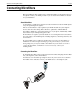
Setup: USB Setup Page 11 Step 1: Connect the Cables Consult the following diagram when connecting the cables. Do not connect one computer to both ports on the device. ADSL Cable USB Cable Power Adapter Procedure Leave your computer on during the installation. Once you connect the Diva 2430 to your computer, Windows will automatically detect the device and request device driver information, which is provided on the Diva 2430 CD-ROM.
Setup: USB Setup Page 12 Step 2: Install USB Drivers 1. Once the USB cable is connected, the ‘New Hardware Found’ window appears, followed by the ‘Add New Hardware Wizard’ window. 2. Click ‘Next’ to begin. 3. Select ‘Search for the best driver for your device’ then click ‘Next’. Select this option 4. Select ‘Specify a location’ and clear other options.
Setup: USB Setup Page 13 5. Click ‘Browse’ and go to the ‘USB’ folder on the Diva 2430 CD-ROM. • If you are using Windows 98, select ‘WIN98’. • If you are using Windows 2000, select ‘WIN2000’. • If you are using Windows Millennium Edition, select ‘WINME’. 6. Click ‘OK’, then click ‘Next’. Windows identifies the driver as an ‘Eicon Diva 2430 Adapter’. 7. Click ‘Next’ to begin installation of the driver.
Setup: USB Setup Page 14 Step 3: Test Internet Access The Diva 2430’s default settings may already grant you Internet access. Try accessing an external web site using your browser, such as the Diva 2430 web site at: http://www.eicon.com • If successful, you do not need to change any settings. • If you receive a ‘page not found’ or similar error, reboot your computer and try again.
Setup: Ethernet Setup Page 15 Ethernet Setup The procedure in the following section describes how to set up the Diva 2430 using any system equipped with an Ethernet card and capable of communicating via the TCP/IP protocol. This includes Windows, Macintosh, and Linux. This procedure assumes your Ethernet card is installed according to the manufacturer’s instructions. In This Section Step 1: Connect the cables ....................................................................
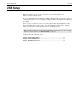
Setup: Ethernet Setup Page 16 Step 1: Connect the cables Consult the following diagram when connecting the cables. Do not install one computer to both ports on the device. ADSL Cable Ethernet Cable (yellow) Power Adapter Procedure 1. Connect the Diva 2430 to an electrical outlet using the power adapter. The power connector is labelled on the Diva 2430. 2. Connect the Diva 2430 to your ADSL telephone outlet (RJ11) using the supplied ADSL cable. The ADSL port is labelled on the Diva 2430.
Setup: Ethernet Setup Page 17 Step 2: Test Internet Access The Diva 2430’s default settings may already grant you Internet access. Try accessing an external web site using your browser, such as Eicon Networks’s site at: http://www.eicon.com • If successful, you do not need to change any settings. • If you receive a ‘page not found’ or similar error, reboot your computer and try again.
Setup: Optional: Install the Diva Assistant Page 18 Optional: Install the Diva Assistant The Diva Assistant provides convenient access to the web-based configuration interface via the Windows system tray and also includes online help and utilities. The Diva Assistant also provides status information for the device. However, you are not required to use this software in order to access the Internet through your ADSL line. Note: The Diva Assistant is very useful when setting up the Diva 2430 on a LAN.
Setup: Optional: Install the Diva Assistant Page 19 5. Click ‘Next’ and follow the onscreen instructions. 6. In the ‘Installation Complete’ window, click ‘Finish’. 7. After you click ‘Finish’, you will see a message stating that you must restart your computer before launching the software. Click ‘Yes’. You may encounter problems with the Diva Assistant if you do not restart your computer after installation.
Setup: LAN Setup Page 20 LAN Setup Installing the Diva 2430 on an existing LAN can be extremely simple, or quite challenging, depending on the complexity of your existing LAN setup. To help you successfully integrate the Diva 2430 into your setup, this section provides important points to keep in mind when setting up on a LAN. However, due to the wide range of networking equipment and topologies that are in use worldwide, your configuration needs may fall outside the strategy presented here.
Setup: LAN Setup Page 21 device. The LAN IP address is changed through the web interface. If you have a computer on your LAN that is using Windows 95 or later, you can also use the Diva Assistant. Diva Assistant The Diva Assistant (for Windows 95 or later) can detect the Diva 2430 over a LAN and can change the LAN IP address for you, without having to change your own IP address settings. Follow these steps: 1. 2. 3. 4. 5.
Setup: Configuring Settings via the Web Interface Page 22 Configuring Settings via the Web Interface The Diva 2430’s settings can be changed via the web-based configuration interface. These configuration menus are accessed via a web browser. Editing your configuration settings may not be necessary if the settings on the Diva 2430 are already compatible with the ADSL network to which you are connected. To test if you now have Internet access, try accessing an external web site using your browser.
Setup: Configuring Settings via the Web Interface 2. Page 23 The ‘Log in’ page appears. Click ‘Log in’ to see the main menu. (By default the Diva 2430 has no password.) Note: If you cannot access the ‘Log in’ page, see Troubleshooting on page 31. 3. The main menu appears. To access any of the configuration menus, click on the links below the ‘Administration’ bar. Using the Configuration Menus • Each configuration menu has a ‘Save’ button.
Setup: Configuring Settings via the Web Interface Page 24 • If this is the first time you have configured the device, you may need to wait up to one minute (after making changes) before being able to access the Internet. This is because your computer may have initially been assigned its network settings from the Diva 2430, when the ADSL line was down and your provider’s server was not available. If, after a minute, it is still not working, reboot your computer in order to force a new DHCP request.
Setup: Configuring Settings via the Web Interface Page 25 ADSL Settings This menu allows you to choose the ADSL mode (‘G.lite’ or ‘Multimode’). It is recommended that you keep the mode set to ‘Multimode’ as this includes attempts to negotiate ‘Full-rate (G.992.1)’, ‘G.Lite (G.992.2)’, and ‘ANSI T1.413’. The new settings take effect immediately upon clicking ‘Save’. The two settings pages you just visited are the only two that affect access to the Internet.
Setup: TCP/IP Setup Page 26 TCP/IP Setup To be able to communicate with the Diva 2430 via Ethernet, your computer must have TCP/IP installed and configured to act as a DHCP client. This allows your computer to acquire its IP address and other settings from your provider’s DHCP server dynamically. The following procedures describe how to set your TCP/IP settings for Windows 95, Windows 98, Windows NT 4.0, Windows 2000, and Macintosh (Mac OS 8).
Setup: TCP/IP Setup Page 27 Windows 95/98 The following procedure describes how to verify and install TCP/IP on Windows 95 or Windows 98. If TCP/IP is already installed on your system, go to Configuring TCP/IP (below). Note that if you have more than one adapter installed on your system, you will have to use the adapter that is in use by the Diva 2430. Procedure 1. Click ‘Start’, ‘Settings’, ‘Control Panel’. 2. Double-click the ‘Network’ icon. The ‘Network’ dialog box appears.
Setup: TCP/IP Setup Page 28 Windows NT 4.0 The following procedure describes how to install TCP/IP on Windows NT 4.0. If TCP/IP is already installed on your system, see Configuring TCP/IP (below). Note that if you have more than one adapter installed on your system, you will have to use the adapter that is in use by the Diva 2430. Procedure 1. Click ‘Start’, ‘Settings’, ‘Control Panel’. 2. Double-click the ‘Network’ icon. The Network dialog box appears. 3. Click the ‘Protocols’ tab.
Setup: TCP/IP Setup Page 29 Windows 2000 Windows 2000 automatically created a network adapter profile (named ‘Local Area Connection’ by default) when the adapter was installed. However, the TCP/IP protocol is not installed by default. You must check if this profile has the Internet Protocol (TCP/IP) installed and properly configured. Note that if you have more than one adapter installed on your system, you will have to use the adapter that is in use by the Diva 2430. Procedure 1.
Setup: TCP/IP Setup Page 30 Macintosh (Mac OS 8 or later) TCP/IP is installed by default with your Mac OS. If it is not in the Control Panels folder, reinstall it from your System Installation CD. Procedure 1. From the Apple menu, select ‘Control Panels’. 2. Select ‘TCP/IP’. 3. Set ‘Connect via’ to ‘Ethernet’. 4. Set ‘Configure’ to ‘Using DHCP Server’. 5. Close the TCP/IP control panel. 6. Click ‘Yes’ to save the changes.
Setup: Troubleshooting Page 31 Troubleshooting I can’t access the Internet. • Make sure all cables are connected properly. • If the power light is not on, verify that the power cable is connected properly. • If the ADSL light is not blinking, verify that the phone cable is connected properly. • Make sure your TCP/IP settings are correct. See TCP/IP Setup on page 26. • Some providers require that you use PPPoE software to establish a connection with the network. Contact your provider for more information.
Setup: Troubleshooting Page 32 • If your Diva 2430 is connected to a LAN, make sure it is the only device with the IP address 192.168.1.1. To verify, ping the address 192.168.1.1. If you get a reply, disconnect the Diva 2430 from your LAN and ping 192.168.1.1 again. If you still get a reply, you have two devices on the same LAN with the same IP address.
Using your Diva 2430 In This Section About the Diva Assistant ..........................................................................................34 Indicator Lights .........................................................................................................37 Resetting the Device ..................................................................................................
Using your Diva 2430: About the Diva Assistant Page 34 About the Diva Assistant The Windows Diva Assistant provides a convenient way to manage your Diva Assistant. The following is a brief description of how to use the software. For more information, consult the Diva Assistant online help.
Using your Diva 2430: About the Diva Assistant Page 35 System Tray Icon Once you install the Diva Assistant and restart your computer, the Diva Assistant icon will appear in the system tray. Launches the Diva Assistant. Right click this icon to activate this menu. The Diva Assistant program group is installed on your ‘Start’ menu. Click here to launch the online help. Click ‘Close’ to close the Diva Assistant and remove the icon from the system tray.
Using your Diva 2430: About the Diva Assistant Page 36 Performance Tab This tab displays information about incoming and outgoing bandwidth usage. You can drag the performance windows onto the desktop. Tools Tab Starts the web-based configuration interface using your default browser. Lets you upgrade your Diva 2430’s firmware. Diagnostic Log Tab The Diagnostic Log displays the messages sent by the the Diva 2430. Double-click on an entry to get more information on a particular entry.
Using your Diva 2430: Indicator Lights Page 37 Indicator Lights The lights on the front of the device reflect the status of the Diva 2430. ADSL Light • Solid Green: An ADSL connection has been established. This does not mean you can access the Internet (you may need to install PPPoE software to do so). • Flashing Green: The Diva 2430 is attempting to establish an ADSL connection. • Off: The ADSL cable is not connected properly. Verify your cable connections.
Using your Diva 2430: Resetting the Device Page 38 Resetting the Device Normal Reset To do a normal reset, press the ‘Reset’ button on the side of the device. (For some models, this button is located on the bottom of the device.) A normal reset ‘reboots’ the device. Your settings are left intact. You can also use the ‘Reset’ button found in the main menu of the web configuration interface. Reset Settings to Factory Defaults This procedure resets the device settings to the factory defaults.
Web-based Configuration Interface In This Section Overview.....................................................................................................................40 Starting the Web-based Configuration Interface ...................................................41 Saving and restoring configuration files..................................................................43 Upgrading Firmware ................................................................................................
Web-based Configuration Interface: Overview Page 40 Overview The Diva 2430 uses your ordinary telephone line to provide an ADSL connection to your Internet Service Provider or corporate network. Many options and settings are set to default values that give good results for most cases. For optimal performance, or to define a custom setup, you must manually adjust the configuration of the Diva 2430. To change these settings, the Diva 2430 offers a web-based configuration interface.
Web-based Configuration Interface: Starting the Web-based Configuration Interface Page 41 Starting the Web-based Configuration Interface Only one user can access the web-based configuration interface at a time. Procedure 1. If you installed the Diva Assistant, double-click the icon in the Windows system tray, click the ‘Tools’ tab, then click ‘Configure’. If you do not have access to the Diva Assistant, start your web browser and click ‘File’, ‘Open’. Type 192.168.1.1 and click ‘OK’.
Web-based Configuration Interface: Starting the Web-based Configuration Interface Page 42 4. The Diva 2430 then displays the ‘Main Configuration’ menu. 5. Click on any of the links in the ‘Administration’ section to change settings. ‘Save’, ‘Reset Form’, and ‘Cancel’ Buttons • Each configuration menu has a ‘Save’ button. For the ‘ADSL’, ‘System’, and ‘Security’ menus, the changes you make become active once you click ‘Save’.
Web-based Configuration Interface: Saving and restoring configuration files Page 43 Saving and restoring configuration files The web-based configuration interface makes it easy to save and restore configuration settings on the Diva 2430. This is useful for backup purposes or if you intend to maintain several different configurations. When you save the configuration settings, they are stored in a file on your computer.
Web-based Configuration Interface: Upgrading Firmware Page 44 Upgrading Firmware The Diva 2430 contains special software, called firmware, that controls its operation. The firmware is stored in flash memory, which allows it to be replaced by uploading a new version. Note: Configuration settings are not lost when upgrading the firmware to a newer version. However, configuration settings may be lost if you upload an older firmware on the device.
Web-based Configuration Interface: Upgrading Firmware Page 45 Uploading New Firmware 1. From the ‘Firmware’ page, click the ‘Browse’ button. 2. Select the new firmware file. If you downloaded new firmware, point to the file you downloaded from the Eicon Networks web site. A firmware file is also located in the ‘Firmware’ folder on the CD-ROM that came with your Diva 2430. 3. Click the ‘Upgrade’ button to upload the firmware to the Diva 2430. This may take a few minutes.
Web-based Configuration Interface: Resetting to Factory Defaults Page 46 Resetting to Factory Defaults Resetting the Diva 2430 to factory defaults will erase all your configuration settings, including the system password. You may want to consider backing up your current configuration, as explained in Saving and restoring configuration files on page 43, before you reset to factory defaults. Note: You can also reset to factory defaults using the Reset button on the device itself.
Advanced Topics In This Section Security.......................................................................................................................48 Virtual Private Networking ......................................................................................
Advanced Topics: Security Page 48 Security Connecting your computer to the Internet or a remote corporate network creates a wide range of benefits but also exposes your computer to certain risks. To safeguard your data and systems, the Diva 2430 provides security features. For starters, access to the device is not allowed through your ADSL line. This section explains how to configure security features for optimal protection. Automatic Log Out................................................................
Advanced Topics: Security Page 49 Automatic Log Out The Diva 2430 applies an automatic time-out to configuration sessions. When a configuration session is idle for more than the time-out value, the Diva 2430 automatically logs the user out. This reduces the risk of unauthorized persons taking advantage of a logged-in computer that has been left unattended. The time-out values cannot be configured and are set as follows: • If you are using the web interface, the time-out is 30 minutes.
Advanced Topics: Security Page 50 System password The Diva 2430 provides a system password that restricts access to the web-based configuration and command line interfaces. This ensures that configuration changes can only be made by authorized personnel. By default, no password is defined. Setting a Password 1. From the main page, click ‘Security’. 2. Enter the password in the ‘Login Password’ and ‘Repeat Login Password’ fields. 3. Click ‘Save’. The changes take effect immediately.
Advanced Topics: Security Page 51 Disable Inbound Server Requests This option drops all incoming server requests from the ADSL line addressed to a well-known port (less than 1024). This effectively blocks requests for the most common servers (such as HTTP, FTP, Telnet, etc.). By default, this option is not checked. Enabling this Option 1. From the main page, click ‘Security’. 2. Make sure ‘Disable Inbound Server Requests’ is checked. 3. Click ‘Save’. The changes take effect immediately.
Advanced Topics: Security Page 52 IP Traffic Only If checked, only IP traffic is accepted or sent, and other network traffic (such as IPX or Appletalk) is dropped. Enabling this option can improve the performance of your network. By default, this option is not checked. Enabling this Option 1. From the main page, click ‘Security’. 2. Make sure ‘IP Traffic Only’ is checked. 3. Click ‘Save’. The changes take effect immediately.
Advanced Topics: Virtual Private Networking Page 53 Virtual Private Networking A virtual private network (VPN) is an interconnection between two networks that uses the PPTP (point-to-point tunneling protocol). By using the Internet to transport data, a VPN can eliminate long distance charges associated with traditional dial-up solutions. Since PPTP provides a secure connection, network security is not compromised. If you are using Windows 95, Dial-Up Networking 1.
Advanced Topics: Virtual Private Networking 2. Enter a name for your connection. 3. Select ‘Microsoft VPN Adapter’ as the device. Page 54 Note: If you do not see ‘Microsoft VPN Adapter’ as an option, make sure the VPN adapter is installed on your system. 4. Click ‘Next’. You will see the following dialog box. 5. Enter the IP address or host name of the VPN server in the ‘Host name or IP Address’ field. 6. Click ‘Next’, then click ‘Finish’. Setting up a VPN with Windows 2000 1.
Advanced Topics: Virtual Private Networking Page 55 2. The Network Connection Wizard opens. Click ‘Next’. 3. Select ‘Connect to a private network through the Internet’ and click ‘Next’. 4. Select ‘Do not dial the initial connection’ and click ‘Next’.
Advanced Topics: Virtual Private Networking Page 56 5. Enter the host name or IP address of the VPN server, then click ‘Next’. 6. The Connection Availability screen appears. Select ‘For all users’ to make the connection available to all users on your network, or ‘Only for myself’ to reserve the connection for personal use. Click ‘Next’. 7. The ‘Completing the Network Connection Wizard’ window appears. Type a name for the connection, then click ‘Finish’.
Advanced Topics: Virtual Private Networking Page 57 Dialing the VPN To connect to the VPN, double-click the connection you just created. When prompted, enter your user name and password and click ‘Connect’. You will see a Dial-Up Networking dialog box, showing the details of your connection. Note: The bps value reported by this dialog box is your LAN Ethernet speed.
Specifications and Regulatory Information: Virtual Private Networking Page 58 Specifications and Regulatory Information In This Section Specifications..............................................................................................................59 Regulatory Information ............................................................................................
Specifications and Regulatory Information: Specifications Page 59 Specifications General Specifications Packaging Contents • Diva 2430 ADSL Modem • Diva 2430 CD-ROM (includes Diva Assistant software, documentation in PDF and HTML formats, and bonus third-party software) • Installation Guide • USB cable • Ethernet crossover cable (RJ45) • ADSL telephone cable (RJ11) for connecting your ADSL line • External power supply • Microfilters (optional) (for connection to existing telephone devices) • Telephone ca
Specifications and Regulatory Information: Specifications Page 60 Software and Firmware Specifications Installation Features • Easy access to configuration pages via a web browser • Auto detection of common problems (connection not possible, incorrect configuration, etc.
ATM Features • • • • • • • • • • • AAL5 (ATM Adaptation Layer 5) VC Multiplexed LLC Encapsulation UNI 3.0, 3.
Specifications and Regulatory Information: Regulatory Information Page 62 Regulatory Information • Regulatory Information for the United States ...................................................63 • Regulatory Information for Canada ...................................................................65 • Regulatory Information for the European Union..............................................
Specifications and Regulatory Information: Regulatory Information Page 63 Regulatory Information for the United States Warning: Changes or modifications to this unit not expressly approved by Eicon Networks Corporation could void the user's authority to operate the equipment.
Specifications and Regulatory Information: Regulatory Information Page 64 If this equipment causes harm to the telephone network, the telephone company will notify you in advance that temporary discontinuance of service may be required. If advance notice isn't practical, the telephone company will notify the customer as soon as possible. Also, you will be advised of your right to file a complaint with the FCC if you believe it is necessary.
Specifications and Regulatory Information: Regulatory Information Page 65 Regulatory Information for Canada NOTICE: The Industry Canada label identifies certified equipment. This certification means that the equipment meets certain telecommunications network protective, operational and safety requirements. Industry Canada does not guarantee the equipment will operate to the user’s satisfaction.
Specifications and Regulatory Information: Regulatory Information Page 66 Regulatory Information for the European Union This equipment displays the Mark to show that it has been tested and found to be in full compliance with the requirements of the Radio & Telecommunications Terminal Equipment, EMC and Low Voltage Directives (1999/5/EC, 89/336/EEC and 72/23/EEC). Safety Status: TNV-3 No voltages within this equipment exceed SELV voltages.
Index Page 67
Index Page 68 A U Advanced Topics 47 Automatic Log Out 49 Upgrading the Diva 2430 Firmware 44 USB Setup for Windows 98/200 10 Using your Diva 2430 33 C Configuration Files 43 V Virtual Private Networking (VPN) 53 D Disable Inbound Server Requests 51, 52 Diva Assistant, About 34 Diva Assistant, Installation 18 F Factory Defaults 44 Features 5 Firmware, upgrading 44 H How ADSL Works 6 I Indicator Lights 37 Installing on an Existing LAN 20 Installing the Diva Assistant (Windows Only) 18 Introducing