
Instruction manual


INTUITY Messaging Solutions Release 4
MAP/5P Maintenance
585-310-186
Issue 3
October 1997
Replacing Other Components
Page 7-4Cartridge Tape Drive Replacement
7
3. Shut down the voice system. See ‘‘Shutting Down the Lucent Intuity
System’’ in Chapter 3, ‘‘Common System Procedures’’, for the procedure.
4. Remove the incoming power. See ‘‘Removing Power from the MAP/5P’’
in
Chapter 4, ‘‘Getting Inside the Computer’’
, for this procedure.
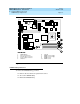
Accessing the Cartridge Tape Drive
To access the cartridge tape drive, remove the dress cover. See ‘‘Removing the
Dress Cover’’ in Chapter 4, ‘‘Getting Inside the Computer’’, for this procedure.
Extracting the Cartridge Tape Drive
To extract the cartridge tape drive, do the following:
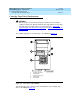
1. Remove the SCSI cable from the cartridge tape drive.
NOTE:
Make sure the SCSI cable pin adapter remains attached to the SCSI
cable.
2. Remove the power cord from the cartridge tape drive.
3. Locate the four screws on peripheral bay chassis that secure the drive in
Position 1 of the peripheral bay.
NOTE:
Pay close attention to the location of the screws in both the
peripheral bay chassis and the cartridge tape drive. If the screws
are returned to a different position, the cartridge tape drive may
protrude from the chassis too far or be recessed into the chassis too
far.
4. Holding the rear of the drive, loosen and remove these mounting screws.
5. Slide the drive forward within the peripheral bay and remove through the
front opening of the chassis.
!
CAUTION:
The drive fits tightly in the peripheral bay.
Do not to scrape wiring or
components on the underside of the drive .
6. Continue with the next procedure, “Cartridge Tape Drive Installation.”