
Instruction manual


INTUITY Messaging Solutions Release 4
MAP/5P Maintenance
585-310-186
Issue 3
October 1997
Replacing the Hard Disk Drive
Page 6-20Replacing a Hard Disk Drive
6
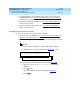
Figure 6-9. Hard Disk Drive 0 Jumper Settings - Seagate
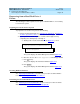
Figure 6-10
shows the correct jumper settings for the Capricorn hard disk drive
SCSI ID 0.
Figure 6-10. Hard Disk Drive 0 Jumper Settings - Capricorn
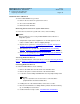
Inserting Hard Disk Drive 0
To insert the hard disk drive, do the following:
1. Remove the new hard disk drive from its ESD-protective wrapping.
NOTE:
Keep the package and all ESD-protective wrapping to return the
defective unit. Re-use of the original replacement unit packaging is
necessary to meet the manufacturer’s warranty.
2. Align Hard Disk Drive 0, with the component side down, with the correct
holes in Bay 6.
NOTE:
Pay close attention to the location of the screws in both the
peripheral bay and the hard disk drive.
3. Attach the hard disk drive to the peripheral bay using the four screws
removed in Step 4
of “Extracting Hard Disk Drive 0” above.
4. Attach the power cable to the hard disk drive.
5. Attach the SCSI cable to the hard disk drive.
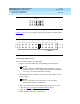
SCSI ID 0
jpcvsg0 LJK 07169
7
13
5
7 9 11 13 15 17 19 21 23
SCSI ID